As mentioned before, the data layer builds the bridge between your finance website and analytics. The first implementation step is to integrate the data layer within the <head> section of each page on your website. This chapter contains a detailed description of the data layer to be implemented.
In the example provided here, we use Mapp's own Tag Management solution. The integration of Mapp Intelligence tracking tags is possible with other Tag Management tools, for example Google Tag Manager (GTM). Just create the relevant data layers as needed. In GTM, the data layer is a combination of events and variables.
Basic Data Layer
The following data layer is required to track each page.
Example
window._ti['pageName'] = 'bankoftomorrow.com/account';
window._ti['language'] = 'en';
window._ti['contentCategory'] = 'Account';
window._ti['contentSubcategory'] = 'Customer Service';
window._ti['emailOptIn'] = 'yes';
window._ti['customerId'] = '<encrypted email address of the user>';Data Layer Variable | Description |
|---|---|
| Contains the full URL of the page without the protocol (HTTP(s)) and parameters. |
| Contains the language version of the page, for example "de", "en", "it", "es" |
| Contains the content category. Possible values:
|
| Contains the content subcategory. Possible values:
|
| Indicates whether a user has decided to receive e-mail. It is user-related status information that can be tracked, for example when a user logs on or via a cookie. Possible values:
|
| The encrypted e-mail of the user. Requires SHA256 hash encoded. |
Data Layer for Product & Application Process Pages
For data layers on product pages, note the following points:
For the product and application process, you must extend the data layer with additional information about the financial product and application details.
For the detail pages of your financial products, it is necessary to track product-specific information such as product IDs.
For the application process, you need to extend the data layer with additional information about each step during the process: from the first step of the application process until the confirmation page.
Data Layer for Product Detail Pages
You probably have numerous interesting financial products that you offer to customers and prospects. To find out more about how your website visitors interact with the product detail pages and to leverage the data in your CI Dashboard, you must implement additional data layers. The tracking of product-specific information such as product ID, name, and category is relevant for the product detail pages. Therefore, in addition to the primary data layer for all pages, you must add the following data layer on all product detail pages of your finance website.
window._ti['productId'] = 'car loan students';
window._ti['productStatus'] = 'view';
window._ti['productName'] = 'car loan students';
window._ti['productCategory'] = 'retail banking';
window._ti['productSubcategory'] = 'loans';Data Layer Variable | Description |
|---|---|
| Contains the title or descriptive name of the product, for example "car loan" or "retirement fund". |
| Indicates whether a product is viewed, added, or purchased. The status must be set to view if viewed but the application process has not started yet. |
| Contains the product title or another descriptive name of the product. |
| Contains the product category, for example "retail banking," "corporate banking", "investment banking", etc. |
| Contains the subcategory of the product, for example "loans" "commercial mortgages", "portfolio management" etc. |
Data Layer for Application Process Pages
Now your customer or prospect has viewed your product detail page on car loans. The offer is so compelling that the person clicks on the button Apply now. By following your call-to-action (CTA), the user starts the application process on your website. To track the entire application process it is necessary to extend the basic data layer with additional information. Each step has to be considered as a separate page – from the first step in your application form until the confirmation page.
You must add the following suffix to the URL of each step:
First Step: "step1"
Second Step: "step2"
Third Step: "step3"
...
Final Step / Confirmation: "stepfinish"
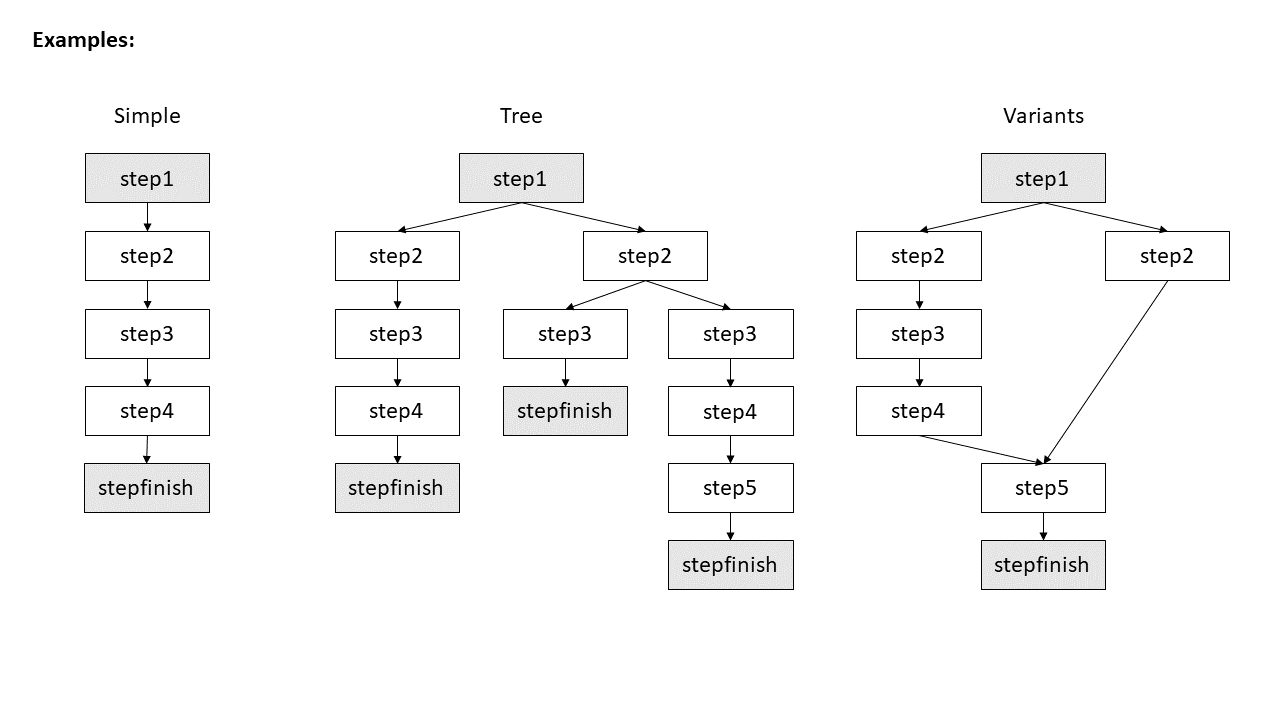
If you have multiple process branches, it is necessary to follow the order of each process step in the process until they reconnect, as shown in the next figure.
Let's assume you have an application process of 5 steps for your product "car loan for students". Then your application form has 5 different pages. Each page represents one step. In the first step, you summarize the offer. In the second and third step, the applicant fills in personal and financial data. On the fourth page you provide an overview with all info that the person has entered. After a thorough check, the applicant sends the form. Everything is correct and you display a confirmation page to inform the person about his successful application in the last step. To cover the entire application process you need to track the different steps. A simple process in 5 steps might look like this:
First Step in Application Forms
As described earlier, the customer starts the application by clicking on the CTA "Apply now" on your product detail page. This action directs the person to the first step in the application process. On the first page of the application form, you might give an overview or the details of the offer.
Like all pages within the form, the page name needs to finish with a suffix. Given the fact that this is the first step, the URL ends with "-step1". Apart from that, the status needs to be set to "add" – only for the first step to indicate that the applicant started the process. The step name will be sent as an additional parameter.
Example
window._ti['pageName'] = 'bankoftomorrow.com/car-loan/application/offerDetails-step1';
window._ti['productId'] = 'car loan students';
window._ti['productStatus'] = 'add';
window._ti['productName'] = 'car loan students';
window._ti['stepName'] = 'offer';Data Layer Variable | Description |
| The page name ends with the suffix "-step1". |
| In general, the same value as product name. |
| The product title or some other descriptive name of the product. |
| The status needs to be set to add. |
| The step name needs to be sent as an additional parameter. |
Second to Second Last Step in Application Forms
On the second page of the process, the prospect enters his details, e. g. name, birthday, and contact details. The 3rd step asks the applicant to provide financial data. In a fourth step you might give the person the opportunity to check all details on an overview page. For these steps page, product and step names are required.
Example
window._ti['pageName'] = 'bankoftomorrow.com/car-loan/application/personalData-step2';
window._ti['productName'] = 'car loan students';
window._ti['stepName'] = 'personalData';You might also want to gather info like birthday or family status. Just add the additional data layers to one of the steps. This info can be processed as soon as it is available. For your implementation, it might be best to pass it at an early stage of the application process. If needed, it can be send with the confirmation page, too:
Example
window._ti['pageName'] = 'bankoftomorrow.com/car-loan/application/personalData-step2';
window._ti['productName'] = 'car loan students';
window._ti['stepName'] = 'personalData';
window._ti['gender'] = '1';
window._ti['income_group'] = 'Group1';
window._ti['family_status'] = 'Single';Data Layer Variable | Description |
| For application processes, the step number needs to be included as a suffix in every step request. |
| The product title or other descriptive name of the product. |
| The step name needs to be sent as an additional parameter. |
| Is filled in when the user specifies their gender. Possible values:
|
| Contains one of four possible income groups. The thresholds should be identical for all application forms. |
| Contains one of these values: Married, Single, Other |
Last Step aka Confirmation Page in Application Forms
In addition to the basic data layer for all pages, apply the following data layer to all confirmation pages that are displayed after a successful application.
Example
window._ti['pageName'] = 'bankoftomorrow.com/car-loan/application/success-stepfinish';
window._ti['productId'] = 'car loan students';
window._ti['shoppingCartStatus'] = 'conf';
window._ti['totalOrderValue'] = '0';
window._ti['productName'] = 'car loan students';
window._ti['stepName'] = 'confirmation';Data Layer Variable | Description |
| The page name ends with the suffix "-stepfinish". |
| Normally contains the same value as productName. |
| Indicates that the application has been sent. Must be set to conf. |
| The order value is needed to track order goals. Needs to be set to 0. |
| Contains the title or other descriptive name of the product. |
| Contains the step name which is sent as an additional parameter. |
If you have multiple values for a variable, separate the values with a semicolon.
Data Layer for Internal Searches
The internal search is an essential navigation element widely used on finance web pages. It is also an excellent web analytics tool for obtaining information on website visitors to optimize, for example, the conversion rate. With the help of internal search analysis, you can better understand which keywords were used by visitors during a session, on which pages this search takes place and, which target pages visitors access later. There are two methods for tracking the internal search:
Using URL Parameters
If you use the URL parameter method, you must inform your Mapp Intelligence Account Manager. The Account Manager can then make the necessary changes in Mapp Q3 (configuration of query parameters).
With a data layer
Example
window._ti['internalSearchPhrase'] = 'WKN';
window._ti['internalSearchResultsQuantity'] = '10';Data Layer Variable | Description |
|---|---|
| Contains the search phrase as a string. |
| Contains the quantity of the search results as a number. |
Implementing Tag Integration Loader
The basis of the tracking implementation is the integration of the Tag Integration loader on your website. To do this, add the following configuration for Tag Integration below the data layer of your website:
Example
window._tiConfig = window._tiConfig || {
tiDomain: 'responder.wt-safetag.com',
tiId: '111111111111111',
option: {}
};
/** start TagIntegration loader */
(function(a,d,c,f){a.wts=a.wts||[];var g=function(b){var a="";b.customDomain&&b.customPath?a=b.customDomain+"/"+b.customPath:b.tiDomain&&b.tiId&&(a=b.tiDomain+"/resp/api/get/"+b.tiId+"?url="+encodeURIComponent("https://"+d.location.host+"/")+"&v=5");if(b.option)for(var c in b.option)a+="&"+c+"="+encodeURIComponent(b.option[c]);return a};if(-1===d.cookie.indexOf("wt_r=1")){var e=d.getElementsByTagName(c)[0];c=d.createElement(c);c.async=!0;c.onload=function(){if("undefined"!==typeof a.wt_r&&!isNaN(a.wt_r)){var b=
new Date,c=b.getTime()+1E3*parseInt(a.wt_r);b.setTime(c);d.cookie="wt_r=1;path=/;expires="+b.toUTCString()}};c.onerror=function(){"undefined"!==typeof a.wt_mcp_hide&&"function"===typeof a.wt_mcp_hide.show&&(a.wt_mcp_hide.show(),a.wt_mcp_hide.show=function(){})};c.src="//"+g(f);e.parentNode.insertBefore(c,e)}})(window,document,"script",_tiConfig);
/** end TagIntegration loader */Parameter | Description |
|---|---|
tiDomain | You can obtain this information from your Mapp Intelligence consultant. |
tiId |
Warning:
Please be cautious when updating your data layer. The data layer is the source of analytical information for Mapp Intelligence. Changes may accidentally remove our tracking pixel, causing disruption and data loss.
Any inconsistency will immediately impact data tracking quality. This means data won’t be available in reports, dashboards, or Engage.