This guide explains how to implement Mapp Intelligence via Google Tag Manager (GTM) using the official Mapp Cloud Tracking Template.
The setup uses a Web container and consists of two steps:
Add the GTM Template to define tracking behavior
Configure your data mapping in the Template UI
Implementation
A) Add the Mapp Intelligence Configuration as GTM Template
Use this tag to define basic tracking settings, such as:
In which Mapp account(s) the data should be tracked
How pages should be named
Whether automatic link tracking is enabled
Steps:
In your GTM container, go to Tags > New > Tag Configuration
Click Discover more tag types in the Community Template Gallery

Search for the Mapp Cloud Tracking tag
Click Choose as Template to add it to your container
In the template settings, enable Load Smart Pixel from Mapp CDN
Name the tag (e.g., Mapp Intelligence Tracking Configuration)
Save the tag:
without a trigger (if you want to activate it later), or
with a trigger of your choice (e.g., All Pages)
B) Configure and Map Data in the Template
Steps:
Open the saved tracking tag in GTM and click Edit.
Set Request Type to Page
This defines the type of interaction the tag tracks.
Use Page to track full page loads (recommended for most websites).
Use Event only for tracking user actions that don’t trigger a page reload (e.g., in SPAs).
Learn more about request types and their supported parameters
Provide the following information:
Setting
Description
Track ID(s)
Unique identifier(s) for your Mapp Intelligence account. Use comma-separated values for multiple accounts.
Track Domain
Provided by your account manager. This is the domain where tracking data is sent.
Manual exclusion of referrers
By default, the domain from which tracking is executed is not counted as a referrer. Use this setting to override that behavior and define additional domains to exclude from referrer and campaign analyses. Enter a comma-separated list of domains and subdomains (without http/https). You can use wildcards (*) to include subdomains. Example: example.com, *.paymentprovider.com.
Optional but recommended settings:
Enable Automatic Link Tracking
Tracks clicks on all HTML links using the default link type “Link”.
Enable Page Naming
The system will use the page URL as the default page name.
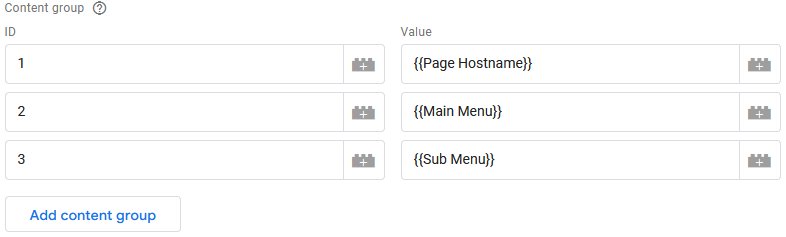
Add Page Categorization using Content Groups (optional but recommended):
Go to the Page section in the template
Enter the ID of the content group
Set the value based on your GTM configuration
Learn more about content groups in this How-To.
Note on Supported Input
Mapp Intelligence supports UTF-8. Each parameter should not exceed 255 characters.
The system trims inputs automatically and may filter unsupported characters. Avoid unnecessary whitespace or special characters.
Testing your GTM Implementation
After configuring tracking in Google Tag Manager, it’s essential to verify that the setup works as intended – both technically and analytically.
We recommend a three-step approach:
1. Check outgoing tracking requests (via Mapp Cloud Debugger)
Use the Mapp Cloud Debugger browser extension to check which tracking requests are sent from your website. This step helps you confirm that:
Tracking requests are fired as expected
The correct Track ID is used
Key parameters such as page name, campaign data, or content groups are included
Optional extensions (e.g., link tracking) are configured properly
2. Check incoming data (in Mapp Intelligence)
Once the tracking requests are confirmed, check whether the data actually appears in Mapp Intelligence. This ensures that:
Data is being received by the correct account
Values are mapped correctly in the user interface
No filtering or configuration issues prevent data from being displayed
You can start with basic reports such as:
Visitors > Traffic
Navigation > Pages
Navigation > Events
Note
Data in standard Mapp Intelligence reports is updated hourly. You may need to wait up to 60 minutes to see newly tracked data.
3. Explore deeper testing and validation options
For more advanced validation, Mapp provides additional tools and strategies to assess data quality and implementation accuracy. These include:
verifying content group assignments
checking event accuracy and scope
analyzing session behavior and entry pages
filtering test traffic by device ID, order ID, or campaign
For a detailed walkthrough of these options, refer to Mapp Cloud Debugger
Optional: Using Extensions
If you want to extend your tracking setup with features like Teaser Tracking or Scroll Depth, refer to the separate GTM Extensions guide. These extensions build on the configuration you implemented here.