Introduction
Segmentation in Mapp Engage allows you to define audiences based on contact data and behavior. A segment represents a dynamic set of contacts that match specific conditions, and it updates automatically whenever the underlying data changes.
This page introduces the key components used to define segmentation logic.
Looking for a structured learning path?
Learn step by step in our Academy Course: Mapp Engage - Segmentation.
.png "grafik(33).png")
Common Use Cases
Targeting specific audiences for message sendouts
Creating dynamic groups that adapt to the latest contact information
Filtering contacts for automation workflows
Sampling controlled subsets of a larger audience
Running A/B tests or pilot groups
How Segmentation Logic Works
A segment is evaluated by checking each contact against the conditions defined in the rule set. The structure of this rule set determines how the system combines the conditions.
A contact is included only if it satisfies the logic as a whole.
The components below describe how this logic is built and organized.
Components of Segmentation Logic
Criteria
A criterion represents a single condition checked for each contact. Criteria can be based on many types of stored data, such as:
Contact Profile data (for example, location, attributes, consent status, or preferences)
Related Data from external or custom data tables linked to contacts
Email Activity (for example, opens, clicks, reactions)
Mobile Activity data from SMS or mobile push interactions
Web Activity data collected through web tracking
Intelligence data imported from Mapp Intelligence, such as events, derived attributes, or Intelligence segments
Each criterion asks a specific question, such as whether a contact has a certain attribute or has performed an action within a defined timeframe.

Operators (AND / OR)
When multiple criteria are used, logical operators define how they relate to one another:
AND – all conditions must be true
OR – at least one condition must be true
The operator applies consistently to all criteria at the same level or within the same container.
Examples:
“Contacts who opened an email AND clicked a link”
“Contacts in Germany OR Austria”
Containers
Containers help you structure complex segmentation logic by grouping multiple criteria under a shared operator. They define how different parts of a segment relate to each other and allow you to model multi-step audience definitions.

Example of a container that groups two criteria into a single logical block
Why containers are important
They act as logical parentheses, grouping related conditions together.
They make it possible to combine AND and OR logic in a controlled way.
They help avoid ambiguous or unintended interpretations of complex conditions.
They support hierarchical logic, such as multi-layer decision structures.
They allow you to reuse existing logic by importing an entire segment into a container.
How containers work
Shared operator: All criteria inside a container use the same operator (AND or OR).
Nested structure: Containers can be nested up to four levels deep.
Consistent logic: Changing the operator applies it to the whole container.
Logical grouping: A container behaves as a single unit inside the overall segment.
Reusing logic: You can import an existing segment into a container; the imported logic becomes independent from the original segment.
Structural flexibility: Containers allow you to move a complete logic block as one element within the segment structure.
Conceptual example
A typical example could look like this:
In this case, the segment is processed as follows: A contact qualifies only if the first condition at the top is true and at least one of the conditions inside the container is also true.
Formally, this corresponds to:
(Contact has Email_Offers = yes)
AND
( Age > 18 OR Age is empty )The container ensures that the two OR-conditions are evaluated together before they are combined with the AND-condition at the higher level.
Combining Multiple Filters and Criteria
When defining segmentation logic, it is important to structure conditions correctly.
Mapp Engage evaluates filters and criteria in different ways depending on how they are grouped.
Why this matters
Using the correct structure ensures that filters are evaluated as intended.
A single criterion narrows down a single dataset record;
multiple criteria combine results across datasets or events.
Multiple Filters within One Criterion
Use this approach when the conditions describe the same event or data record.
Example:
A purchase record must meet both conditions:
Amount > 0
Payment Method = “Card”
Both checks refer to the same row in the same dataset, so they belong in one criterion.
Multiple Independent Criteria
Use separate criteria when the conditions describe different events or independent data records.
Example:
A contact must have:
Made at least one purchase
Opened at least one email in the last 30 days
These actions come from different datasets and are evaluated independently. In this case, separate criteria are required.
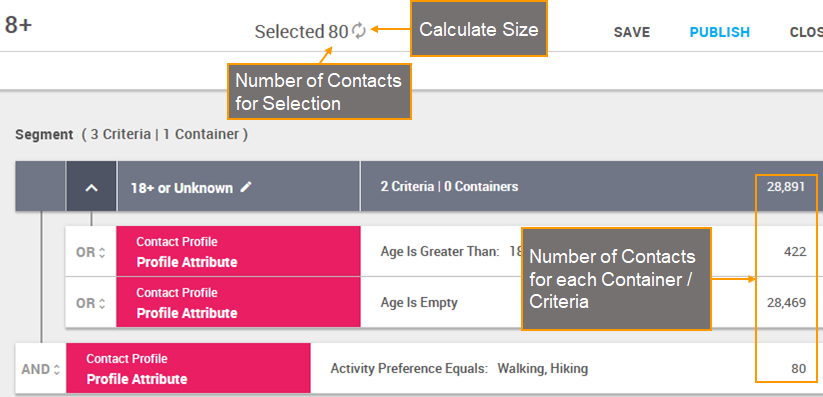
Contact Counts
Engage calculates different types of counts to help interpret how your logic affects the resulting audience:
Segment count: number of contacts that match the full segment
Container count: number of contacts that meet all conditions inside a container
Criterion count: number of contacts that match a single condition
Note
If a criterion involves more than one million records, Engage does not calculate the count. This prevents performance issues when processing very large datasets. In these cases, an indicator is shown instead of an immediate count.
Segment Size Limit
A segment can include an optional maximum size limit. When a limit is set, the resulting segment contains no more than the specified number of contacts, even if more contacts meet the conditions.
This is useful for:
controlled sampling
throttling audience size
A/B testing or pilot groups
selecting a representative subset of a larger audience