Prerequisites
Active Engage and Shopify accounts.
The Mapp Cloud app installed on your Shopify store. See Installation.
Shopify Plus is required to turn off Shopify's transactional emails and replace them with Engage messages.
Data Flow
These webhooks handle the data flow between Shopify and Mapp Engage:
CUSTOMERS_CREATE,CUSTOMERS_UPDATE,CUSTOMERS_DELETEPRODUCTS_CREATE,PRODUCTS_UPDATEORDERS_CREATE,ORDERS_FULFILLED,ORDERS_CANCELLED,ORDERS_DELETEREFUNDS_CREATEORDERS_EDITED
For products with up to 2000 variants, data is fetched in increments: the first 100 variants are processed first, then 250 at a time within Shopify's API limits.
Procedure
Create subscriber and customer groups
Create the Engage groups that Shopify contacts and subscribers are added to. See Create a New Group.
Create prepared messages (optional)
Use Shopify to send order updates, confirmations, refunds, and cancellations. See Prepared Messages.
Create a Mapp Connect integration
Go to Data Management > Mapp Connect.
Click Add New Integration.
Select Type: Shopify, and enter a name and optional description.
Click Create.
Note your Integration ID and Secret — you add these in Shopify.
Set up mapping with your groups and messages.
Configure the app in Shopify
After installing the Mapp Cloud app (see Installation):
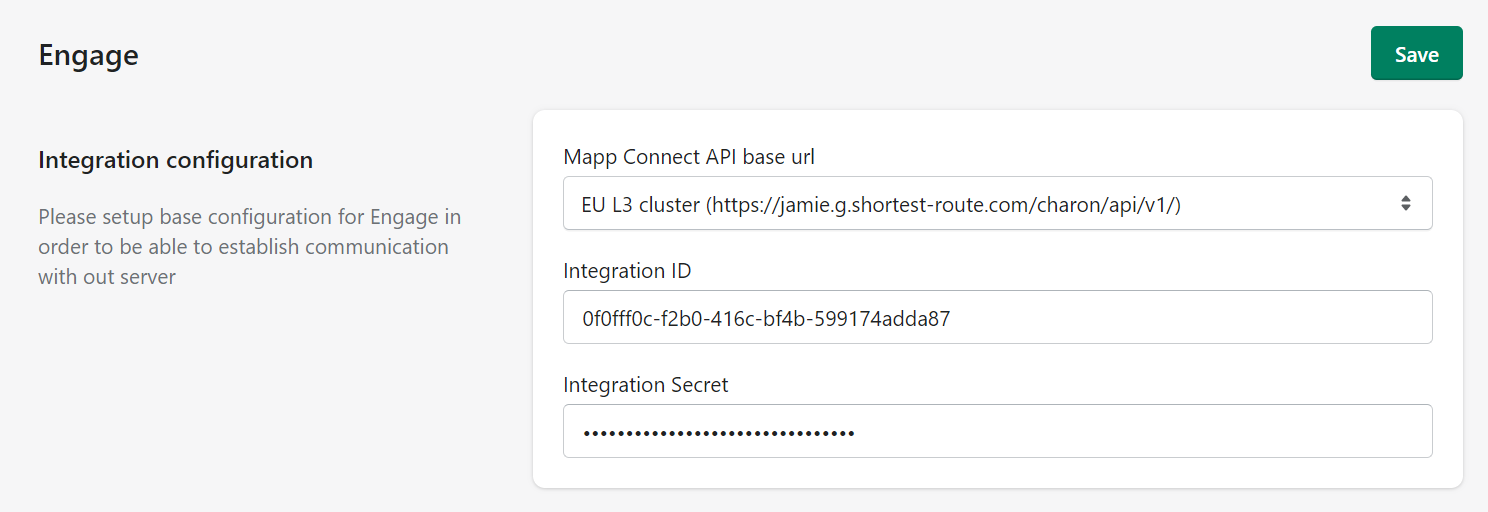
Open the Mapp Cloud app and select Engage.
Add your Cluster and domain.
Add the Integration ID and Secret, then select Save. Additional fields appear.
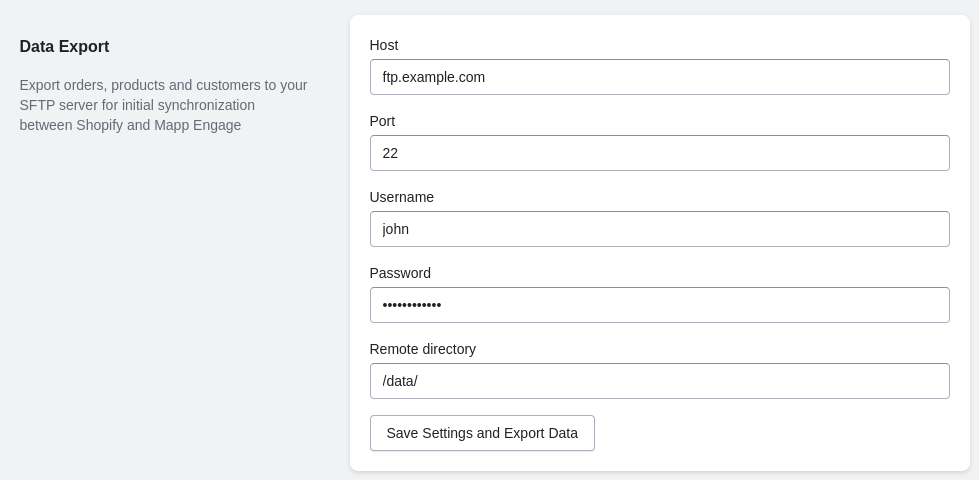
Add your SFTP information.
Under Other Configurations, choose whether contacts confirm their subscription and whether to use the abandoned cart function.

Under Mapp Engage Group Configuration, choose the groups for customers and subscribers.
Under Message Configuration, select prepared messages for each scenario (optional).
Select Save.
Warning
To avoid duplicate emails, turn off the corresponding Shopify emails manually. This is only possible with Shopify Plus.
Warning
If your store's primary domain changes, or you add or remove market regions, return to these Engage settings and click Save again. The domain is stored in the session; saving resets it to the current value, otherwise product URLs keep the old domain.
Set up the initial import
This one-time job connects Engage and Shopify.
Go to Data Management > Mapp Connect and edit your integration.
Select Import Configuration and add a new import job.
Enter a job name.
Set the job run at least one hour ahead, then click Apply.
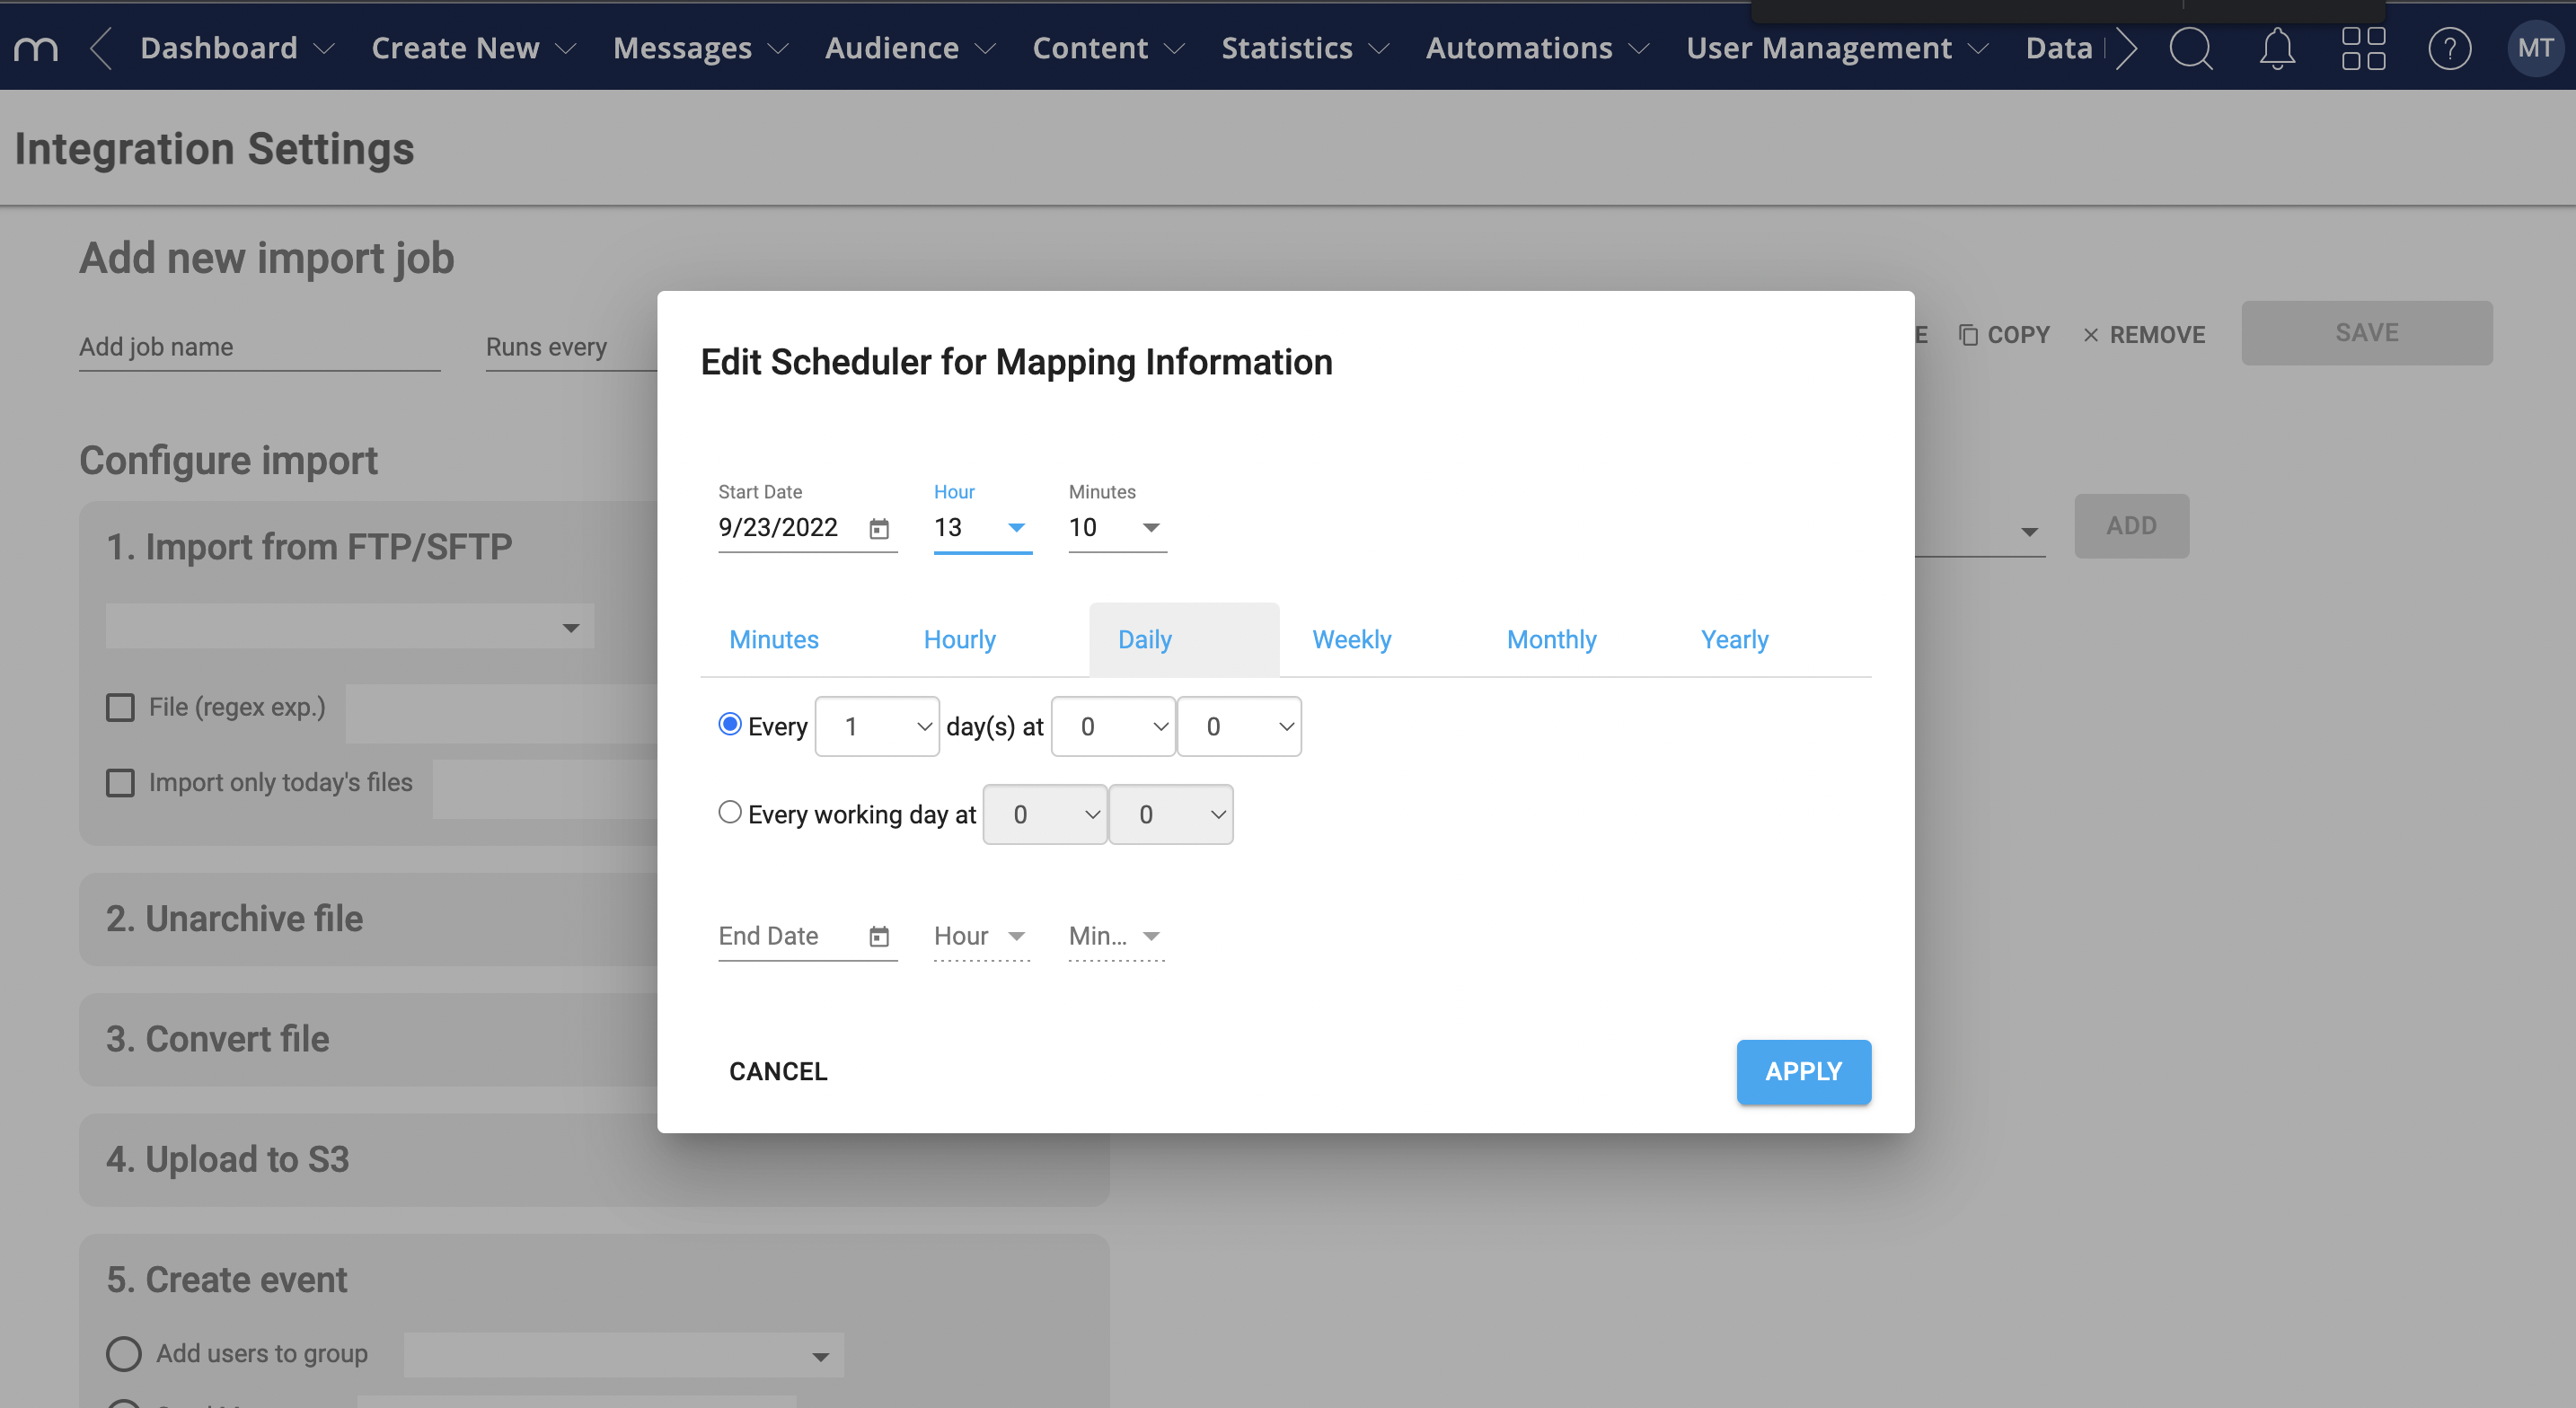
Set the job status to enabled.
Choose FTP and click Test Connection. A green check confirms the connection.
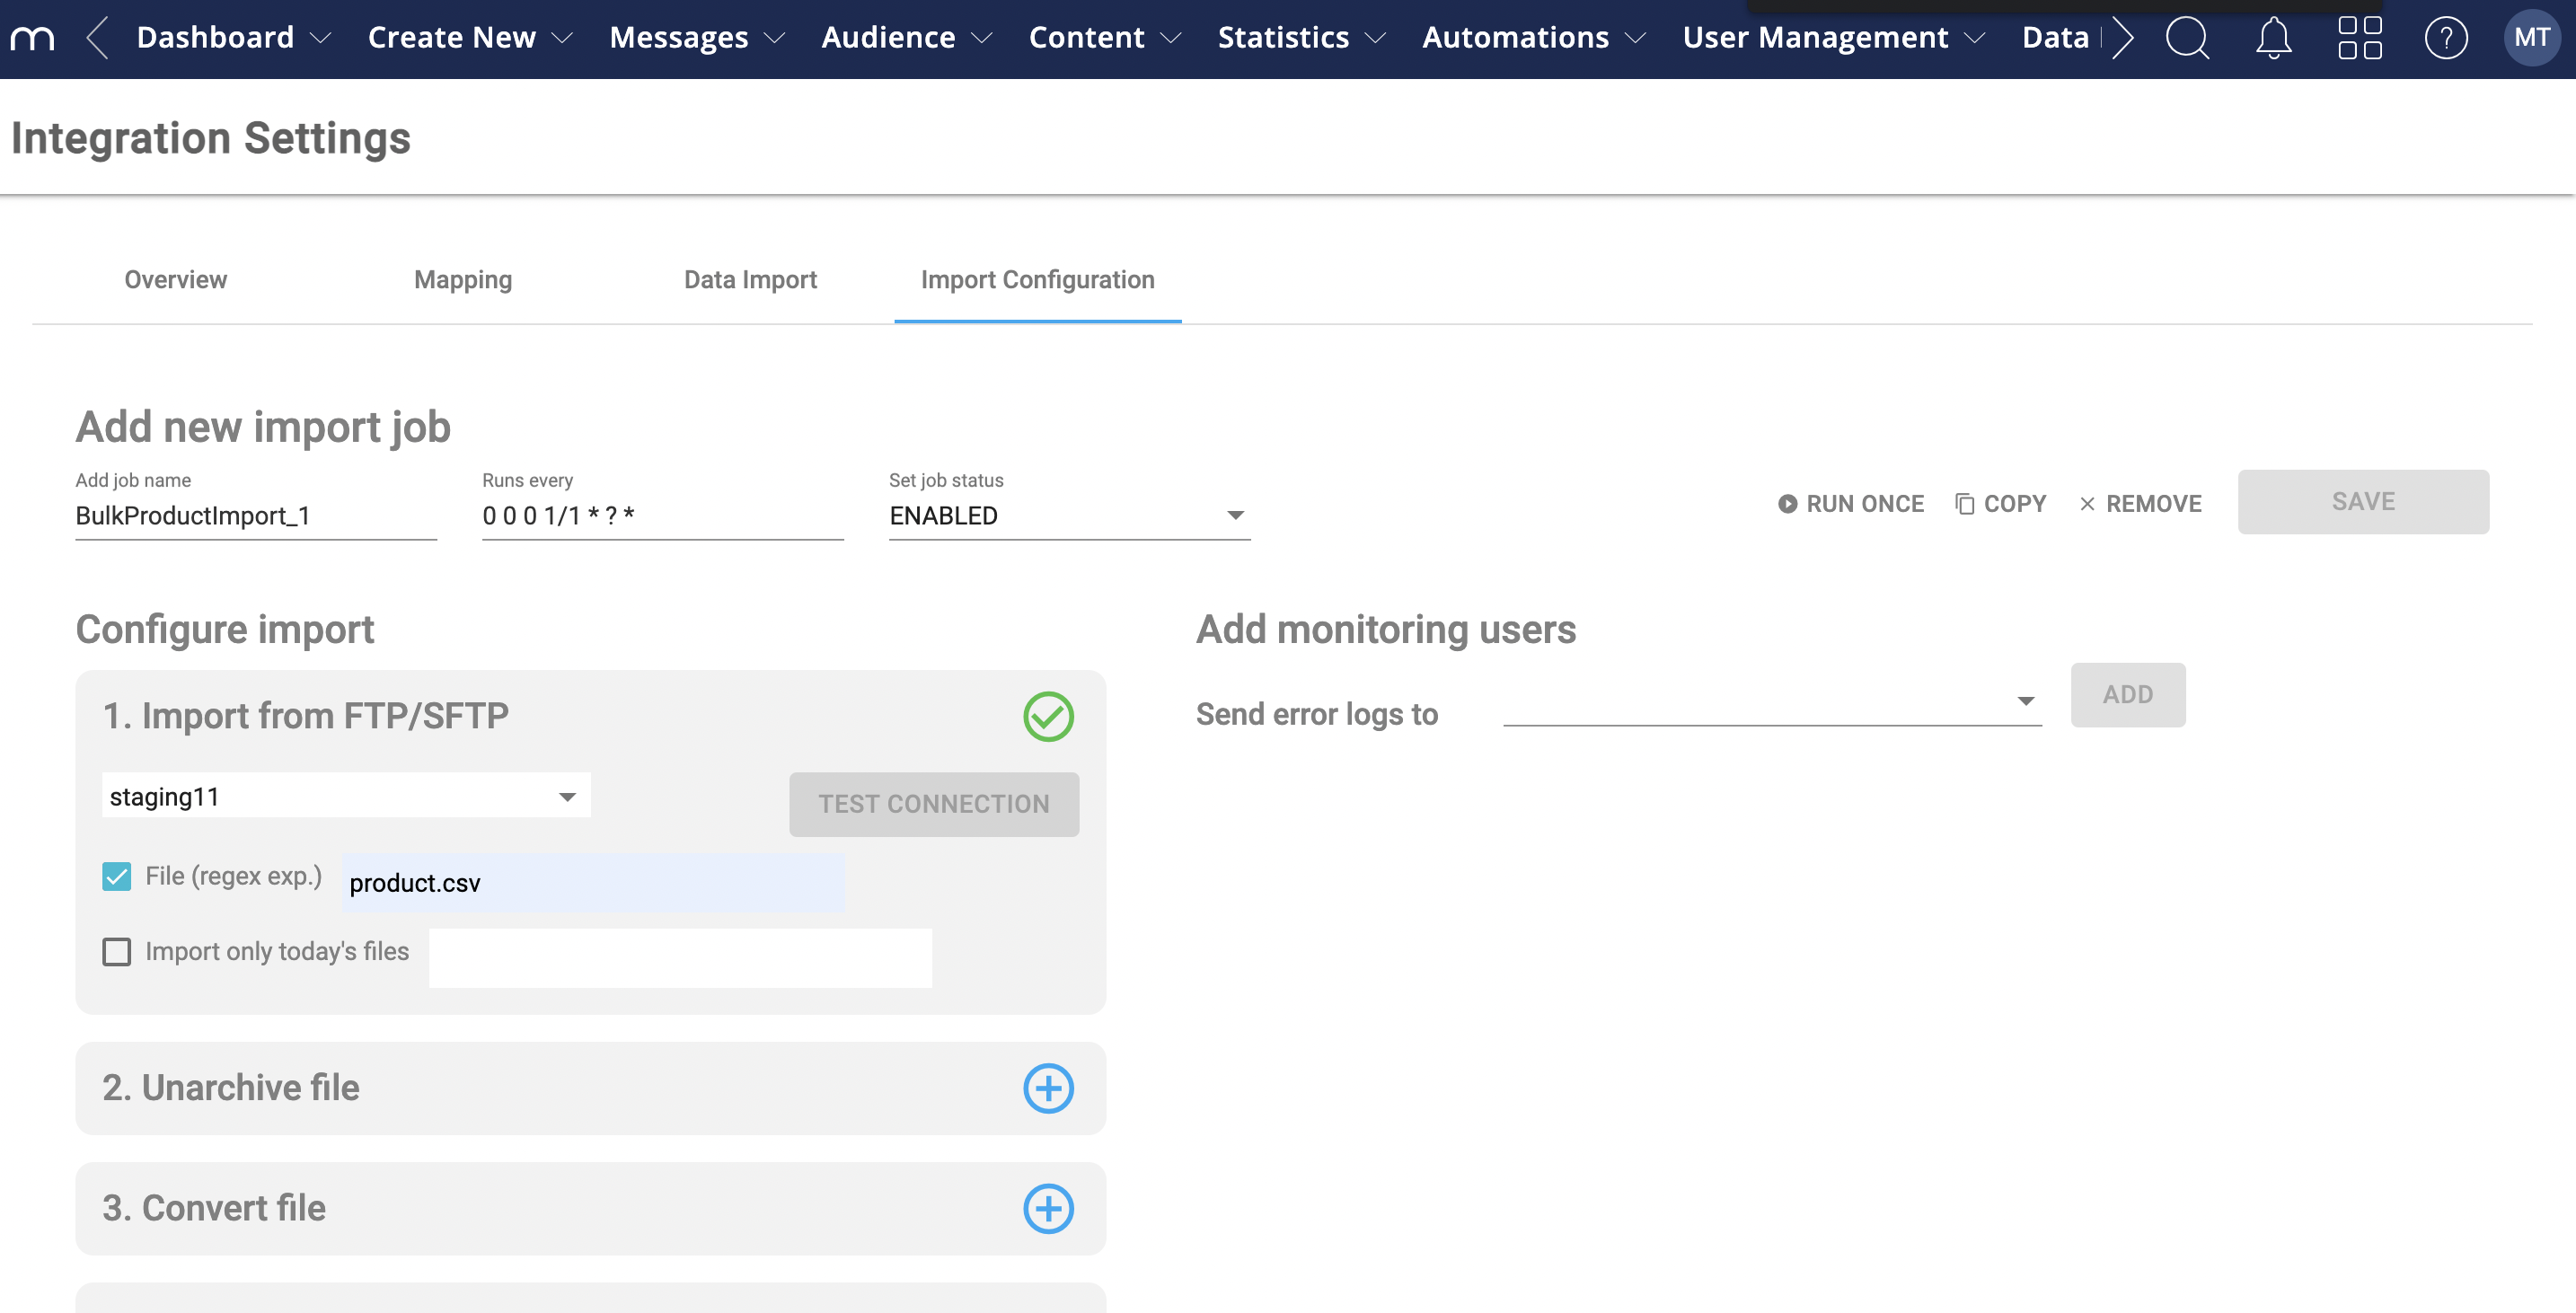
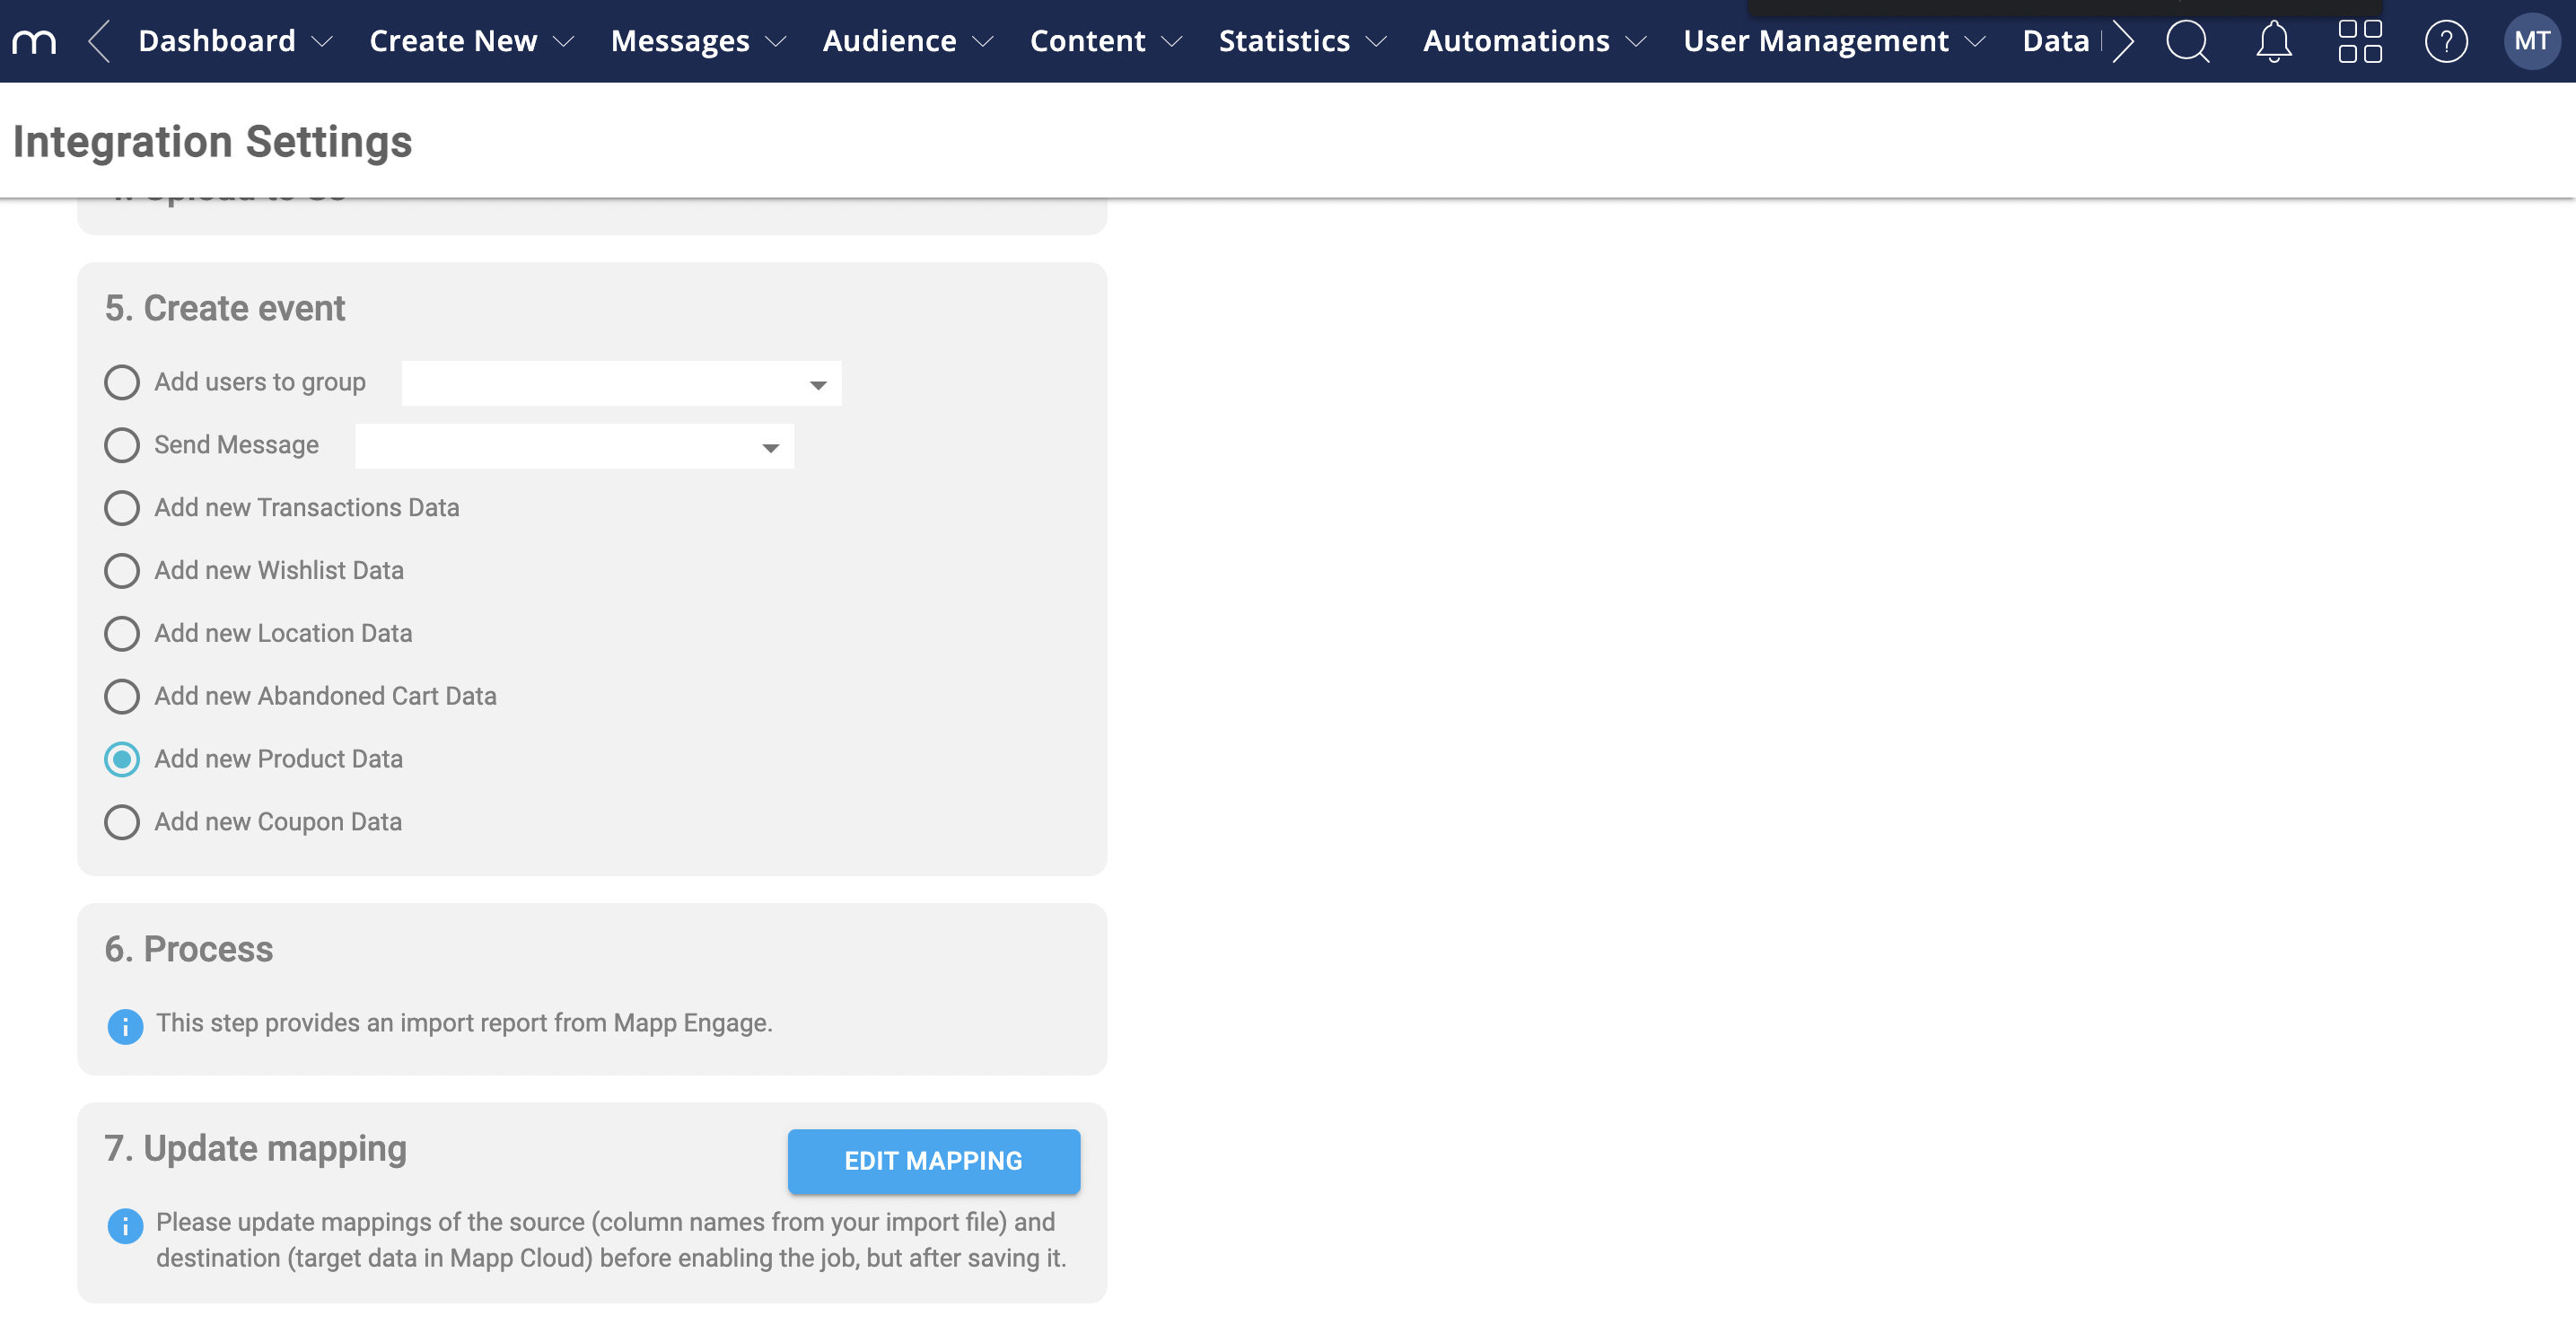
Add the events you need: add users to the group (initial customer import), add transaction data, and add product data.
Add monitoring users to oversee the jobs.
Click Save.
Note
Importing product categories via the Mapp Connect Shopify plugin is currently not supported.
Unsubscribe Behavior
A Shopify unsubscribe is included in every future user update. This works only for unsubscribes made in Shopify. Unsubscribes made in Engage (for example, via Engage unsubscribe links) are not sent back to Shopify, and later Shopify updates may re-add the contact to the subscriber group.
Additional Information
Data Sources
Key customer, order, and product data is captured through webhooks:
Customer:
id,email,first_name,last_name,phone,currency, and subscription status.Order:
orderId,orderTotal,shippingAddress, and other order details.Product:
productName,productSKU,stockTotal, and descriptions.
Exports
Shopify's Bulk API creates export jobs; webhook notifications deliver the data to an SFTP server.
Limitations
Abandoned carts track only carts that enter checkout for logged-in contacts.