Once you’ve created the required event parameters in Mapp Q3 (see Step 1), the next step is to implement the Teaser Tracking plugin on your website.
The technical implementation depends on your chosen integration method:
Smart Pixel
Tag Integration
Pixel Version 4
Each method allows you to automatically track teaser views and clicks, and optionally measure engagement and conversions.
Use this method if you have integrated Mapp’s Smart Pixel via the wtSmart API.
Plugin Activation
You activate the plugin using the following method:
wtSmart.extension.teaser_tracking.activate();Optional methods:
wtSmart.extension.teaser_tracking.deactivate();
wtSmart.extension.teaser_tracking.isActivated();Plugin Configuration
You can define how teasers should be tracked using .config().
wtSmart.extension.teaser_tracking.config({
viewPercent: 100,
viewTime: 1000,
attribution: "all",
maxSendTeasers: {
session: 10000,
page: 1000
},
extendClickSelector: ".clickable",
maxCookieSize: 4000,
clearConversions: true,
autoEngagements: true
});Option | Type | Default | Description |
|---|---|---|---|
viewPercent | number | 100 | Defines how much of the teaser (height × width) must be visible in the viewport to be counted as “viewed”. |
viewTime | number | 1000 | Defines how long (in milliseconds) the teaser must be visible before being counted as “viewed”. |
attribution | string | "all" | Determines how conversions or website goals are attributed: – "first": Only the first teaser is credited. – "last": Only the last teaser is credited. – "all": All teasers are credited. |
maxSendTeasers.session | number | 10000 | Defines the maximum number of teaser tracking events sent per browser session. Use -1 to track all. |
maxSendTeasers.page | number | 1000 | Defines the maximum number of teaser tracking events sent per page view. Use -1 to track all. |
extendClickSelector | string | "" | Adds additional CSS selectors for clickable elements inside the teaser (in addition to default elements: a, area, button, input[type="submit"]). Only applies to manually added teasers. |
maxCookieSize | number | 4000 | Maximum size of the teaser tracking cookie (in characters). Use -1 to disable cookie usage — this also disables engagement and conversion tracking. |
clearConversions | boolean | true | If set to true, the cookie used for conversion tracking is deleted after a successful conversion. |
autoEngagements | boolean | true | Controls how engagement is tracked: – true: Engagement is tracked automatically after a click. – false: You must explicitly define engagement tracking using wtstp_teaserEngagements = true on each relevant page. |
Integrate the teaser tracking plugin into the container in which the webpage to be measured is located.
To add plugins the desired container, proceed as follows:
In the container overview, select the required container by clicking the corresponding entry.
Click Add Plugin. You will be forwarded to the overview of all available plugins.
Select the Teaser tracking plugin by clicking the appropriate button. The plugin configuration dialog opens.
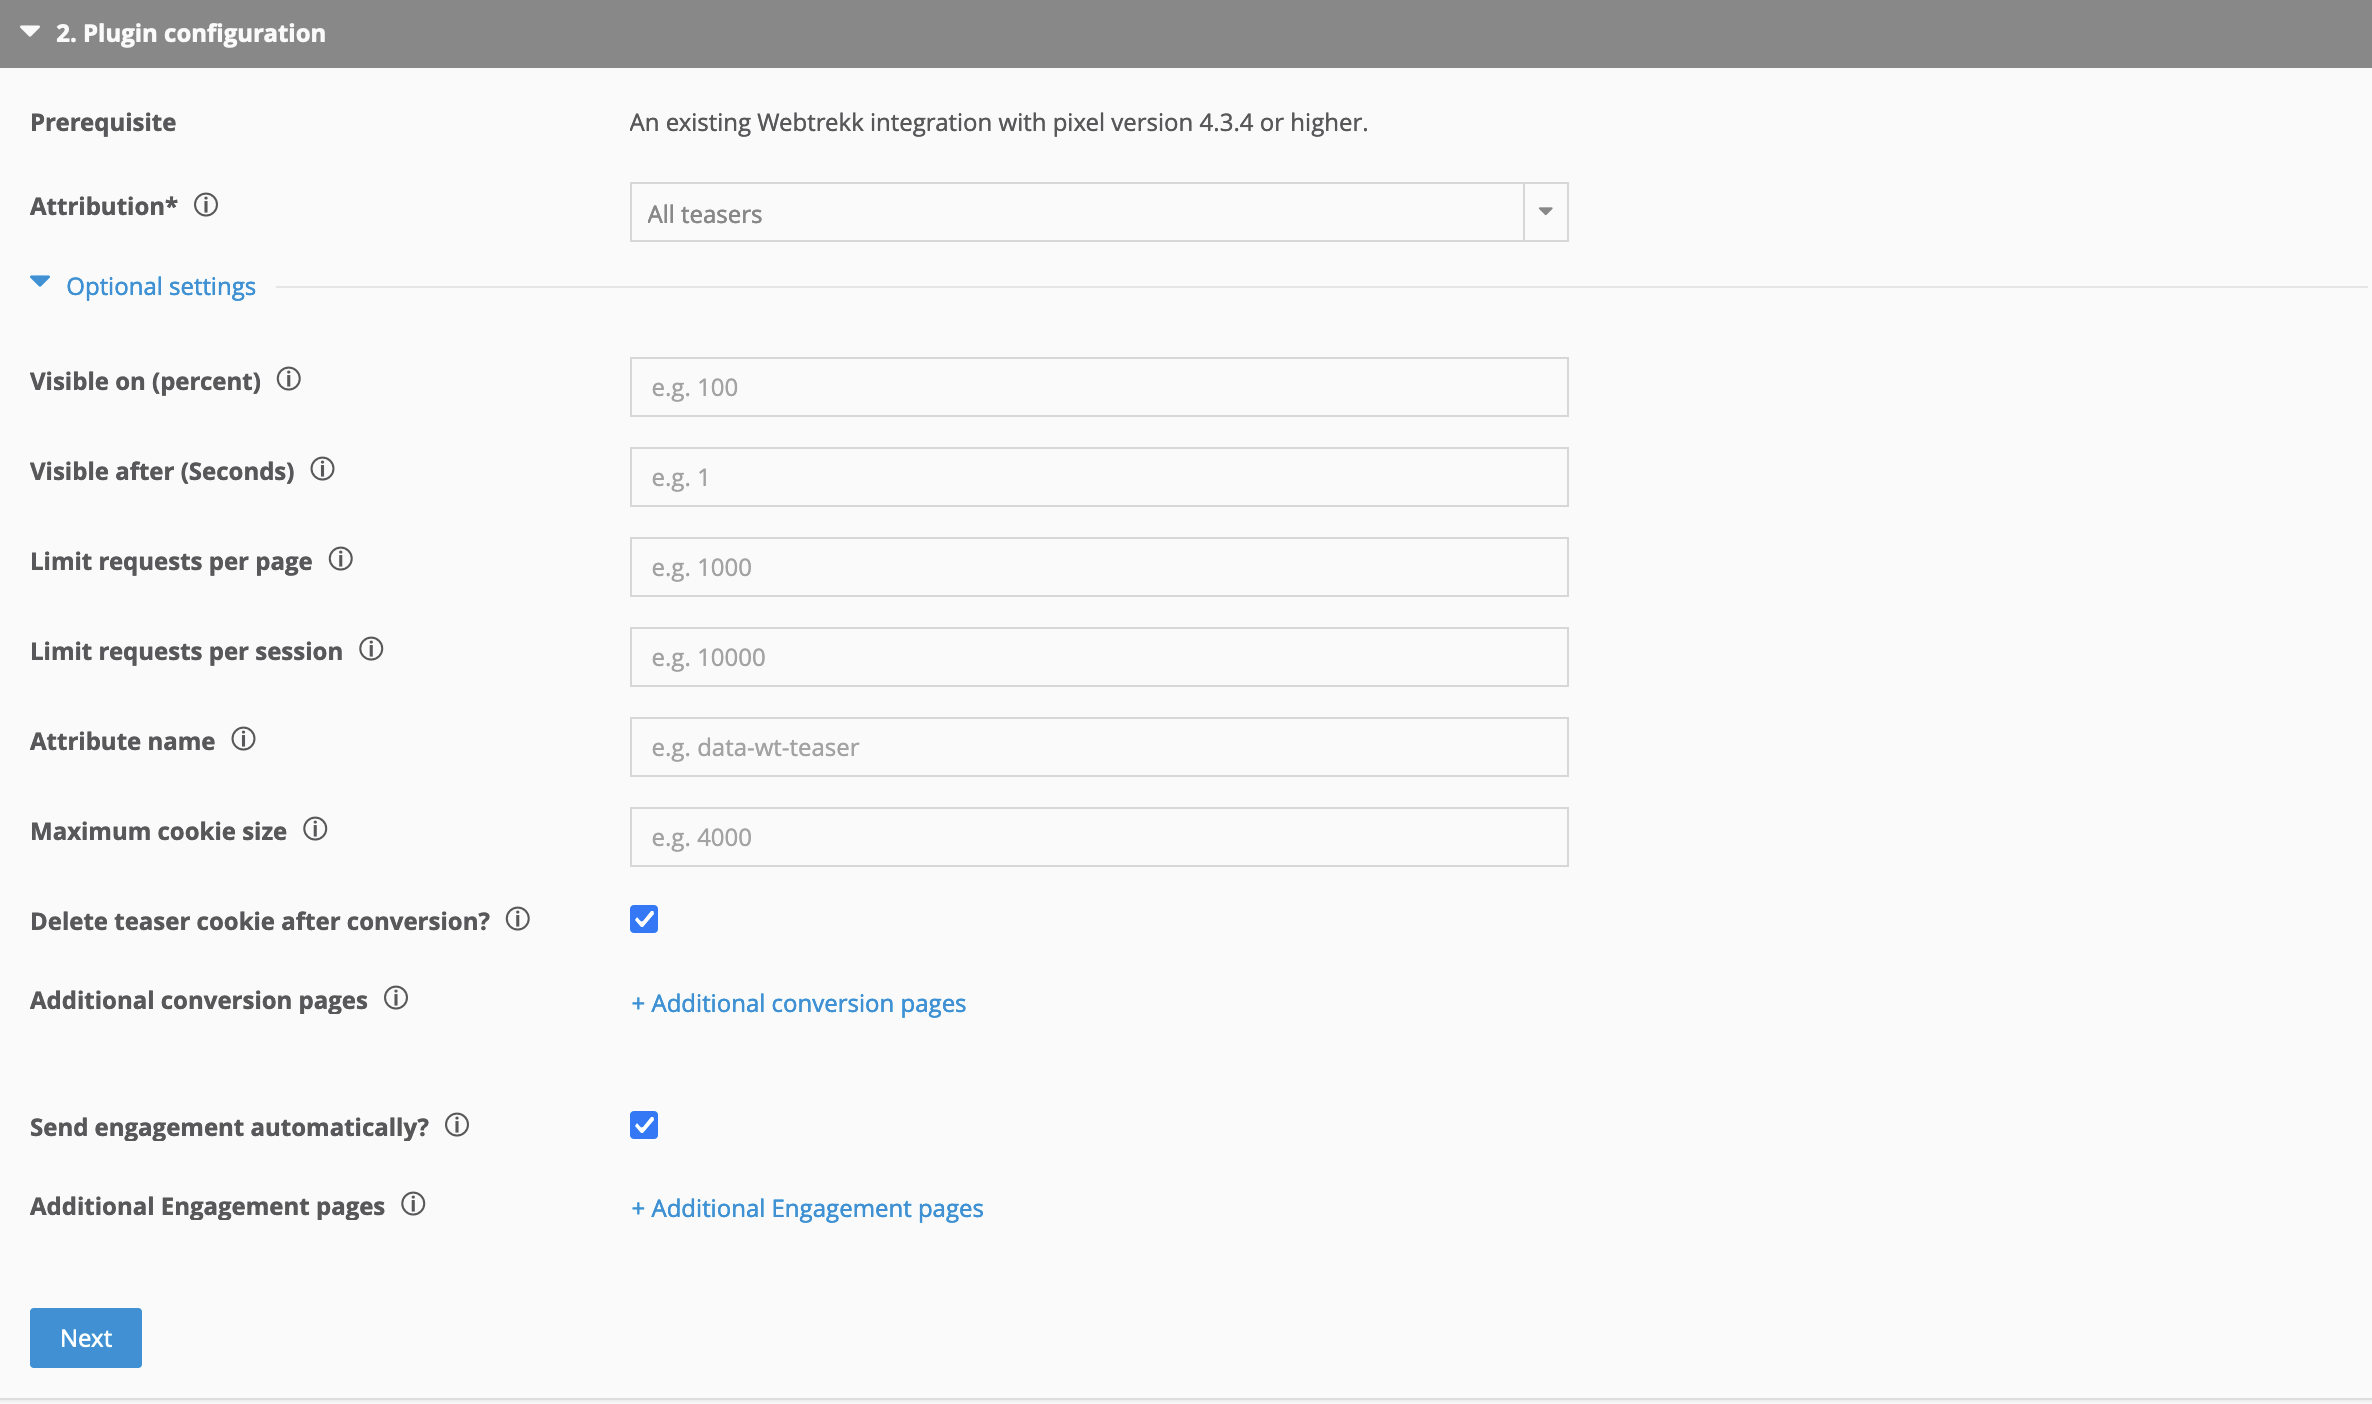
Now enter the following information:
Parameter
Description
Attribution
Select the attribution to be used for the conversion or website target:
First teaser: Only the first teaser associated with the conversion or website target.
Last teaser: Only the last teaser associated with the conversion or website target.
All teasers: All teasers associated with the conversion or website target.
Visible on (percent)
Optional. Specify what percentage of the height and width of a teaser element should be visible in the user's viewport to recognize the teaser as "viewed".
By default, teasers are sent if the HTML element is 100% visible in the user's viewport.
Visible after (seconds)
Optional. Specify how long a teaser element should be visible within the user viewport to recognize the teaser as "viewed."
By default, teasers are sent when the HTML element is visible in the user's viewport for 1000 milliseconds.
Limit requests per page
Optional. Request limitation: Define a limit for sending teasers on a single page. By default, a maximum of 1000 teasers is allowed on a single page. To capture all teasers on a single page, enter "-1".
Limit requests per session
Optional. Request limitation: Define a limit for sending teasers within the browser session. By default, a maximum of 10000 teasers is allowed during the browser session. To be able to capture all teasers within a browser session, enter the value "-1".
Attribute name
Optional. Specify the attribute name of the teaser element containing the teaser information (compatibility mode for teaser tracking version 1).
Maximum cookie size
Optional. Specify the size of the cookie in byte. Default is 4000.
Delete teaser cookie after conversion
Optional. Activate the checkbox to determine that the cookie in which the teaser information is stored will be deleted after a successful conversion.
Additional conversion pages
Optional. Click + Additional conversion pages to add a page area where a conversion takes place.
Send engagement automatically
Optional. Activate the checkbox to specify that teaser engagements are sent automatically.
When sending manually, you must define the variable wt_teaserEngagements on the desired pages.
Additional engagement pages
Optional. Click on + Additional engagement pages to add a page area where an engagement should be sent.
In the Assign rules area, you define the page areas on which the measurement is to be carried out.
Finally, click Add plugin.
Download the JavaScript file from the download area.
The configuration object "wt_teaserTrackingConfig_v2" is located inside the plugin. Make the following adjustment:
Examplewindow.wt_teaserTracking = function(conf) { if ((conf.mode === "page" || conf.mode === "config") && conf.requestCounter === 1) { var wt_teaserTrackingConfig_v2 = window.wt_teaserTrackingConfig_v2 || { teaserAttribute: "", viewPercent: 100, viewTime: 1000, attribution: "all", maxSendTeasers: { session: 10000, page: 1000 }, maxCookieSize: 4000, clearConversions: true, autoEngagements: true }; // ...... } };Parameter
Description
teaserAttribute
Specify the attribute name of the teaser element containing the teaser information (compatibility mode for teaser tracking version 1).
viewPercent
Specify what percentage of the height and width of a teaser element should be visible in the user's viewport to recognize the teaser as "viewed ."
By default, teasers are sent if the HTML element is 100% visible in the user's viewport.
viewTime
Specify how long a teaser element should be visible within the user viewport to recognize the teaser as "viewed."
By default, teasers are sent when the HTML element is visible in the user's viewport for 1000 milliseconds.
attribution
Select the attribution to be used for the conversion or website target:
first: Only the first teaser associated with the conversion or website target.
last: Only the last teaser associated with the conversion or website target.
all: All teasers associated with the conversion or website target.
maxSendTeasers
Request limitation.
session: Define a limit for sending teasers within the browser session. By default, a maximum of 10000 teasers is allowed during the browser session. To be able to capture all teasers within a browser session, enter the value "-1".
page: Define a limit for sending teasers on a single page. By default, a maximum of 1000 teasers is allowed on a single page. To capture all teasers on a single page, enter "-1".
maxCookieSize
Optional. Specify the size of the cookie in byte. Default is 4000.
clearConversions
true = The cookie in which the teaser information is stored is deleted after a successful conversion.
autoEngagements
true = Teaser engagements are sent automatically.
When sending manually, you must define the variable "wt_teaserEngagements" on the desired pages.
Manual Engagement and Conversion Tracking (Optional)If you want to track engagements or conversions manually (instead of using the automatic mode), define the following variables in your HTML source code:
<!-- On conversion pages --> <script> var wt_teaserConversions = true; </script> <!-- On engagement pages --> <script> var wt_teaserEngagements = true; </script>Important
These variables must be defined before loading the teaser plugin and the base pixel (webtrekk_v4.min.js).
Otherwise, manual tracking will not be applied.
Example:
<script> var wt_teaserConversions = true; var wt_teaserEngagements = true; </script> <script src="path/to/pixel-teasertracking-v2.min.js"></script> <script src="path/to/webtrekk_v4.min.js"></script>Insert the script before the "webtrekk_v4.min.js" in your HTML document.
Example<script type="text/javascript" src="path/to/file/pixel-teasertracking-v2.min.js"></script> <script type="text/javascript" src="path/to/file/webtrekk_v4.min.js"></script>You can use the parameter executePluginFunction in the tracking pixel to activate the plugin functionality. You can make the setting either in the configuration variable (webtrekkConfig) or as a parameter of the pixel object.
Example global configurationvar webtrekkConfig = { trackId: "111111111111111", trackDomain: "track.webtrekk.net", domain: "www.website.com", executePluginFunction: "wt_teaserTracking" };Example page-specific configuration
var wt = new webtrekkV3(); wt.contentId = "de.startseite"; wt.executePluginFunction = "wt_teaserTracking"; wt.sendinfo();A semicolon separates multiple plugins.