This page includes a description of all Whiteboard windows.
Looking for a structured learning path?
Learn step by step in our Academy Course: Mapp Engage - Automating Campaign Flows with Whiteboards.
Window "Overview"

Navigation
Automations > Whiteboards
What can I do in this window?
Manage your Whiteboard plans. This includes creating a new Whiteboard, copying, editing, adding a label to, deleting, or viewing an existing Whiteboard.
Actions
Action | Description |
|---|---|
Create | Opens the New Whiteboard Plan window. Here you select the type of whiteboard plan and enter a name and description for the new plan. |
| Opens an inactive plan in edit mode. In edit mode, you can view and edit the whiteboard. You can only edit inactive whiteboard plans. To edit an active whiteboard, deactivate it first. |
| Creates a copy of the whiteboard plan. The copy contains the same events, jobs, and filters as the original whiteboard plan. By default, the copy has inactive status. |
| Deletes the plan after an additional confirmation request. A deleted plan cannot be recovered. |
| Archives the selected Whiteboard. Archived Whiteboards are not removed and you can activate them again when needed. |
Information
You can filter the information that is shown in several columns of the Whiteboard Plans overview.
Field Name | Description |
|---|---|
Name | Displays the name of the whiteboard plan. You define the name when you create the plan. To change the name of the whiteboard plan, open the plan. You can change the name in the info panel to the right of the canvas. |
Type | Displays the type of whiteboard plan.
|
Author | Displays the name of the system user who created the whiteboard plan. |
Last Change | Displays the date and time when the whiteboard plan was last updated. |
Status | Displays the status of the whiteboard plan.
|
Labels | Allows you to:
|
Window "Whiteboard Configuration"
Navigation
Automations > Whiteboards > Create or Edit
What can I do in this window?
The whiteboard canvas is where you build your whiteboard plan.
Setup

The Setup panel on the ribbon below the whiteboard name contains various options depending on the type of whiteboard.
Field | Description |
|---|---|
Group | On event-based whiteboards, open the Setup panel to define the whiteboard audience. |
Duration | Opens the Setup panel to define start and end dates or a schedule for your whiteboard. |
Recurrence | On a recurring whiteboard, open the Setup panel to define if and how often the whiteboard recurs. |
Define Whiteboard Goal | Opens the Setup panel to define a goal event for the whiteboard. |
For more information on Setup settings for different types of whiteboards, see Create an Event-Based Whiteboard Plan and Create a Recurring Whiteboard Plan.
Toolbar

The toolbar above the whiteboard canvas provides these basic tools:
Symbol | Tool | Description |
|---|---|---|
| Undo | Erases the most recent action on the whiteboard plan. For example, if you delete a step accidentally, click the |
| Redo | Restores the most recent action that you erased with the undo-tool. If this button is not available, you did not undo a step on the whiteboard plan recently, or the whiteboard plan is active. |
| Zoom Out | Decreases the level of magnification at which Mapp Engage displays the canvas. Zoom out for a less detailed overview of your canvas. |
| Zoom In | Increases the level of magnification at which Mapp Engage displays the canvas. Zoom in to focus on a specific area of your whiteboard plan. |
| Reset Zoom | Resets the zoom level to 100%. |
| Overview | Sets the level of magnification automatically so that the entire whiteboard plan is visible on the canvas. |
| Path View | Sets the level of magnification automatically so that all steps of the selected path are visible on the canvas. |
| Whiteboard Settings | Opens the Whiteboard Settings window. Here you define on which days Mapp Engage executes the whiteboard plan and how many times a contact can enroll in the plan. This window also determines the time zone for the whiteboard. |
| Plan Details | Opens the Plan Details panel. |
Whiteboard Details Panel
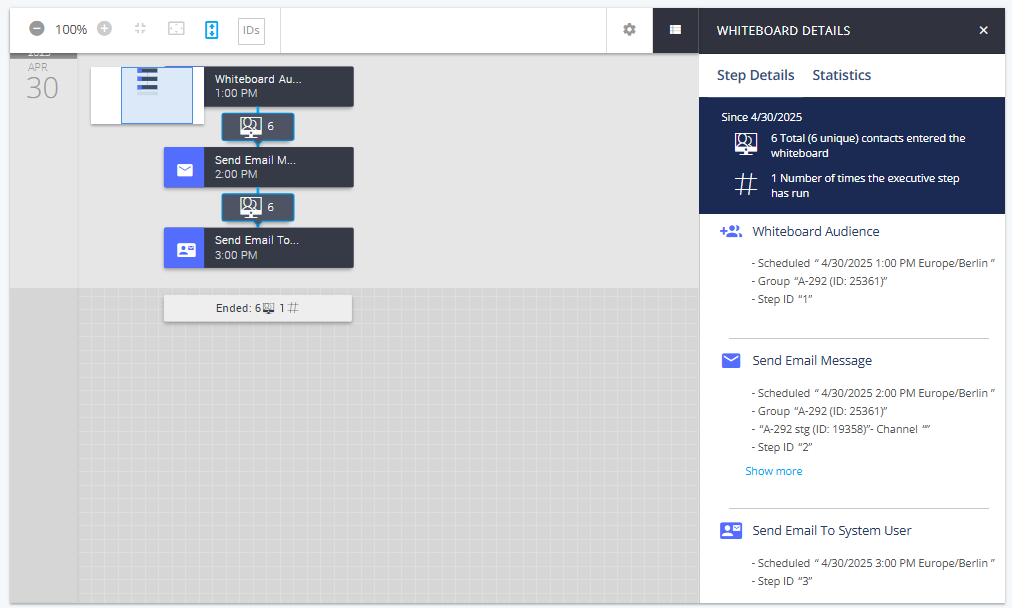
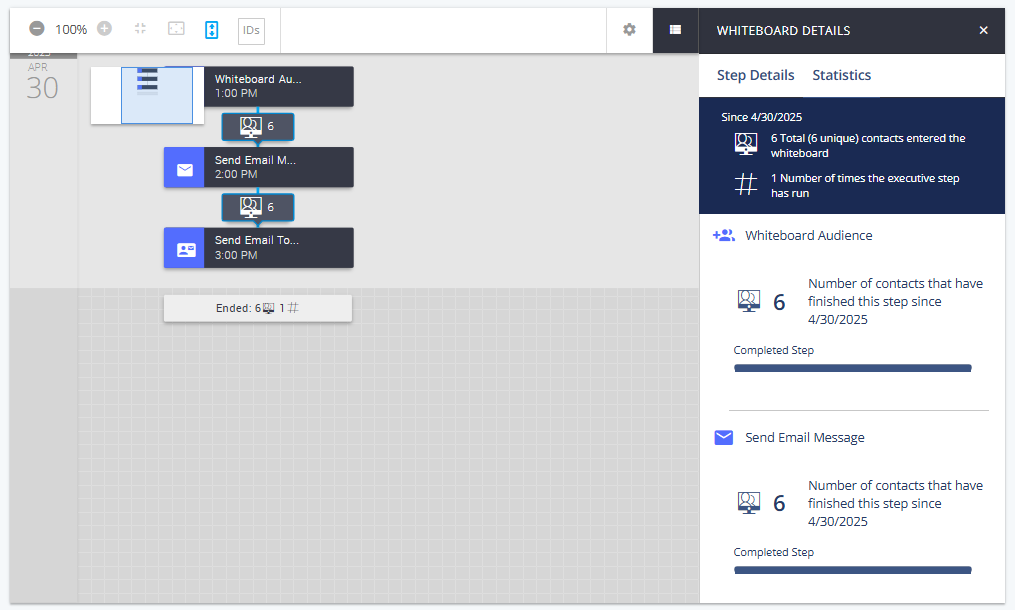
The Whiteboard Details panel provides detailed information about each step in your whiteboard. It is particularly useful when working with complex whiteboards that include multiple splits. The panel includes two tabs: Step Details and Statistics.
To open the Whiteboard Details panel, click the ![]() icon.
icon.
Step Details
This tab displays information such as the conditions, attributes, and the step ID for each step in the journey.

Statistics
The Statistics tab shows the number of contacts exiting a step, the goals reached, and the number of executions for executive steps.

For more information, see Whiteboard Statistics.
Canvas Tools
Mapp Engage provides an intuitive and easy-to-use canvas for designing, validating, and executing marketing campaigns. This table gives an overview of the most important tools on the canvas.
Symbol | Action | Description |
|---|---|---|
| Add Step | Adds a step to the whiteboard. A panel opens, where you can select the step that you want to add. |
| Insert Step | Adds a step between two steps on the whiteboard. |
| Join | Joins one path to another path. If you have one or more splits on your whiteboard plan, you can use the join tool to reconnect the paths. The join moves contacts from one path to another path. To join two paths, drag the join tool to a step on a different path. You cannot drag the join tool to a point that is between two steps. The join must be the last step on a path. You cannot create a join in the middle of a path. You cannot use the join tool to create loops in which contacts repeat the same steps multiple times. When you join one path to another, the normal rules for sequences apply. To delete a join, move your mouse to the area where the paths intersect and click the symbol. The |
| Edit | Opens a window where you can edit the settings of the step. To change the step type, click the step, then click the Back button. |
| Delete | Deletes the whiteboard step.
|
| Warning | This indicates that mandatory information in the step is missing. You can see this symbol when you try to create, save, or activate a whiteboard plan that contains an error. You cannot activate a whiteboard plan when information is missing. Add the missing information, then activate the whiteboard plan. |
Information Panel

To view information about the whiteboard plan, click the  symbol in the header area of the whiteboard canvas window. If the whiteboard plan is inactive, you can edit information in this panel.
Field Name | Description |
|---|---|
Name | Displays the name of the plan. To edit the name of an inactive plan, click the |
Description | Displays a description of the plan. The description lets you store helpful information about the plan. To edit the description of an inactive plan, click the |
Author | Displays the name of the system user who created the plan. |
Creation Date | Displays the date and time when the plan was created. |
Last Change | Displays the date and time when the plan was last updated. |
ID | Displays the ID number of the plan. The ID is a unique number that Mapp Engage generates when you create a plan. The ID allows you to identify the plan in the Mapp Engage system and cannot be changed. |
Whiteboard Management

The header area above the whiteboard canvas contains basic controls for your whiteboard plan. The options that Mapp Engage displays depend on the status of the whiteboard.
Action | Description |
|---|---|
Save | Saves the whiteboard plan as a draft. Mapp Engage does not execute the automations on your draft. You can edit the draft later. Mapp Engage does not save whiteboard plans automatically. Save your whiteboard from time to time while you work. |
Activate | Activates the whiteboard plan. When the whiteboard plan is active, Mapp Engage executes the jobs on the whiteboard according to your plan and rules. You can only activate the whiteboard plan if the sequence of steps is logically correct and all mandatory information must be provided. If you cannot activate the whiteboard plan, check for error messages on the canvas. These errors indicate where information is missing. You only see this option when you view an inactive whiteboard plan. To activate a whiteboard plan, you need permission 356. |
Deactivate | Deactivates the whiteboard plan immediately. A deactivated whiteboard plan is never executed. You only see this option when you view an active whiteboard plan. |
Phase Out | Opens the Phase-Out Details window. In this window, you select a date to define the time period over which Mapp Engage deactivates the whiteboard plan. When you click Phase Out, Mapp Engage begins the phase-out process immediately. During the phase-out process, Mapp Engage does not add new contacts to the whiteboard plan. Contacts who enter the plan before the phase-out period begins can continue in the plan until the selected deactivation date. |
Edit Phase-Out | Opens the Phase-Out Details window of an active phase-out process. In this window, you can adjust the time period over which Mapp Engage deactivates the whiteboard plan. When you click Phase Out, Mapp Engage updates the length of the phase-out process immediately. |
Close | Closes the whiteboard plan without saving your changes. |
Window "Whiteboard Settings"

Navigation
Automations > Whiteboards > Create or Edit > Settings ![]()
What can I do in this window?
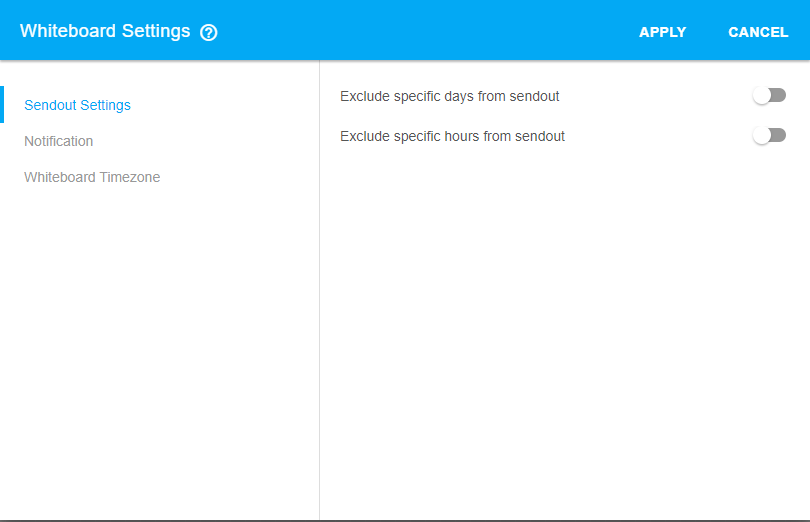
Define the settings that apply to your Whiteboard plan and all its steps. The settings vary based on the Whiteboard type that is selected.
Sendout Settings
Defines the days and hours on which the system does not execute sendouts. These settings are available for event-based and recurring whiteboards. Use it to ensure that the communication does not disturb the contact at an unwanted time. You can exclude both days and hours to fine-tune the time of your sendout.
Setting | Description |
|---|---|
Exclude specific days from sendout | Select this option to exclude specific days from sendout. By default, no days are excluded, and the system executes the sendout without limitations.
After excluding specific days from the sendout, the system executes it the next day at the same time. |
Exclude specific hours from sendout | Select this option to exclude specific hours from sendout.
After excluding specific hours from the sendout, the system executes it within 30 minutes after the excluded time range. |
Execution of certain steps in the system can take some time. Sometimes the sendout can be executed on hours that were set up as excluded from the sendout. For example, hours between 8:00 and 9:00 are excluded from the sendout. As a result of the journey, the system initiates a message sendout to the contact at 7:59. Because of the processing time, the message is delivered to the contact within the excluded time frame.
Statistics
Defines how the system calculates statistics for this whiteboard. These settings are available for Event-based and Recurring whiteboards.
Setting | Description |
|---|---|
Reset enrolment counter on activation | The enrolment statistics for the whiteboard show only the number of contacts who enter the current activation of the plan. |
Continue enrolment count from previous activation | The enrolment statistics for the whiteboard are cumulative. The system adds the number of contacts who enter the current whiteboard to the number of contacts who entered previous activations of the plan. |
Notification
Defines whether an expiry notification is sent 30 days before the whiteboard plan deactivates. These settings are available for Event-based and Recurring whiteboards.
Setting | Description |
|---|---|
Send Notification to | Sends an email notification to the selected system users 30 days before the whiteboard ends. You can select up to 10 system users from the list of available users. |
Notify when imports have no file | When this toggle switch is activated, the Engage system will send a message to the defined recipients when an import fails due to a lack of files. The toggle switch is disabled by default. Available for time-based whiteboards only. |
Whiteboard Time Zone
Defines the time zone that the system uses to calculate time on the whiteboard plan. The time zone that you select for your whiteboard audience defines the time zone for all subsequent steps in the whiteboard. By default, your system's time zone is selected.
.png)
 Edit
Edit


 symbol appears when your mouse hovers where the two paths meet.


 symbol.