Goal
Set up Mapp Engage and Adobe Commerce so one website can send localized transactional messages for multiple Store Views (for example, English, Italian, German).
Background Information / Prerequisites
Store Views are typically used for languages or regional differences.
You will create dedicated Groups and Messages per Store View in Mapp Engage, then connect and map data via Mapp Connect, and finally assign groups and messages in Adobe Commerce.
Procedure
A) Create Groups in Mapp Engage
On Mapp Engage, navigate to Create New > Group and for each Store View, create 3 groups:
For customers (e.g.
magento_customer_<LANG>)For subscribers (e.g.
magento_subscriber_<LANG>)For guests (e.g.
magento_guest_<LANG>)
Example for Italian:
magento_customer_ITmagento_subscriber_ITmagento_guest_IT
Tip: Use clear, language-based naming to avoid mixing up groups later.
B) Prepare Messages in Mapp Engage
In Create New > Message > Email Message > HTML Email, create a separate set of transactional messages (prepared Email messages) per Store View (for example, English, Italian, German).
Save each email as a Prepared Message for later selection in Adobe Commerce.
Tip: Keep message names organized by language.
C) Create Integration in Mapp Connect
Go to Data Management > Mapp Connect.
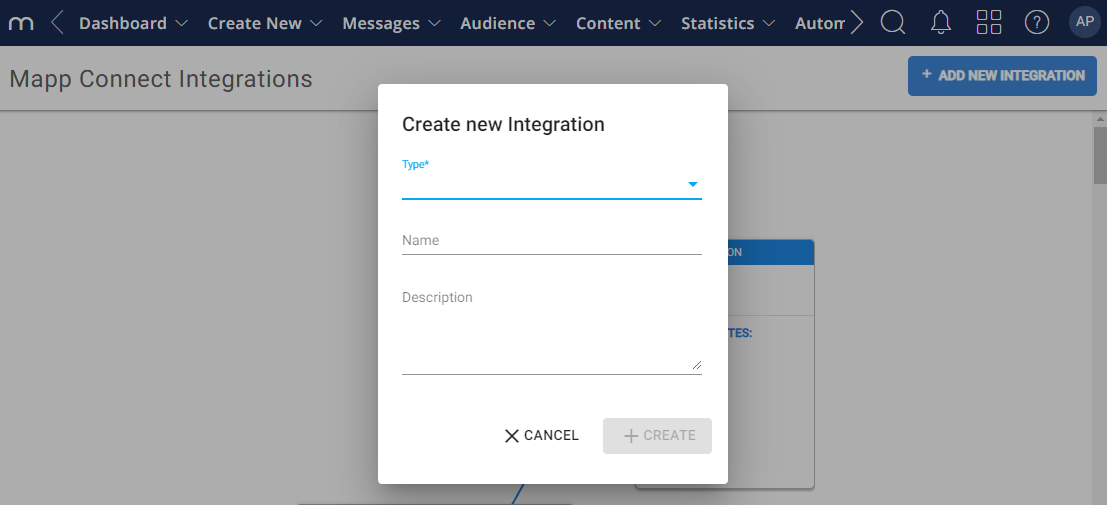
Click Add New Integration.
Select Magento as the integration type.
Enter the name of the connection and click Create.
In Integration Settings > Overview, optionally add a description.
(Optional) Enable the Whiteboard trigger for mapping attribute changes.
Copy the Secret Key and save it for later authentication.
Click Save.
Note: The secret key is only visible once. Save it immediately.
D) Configure Mapping in Mapp Connect
Default import types and standard attributes for Adobe Commerce are pre-added.
For the full list of default mapping types and what each one does, see Mapping.
Any custom mapping needs to be added to the configuration. This can be done via an import or manually:
Go to Data Management > Mapp Connect.
Open the Adobe Commerce integration of your choice.
Click the Mapping tab.
Import your mapping, or add custom mapping manually as needed.
For more information, see Mapping.
E) Configure general settings in Adobe Commerce
In Adobe Commerce Admin, go to Store > Configuration > Mapp Cloud > Mapp Engage (Connect) - General.
This page opens with the Scope “Default Config”.Configure general settings, such as choosing the environment or adding specific preferences.
Enable the module and Save.
Setting | Details |
|---|---|
Module Enable | Enables or disables the module. |
Mapp Connect API URL | Sets the API endpoint used by MapConnect.
For more information, see Mapp Engage Clusters and Time Zones. |
Mapp Connect custom API URL | Specifies a custom API endpoint for Mapp Connect, if needed. |
Example configuration

F) Configure the integration in Adobe Commerce
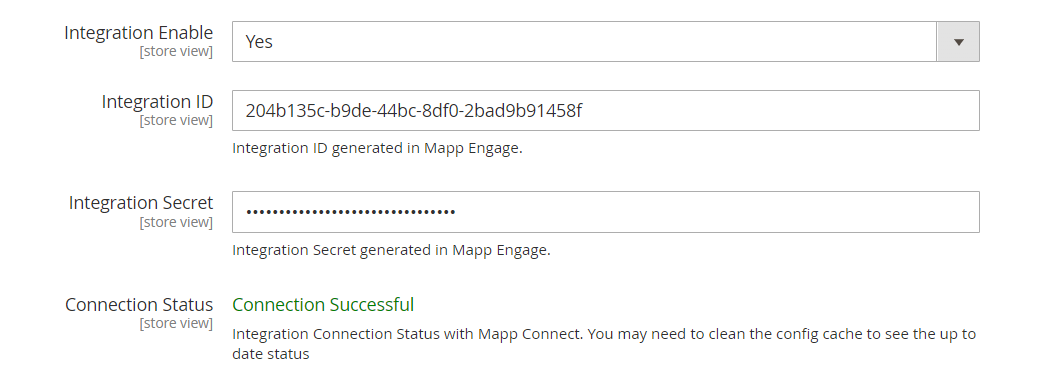
Set Integration Enable to “Yes”.
Enter the Integration ID and Integration Secret.
Click Save.
Confirm Connection Status shows “Connection Successful“.
Click Save Config.
Setting | Details |
|---|---|
Integration Enable | Activates the connection to Mapp Engage. |
Integration ID | Unique identifier of the integration created in Mapp Connect. |
Integration Secret | Secret key generated during integration setup in Mapp Connect. |
Connection Status | Displays the current connection status, for example, “Connection Successful”. |
Example configuration
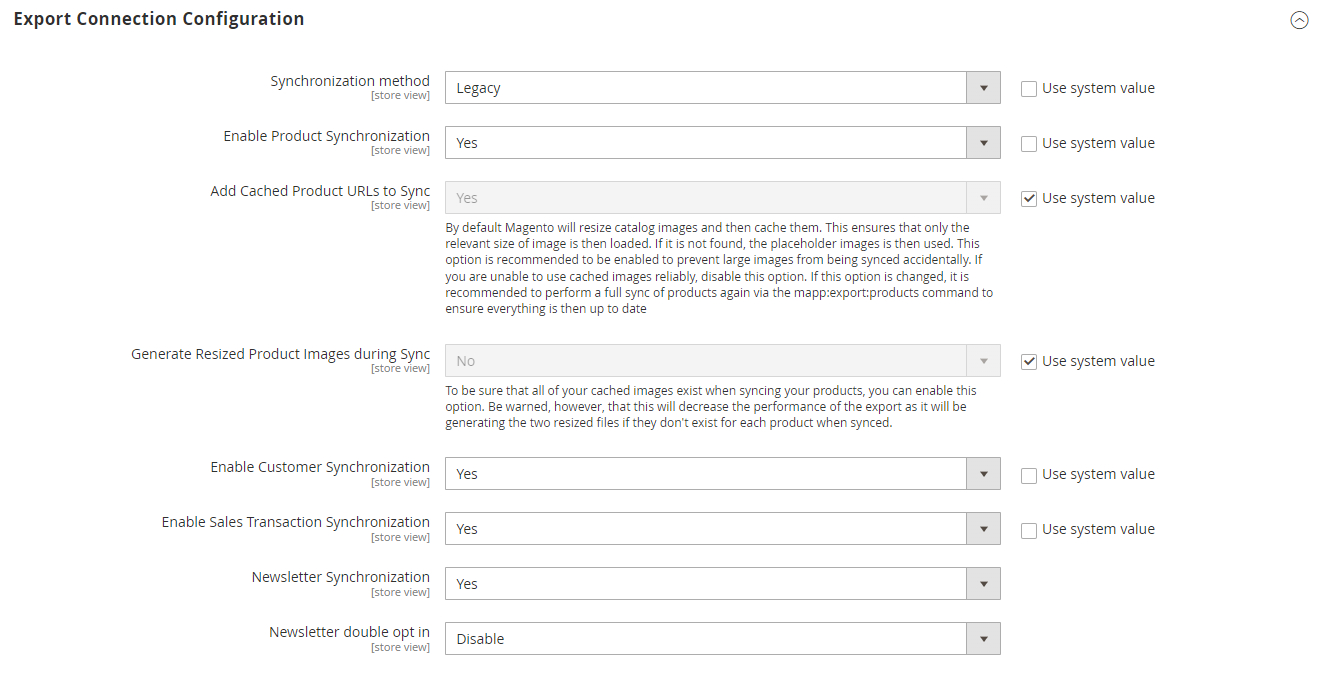
G) Export Connection Configuration
Configure synchronization for products, customers, transactions, and newsletters, as required for your setup.
Note:
Adobe Commerce sends only real-time data to Mapp Engage. Historical data is not transferred automatically.
To add historical data, export CSVs from Adobe Commerce, then import them to Engage via Mapp Connect (FTP/SFTP).
Setting | Details |
|---|---|
Synchronization Method |
|
Enable Product Synchronization | Defines synchronization preferences for products. If enabled, products created in Adobe Commerce appear in the product catalog in Mapp Engage. |
Add Cached Product URLs to Sync |
|
Generate Resized Product Images during Sync | Appears when Add Cached Product URLs to Sync is set to “Yes”. Ensures all cached images exist during synchronization. May reduce performance, as two resized files are generated per product if they do not already exist. |
Enable Customer Synchronization | Defines synchronization preferences for contacts. If enabled, contacts created in Adobe Commerce are mirrored in Mapp Engage. |
Enable Sales Transaction Synchronization | Defines synchronization preferences for transactions. If enabled, transactions registered in Adobe Commerce are mirrored in Mapp Engage. |
Newsletter Synchronization | Defines synchronization preferences for newsletters. If enabled, newsletter sign-ups are added to the defined Mapp Engage group. |
Newsletter Double Opt-in | Enables or disables double opt-in for newsletters. See Set up Double Opt-in with the Email Channel for details. |
Max Newsletter Request Retry Count | Appears when Synchronization Method is set to “DB Trigger”. Defines how many times failed requests are retried. The default is 10, but you can uncheck Use system value and enter a custom number. |
Use system value | If checked, the plugin uses the Adobe Commerce system value, even if another option is selected. |
Example configuration
H) Set up store views and localized product attributes
Store Views
Go to Stores > Settings > All Stores.
Create a Store View for each language.
Set the locale at Stores > Settings > Configuration > General > Locale Options.
Localized product attributes
Go to Catalog > Products and open the product.
Use the Store View selector to switch to the desired view.
For attributes such as Name, Description, Short Description, Meta Title, Meta Description, and URL Key:
Clear Use Default Value.
Enter localized content.
Save the product.
In Engage, open Administration > eCommerce > Product Catalog to confirm localized data is updated.
For details, see the following documentation:
Product Catalogecommerce-product-catalog
I) Assign Groups in Adobe Commerce
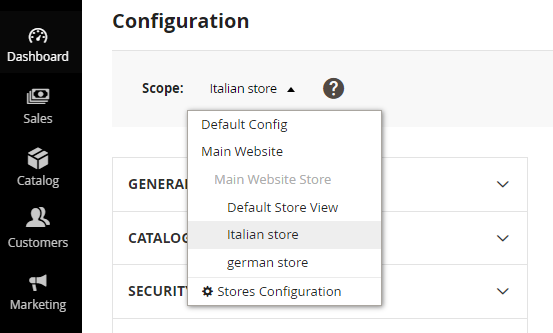
In the configuration, select the Mapp Engage Groups created in Engage. These are the defaults for Scope: Default Config and appear only after the plugin is set up and the connection is active.
Example configuration

Click the Save Config.
To adjust groups for other Store Views, change the Scope and select the required group.
Click Save Config.
Note:
Only adjust the Customer Group per Store View. The Subscribers and Guests groups remain the same across all Store Views.
J) Configure Messages in Adobe Commerce
Go to Stores > Configuration > Mapp Cloud > Mapp Engage (Connect) - Emails.
For each Store View, assign the localized prepared messages you created in Engage.
Save config.