Configuration and Mapping via Tag Integration
- 4 Minutes to read
- Print
- DarkLight
Configuration and Mapping via Tag Integration
- 4 Minutes to read
- Print
- DarkLight
Article summary
Did you find this summary helpful?
Thank you for your feedback
Configuration
To configure the plugin, follow these simple steps:
In the admin panel, go to Stores > Configuration
In the plugin list, select Mapp Cloud >Mapp Intelligence > Tag Integration
Enable the plugin
You need to enter your tiId and the responder domain, all the other values are optional
Setting | Description |
|---|---|
TagIntegration ID | The Tag Integration ID equals the trackId of the first account in Mapp Intelligence. When in doubt, contact Mapp support. |
TagIntegration Domain | Enter your Tag Integration domain. Usually, this should be "responder.wt-safetag.com". |
Custom Domain | Enter your domain here, if the TagIntegration file should be loaded from your server. |
Custom Path | Enter the path to your JavaScript file here, if the TagIntegration file should be loaded from your server. |
Attribute blacklist | You can put here a list of all attributes that should be filtered out of the data layer, separated by a semicolon. For example you can exclude the following attributes like this "customer*", "orderPayment*", "orderBilling*" und "orderShipping*".
|
Add-to-cart Eventname | The name of the add-to-cart event, which takes place whenever a visitor adds a product to the shopping cart. If no value is given, 'add-to-cart' will be used. |
After changing the configuration, you will need to flush the cache. This can be done via path_to_magento_app/bin/magento cache:flush. In the Admin panel, you can go to System > Cache Management and flush the cache from there.
Whitelisting
Mapp allows you to load the responder script (which loads the Tag Integration container) as well as the tracking domain (which loads the tracking pixel) from your own domain instead of the ones provided by Mapp.
Since Adobe Commerce now has its own Content Security Policies (CSP) service which is enabled by default, you need to add your own domains to the whitelist. It is possible to do this by editing a file of the plugin.
You can find the file on your server under app/code/Webtrekk/TagIntegration/etc/csp_whitelist.xml
Future plugin updates might overwrite those changes and you'd need to apply them again.
Under the img-src policy you can add /replace your custom track domain, and under the script-src policy, you can add/replace your custom responder domain.
More information about Adobe Commerce CSP can be found here.
Mapping
Here you'll learn how to map the Magento store data that is exposed under window_ti via Mapp Tag Integration.
It is a simple two-part process:
Create a parameter that reads the data from the _ti object.
Example: To track the pageName, create a parameter in TI like this:
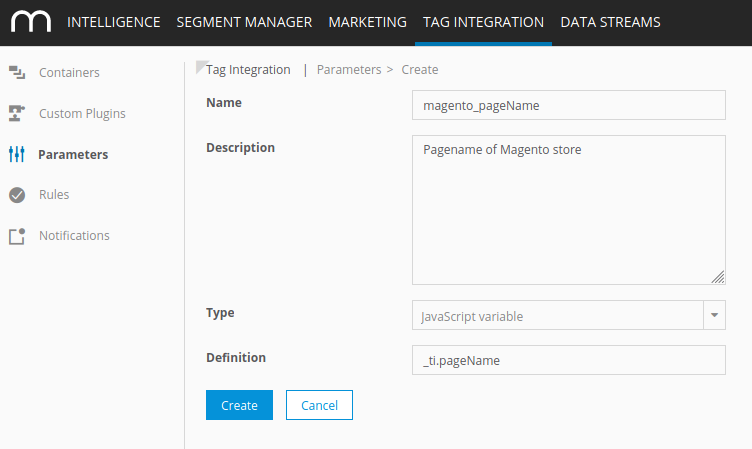
Map the data to the Mapp Intelligence plugin in your container within the Mapp Intelligence plugin


Attribute overview of _ti object
Attribute | Description | Suggested mapping |
|---|---|---|
pageName | URL without parameter. | Page → Page name |
pageTitle | Meta title of the page. | Publisher → Page title |
customerId | Sha256 hash of the customer's email address | Visitor → Customer Id |
gender | '1' for male and '2' for female (this will only work if the technical name for Salutations is for male Mr or Herr, and Ms, Mrs, Miss or Frau for female (see Settings → Salutations in Shopware 6 Backend). Only available if customer is logged in. | Visitor → Gender |
contentCategory | Depending on where you are the values can be: Checkout, Catalogue, Account, Home, Content. | Page → Content Groups |
contentSubcategory | Depending on where you are the values can be: Product Overview, Product Detail, Internal Search, Landing Page. | Page → Content Groups |
pageNumber | Number of page in product lists and search results. | Page → Page Parameter |
internalSearch | Search term on search result page. | Page → Internal Search Phrase |
productCost | Product price. Will be calculated based on the quantity during order or when multiple items are added to cart at once. | Product → Product Costs |
productId | The value you enter under 'Product number' when you create a product in Shopware 6. | Product → Product Name or ID |
productName | The title of a product. | Product → Product Categories |
productQuantity | The amount of a product. | Product → Product Quantity |
productSoldOut | '1' if available stock is 0 or below, '' if available stock is at least 1. | Product → Predefined → Product Sold Out |
productCategories | All product categories as an array. | Product → Product Categories |
productCategory | The first product category. | Product → Product Categories |
productSubCategory | The second product category. | Product → Product Categories |
shoppingCartStatus | Either 'view' (product detail), 'add' (when adding to basket) or 'conf' (during order). | Product → Shopping Cart Status |
currency | The currency ISO code. | Product → Currency |
orderId | The ID of an order. | Product → Order ID |
totalOrderValue | The total value of an order, incl. taxes. | Product → Total Order value |
couponValue | Value of coupons during order. | Product → Predefined → Voucher Value |
Additional data
Depending on your configuration there is a lot more data in the data layer. To see it, just open your Magento store in your browser and press F12 to open the developer tools.
There, switch to the JavaScript console, type "_ti" and press enter.
Add-to-cart event
A special case is the add-to-cart event: since the data layer holds the add-to-cart data for a couple of milliseconds only, you cannot read it like described above.
In order to see the add-to-cart data, you have to set the cookie 'mapp_debug'in your browser - having set that, the data of the add-to-cart event will be logged to the JS console.
Here is a step-by-step guide to see an add-to-cart event:
Open your Magento store
Open the dev-tools by pressing F12
Set the JS cookie 'mapp_debug' - you can use the code snippet below to set this cookie for 1000 days, just copy&paste into the JS console and press enter
With the dev tools still open and the JS console tab selected, add an article to the basket - the data will be logged to the console
(function() {
	var d = new Date();
	d.setTime(d.getTime() + (1000*24*60*60*1000));
	var expires = "expires="+ d.toUTCString();
	document.cookie = "mapp_debug=1;" + expires + ";path=/";
})();
Certain product data, like the attributes of a configurable product, is only available during the add-to-cart event and during the order, but not on the normal product view (since the options are not yet selected).
For instance, _ti.productAttributesSize holds the data of the size of a product, for clothes that value would be 's', 'm', 'l', 'xl' etc. The attribute for color can be found under _ti.productAttributesColor.
Depending on your configuration you will find all the configurable data in _ti, however, you won't find it during view, just during add-to-basket and order.
Was this article helpful?