Once your Engage system is set up, sending an email follows a clear, repeatable workflow.
This page gives you a high-level overview of the required steps and points you to the right areas of the documentation for each phase.
If you are new to Mapp Engage, watch the short introductory video above to understand the overall process before diving into the individual steps.
A) Build Your Audience
Before you can send an email, you need to understand how audiences are structured in Mapp Engage.
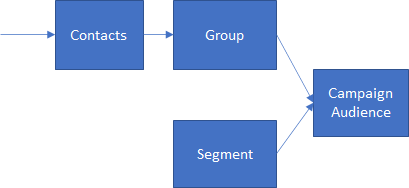
Audiences are built from contacts, organized through groups, and activated through sendouts.
Related documentation
Audience Model in Mapp Engage – Understand how contacts, groups, and membership work together
Build Audiences with Segmentation Builder – Define target audiences based on data and activity
B) Create the Email Message
Once your audience is defined, you create the email message that will be sent to recipients.
In Mapp Engage, email messages follow a consistent model that applies across different email types and use cases. At this stage, you decide which email message type to use. The creation process itself depends on this choice.
Before choosing a specific implementation, it is helpful to understand how email messaging works conceptually and how the available email types relate to each other.
Related documentation
Email Model in Mapp Engage – Understand how email messages are structured and how different email types fit into the overall messaging model
Next, choose the email type that best fits your content strategy and technical requirements:
CMS Email – Create structured, reusable email messages based on content blocks and frameworks
HTML Email – Create email messages using custom HTML for full control over layout and markup
AMP Email – Create interactive email messages with dynamic content inside the inbox
As part of message creation, you typically:
add personalization and reusable variables to adapt content for recipients,
review and test the message to validate content, layout, and deliverability,
prepare the message for sendout or reuse in automations.
C) Send the Message
Once your email message is prepared, it is sent to the selected audience.
In Mapp Engage, sendouts can be executed immediately, scheduled for a later time, or triggered automatically based on defined conditions.
In this step, you decide:
when the message is sent,
whether the sendout is executed once or repeatedly,
whether the message is sent manually or as part of an automated flow.
Related documentation
Send an Email Message – Execute, schedule, reschedule, or cancel email sendouts
Message Orchestration – Understand how automated and event-based sendouts are coordinated across campaigns and journeys
Regardless of the sendout method, the same rules apply:
the message is sent in the context of a group,
targeting and personalization are evaluated at sendout time,
delivery and moderation settings defined at the group level are applied.
D) Analyze Performance and Reporting
After the email is sent, reviewing performance helps you evaluate results and optimize future campaigns.
Mapp Engage provides centralized statistics and reporting to analyze message engagement and delivery across channels.
In this step, you:
review key performance indicators such as delivery, opens, clicks, and conversions,
analyze results for individual messages and sendouts,
identify deliverability issues and audience-related trends,
export reports or raw data for further analysis.
Related documentation
Statistics – Analyze message performance, engagement metrics, and reporting data