This article illustrates with an extended example how to organize product access and report rights via user management. It builds on the User Management Basic Use Case.
Preface
For our example, we focus on a department with two users in the workspace Shop GER:
User A is a product manager who needs access to specific product-related data:
Access to Mapp Intelligence is limited to analyses in the E-Commerce section.
Read-only access to reports in the Online Marketing Reports category.
Full control over their private reports (view, create, edit, and delete).
User B is an online marketing manager who needs broader access:
Full access to all analyses in Mapp Intelligence.
Full control over the Online Marketing Reports category (view, create, categorize, edit, and delete).
Full control over their private reports.
.png)
Key concepts
Private reports: Reports that are not assigned to any category. They are visible only to the creator and administrators.
Categories: Categories determine which users can access specific reports and which permissions they have (for example, view-only or edit/delete).
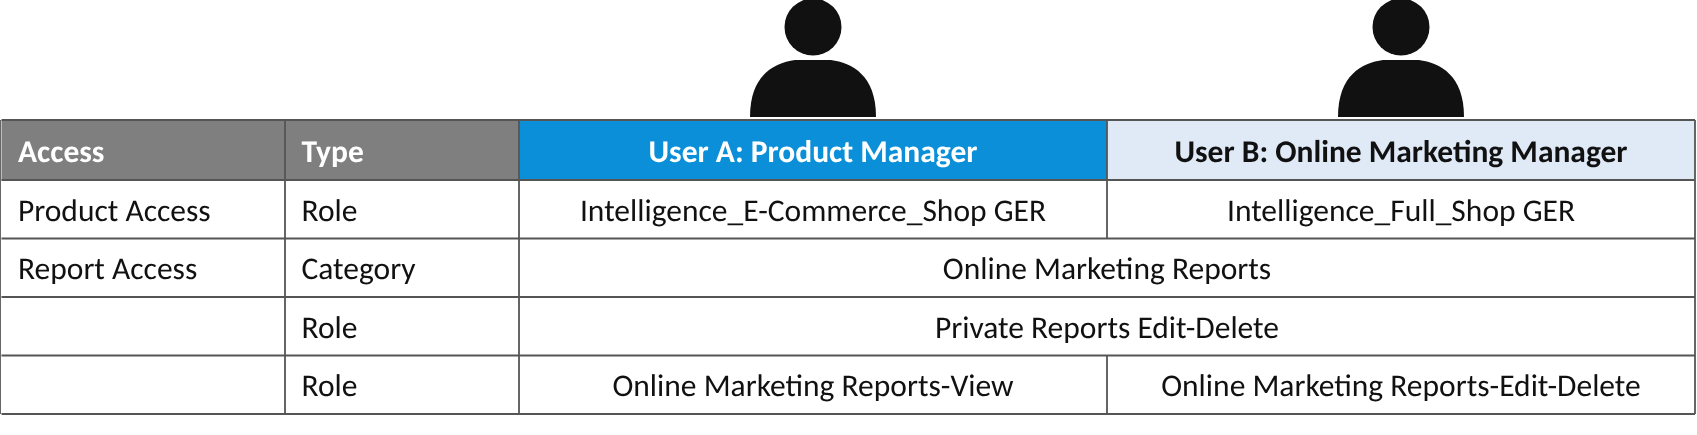
Roles: Roles manage access rights for products, reports and categories. If a user has several roles, their rights are added up (maximum privilege principle). Therefore, each role in this example covers only one aspect.
The following overview shows the roles and the category that we set up in this example.
Step 1: Create users
As a first step, the logins for User A and User B must be created. To open the User Management, click the gear icon in the top navigation bar and select User Management. Then go to Users.
Create two new users. In our example, the first name is User and the last name is A or B.
Fill in the remaining basic user information.
(Optional) Set a password expiration date.
Do not assign any roles yet.
Step 2: Manage product access with roles
Roles manage access to Mapp products. For product access, we create two roles, one for each user. This is done in Roles in the User Management.
Role 1 (User A): Limits access to Mapp Intelligence to analyses from the E-Commerce section.
Role 2 (User B): Grants access to all analyses in Mapp Intelligence.
Both roles have these settings in common:
In the Workspace assignment, assign the workspace Shop GER.
In the Service assignment, select Intelligence for Shop GER in the Intelligence section.
Do not activate report access. These roles manage only product access. Report rights are set up in Step 3.
A) Role 1 (User A)
Choose a name for the role, for example Intelligence_E-Commerce_Shop GER.
Assign User A to the role.
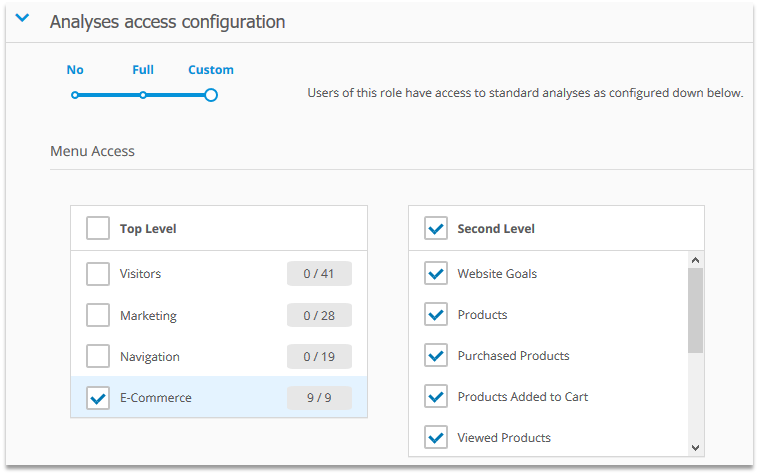
In the Analyses access configuration, set the slider to Custom and check only E-Commerce for top-level menu access. All analyses grouped there are available. If necessary, you can select or unselect specific analyses on the second and third levels.
In the Advanced features access configuration, leave Activate creating, editing and deleting custom metrics and formulas unchecked. User A does not need this right.
Save the role.
B) Role 2 (User B)
Choose a name for the role, for example Intelligence_Full_Shop GER.
Assign User B to the role.
In the Analyses access configuration, set the slider to Full. This grants access to all analyses in Mapp Intelligence.
Save the role.
Step 3: Manage report rights with roles and categories
A) Set up the report category
Categories control access to specific reports. Create the category Online Marketing Reports in Categories in the User Management.
The Access level of a role defines what users can do with reports in the assigned categories. Each level includes the permissions of the previous levels. For details, see the User Management Basic Use Case.
Settings for all report roles
For report rights, we create three roles in Roles in the User Management: one for private reports (User A and User B), one for viewing the category (User A) and one for editing the category (User B). All three roles have these settings in common:
In the Workspace assignment, assign the workspace Shop GER.
In the Service assignment, select Intelligence for Shop GER in the Intelligence section. Product access is managed by the roles from Step 2, but access to reports requires access to Mapp Intelligence.
In the Analyses access configuration, set the slider to No. Access to analyses is already managed by the roles from Step 2, so these roles must not grant additional menu access.
In the Report access configuration, select Activate report access for this role.
B) Role for private reports (User A and User B)
Both users should be able to view, create, edit, and delete private reports.
Choose a name for the role, for example Private Reports Edit-Delete.
Assign User A and User B to the role.
Set the Access level to Edit/Delete. Do not assign any categories.
Save the role.
As a result, users with this role can view, create, edit, and delete their own reports. Because no categories are assigned, the reports remain private and are only accessible to the creator and administrators.
C) Role for viewing Online Marketing Reports (User A)
Choose a name for the role, for example Online Marketing Reports-View.
Assign User A to the role.
Set the Access level to View and assign the category Online Marketing Reports.
Save the role.
D) Role for editing Online Marketing Reports (User B)
Choose a name for the role, for example Online Marketing Reports-Edit-Delete.
Assign User B to the role.
Set the Access level to Edit/Delete and assign the category Online Marketing Reports.
Save the role.