This section describes the information which can be sent for different request types. They can be adapted to suit your needs.
Page
Supported methods for page requests
Methods | Description | Where to configure ( Q3 > Configuration > ...) | Where to analyze |
|---|---|---|---|
Creates the page parameter object | - | - | |
searchTerm | Search terms used in internal search. | - | Marketing > Search Phrases > Internal Search Phrases |
categories | Page categories (called "Content Groups" in Mapp) are used to group pages to create website areas. | Categories > Content Groups > New Category | Datatype Text: Navigation > Content groups > [Name of Content group] Datatype Figure: metric |
params | You can use parameters to enrich Mapp Intelligence data with your own website-specific information and/or metrics. | Custom Parameters > Page Parameters > Create new Custom Parameter > Preconfigured > Own Configuration | Datatype Text: Navigation > Page Parameters > [Name of Parameter] Datatype Figure: metric |
Creates the page name | - | Navigation > Pages > Pages |
PageParameters()
/**
* PageParameters() constructor
*
* @return PageParameters()
*/
var pageProperties = PageParameters()searchTerm
/**
* @param s Search terms used in internal search
*
* @return PageParameters()
*/
pageProperties.searchTerm = String s;params
/**
* You can use parameters to enrich Mapp Intelligence data with your own website-specific information and/or metrics.
*
* @param id ID of the parameter
* @param value Value of the parameter
* @return PageParameters()
*/
pageProperties.params = {int id1: String value, int idn: String value};categories
/**
* Page categories (called "Content Groups" in Mapp) are used to group pages to create website areas.
*
* @param id ID of the parameter
* @param value Value of the parameter
* @return PageParameters()
*/
pageProperties.categories = {int1: String value, intn: String value};PageViewEvent()
/**
* PageViewEvent() constructor
*
* @param n Allows to set the page name
* @return PageViewEvent()
*/
var pageViewEvent = PageViewEvent(String n);buttons.add(ElevatedButton(
onPressed: () async {
var pageProperties = PageParameters();
pageProperties.searchTerm = "searchTerm";
pageProperties.categories = {1: 'category 1', 2: 'category 2'};
pageProperties.params = {1: 'parameter 1', 2: 'parameter 2'};
var pageViewEvent = PageViewEvent("custom page name");
pageViewEvent.pageParameters = pageProperties;
PluginMappintelligence.trackPageWithCustomData(pageViewEvent);
},
child: Text('Track Page with custom data'),
style:
ElevatedButton.styleFrom(primary: Theme.of(context).primaryColorDark),
)
);
return buttons;Event
Any action of a user can be tracked as an event in Mapp Intelligence. A typical event is clicking on a button or link within the app. Measured actions are listed in the tool under "Navigation > Events".
Parameters
You can use parameters to enrich analytical data with your own website-specific information and/or metrics. Observe the syntax guidelines when defining parameters. Event parameters must be set up in the configuration (" Configuration > Custom Parameters > Event Parameter") before they can be entered. The ID and data type (text/number) are defined for each parameter during setup, among other things.
Supported methods for page requests
Methods | Description | Where to configure ( Q3 > Configuration > ...) | Where to analyze |
|---|---|---|---|
Creates the event parameter object | - | - | |
parameters | You can use parameters to enrich analytical data with your own website-specific information and/or metrics. Observe the syntax guidelines when defining parameters. | Custom Parameters > Event Parameter > Create new Custom Parameter > Preconfigured > Own Configuration | Navigation > Event Parameters > [Name of Parameter] |
Creates the action event and sets the name/unique identification of the event. | - | Navigation > Events |
EventParameters()
/**
* EventParameters() constructor
*
* @return EventParameters()
*/
var eventParameters = EventParameters();parameters
/**
* You can use parameters to enrich analytical data with your own app-specific information and/or metrics.
* Observe the syntax guidelines when defining parameters.
*
* @param id ID of the parameter
* @param value Value of the parameter
*
* @return MappIntelligenceAction
*/
eventParameters.parameters = {int id1: String value, int idn: String value};ActionEvent()
/**
* ActionEvent() constructor
*
* @param n Allows to set the action name / unique identifier
* @return ActionEvent()
*/
var event = ActionEvent(String n);buttons.add(ElevatedButton(
onPressed: () async {
var eventParameters = EventParameters();
eventParameters.parameters = {1: "parameter 1"};
var event = ActionEvent("action event name");
event.eventParameters = eventParameters;
PluginMappintelligence.trackAction(event);
},
child: Text('Track Action'),
style:
ElevatedButton.styleFrom(primary: Theme.of(context).primaryColorDark),
)
);Campaign
Campaign tracking is configured in Mapp Q3 (" Configuration > Marketing Configuration"). Without this configuration, no campaign information such as campaign clicks will be collected. Visits to certain pages or the entry of defined links can be tracked as campaign clicks. Most importantly, campaign tracking uses specific parameters – so-called media codes - that are added to the target URLs of the ads. Using a media code improves the accuracy of the data collected with the library. Media codes can also be overwritten or supplemented with additional information using campaign parameters. Campaign can either be run within the app (e.g. via inApp messages) or via deep links from external sources to the app.
ID
You have the option of setting your own campaign ID in the library. A campaign ID consists of a media code name and its value, separated by "%3D".
MediaCode
If you use media codes as a data source for your campaign tracking, entering the name of the media code parameter can increase tracking accuracy. Without this information, up to 10% of the tracked data can, for example, be impaired if certain firewalls are used. Example: You have created a campaign called "ABC" in the Webtrekk tool and measure it using the media code process (data source settings e.g. "URL parameter: mc" and "Value: campaign.abc"). The URL for this campaign must be as follows: http://www.website.com/index.htm?mc=campaign.abc . The campaign will then be identified by the URL parameter "mc". The value of the URL parameter ("campaign.abc") plays no role in pixel configuration. To raise the accuracy of the media code process, enter the URL parameter used for campaign identification, e.g. "mc", in the pixel's configuration segment. This configuration needs only to be made for pages to which the campaign refers (target page/landing page).
OncePerSession
If you only want to track each campaign once within a specific session, you can force this by using this parameter. This means that the campaign will only be tracked once within a session, no matter how often a user clicks it.
action
By default, the campaign is only tracked if the user clicks it. You can change this and also track users who viewed the campaign.
Parameter
Campaign parameters can either be entered directly in the page configuration or in the campaign configuration with a target URL along with the media code. If the same parameters are used for both the URL and the page configuration, the latter takes precedence and overwrites the URL parameter. A typical example of transmitting a campaign parameter by URL is a link position in a newsletter. If the newsletter contains several links, this identifies which link was used.
http://www.website.com?wt_mc=Newsletter_2010_08&wt_cc1=link1 |
Supported methods for page requests
Methods | Description | Where to configure ( Q3 > Configuration > ...) | Where to analyze |
|---|---|---|---|
Creates the campaign object and sets the campaign ID. A campaign ID consists of a media code name and its value, separated by "%3D". | - | Marketing > Campaign > Advertising Media | |
mediaCode | You can use parameters to enrich analytical data with your own website-specific information and/or metrics. Observe the syntax guidelines when defining parameters. | Marketing Configuration > General Settings > Standard value for URL Parameter | - |
oncePerSession | Ensueres campaign is only tracked once within a session | - | Navigation > Events |
action | Overwrites the default campaign tracking action (click) | - | - |
customParameters | Campaign parameters always refer to an advertising medium. | Custom Parameters > Campaign Parameters > Create new Custom Parameter > Preconfigured > Own Configuration | - |
CampaignParameters();
/**
* CampaignParameters() constructor
*
* @param n unique identification of the campaign
* @return CampaignParameters
*/
var campaignProperties = CampaignParameters(String n);mediaCode
/**
* You can change the media code used to detect your campaigns
*
* @param n mediaCode used to detect your campaigns
* @return CampaignParameters
*/
campaignProperties.mediaCode = String n;oncePerSession
/**
* You can ensure campaigns are only tracked once per session
*
* @param n identifies if campaign can only be tracked once within the session
* @return CampaignParameters
*/
campaignProperties.oncePerSession = boolean n;action
/**
* You can change the default campaign tracking count from click to view
*
* @param n specifies what counts as a campaign action (view or clicked(default))
* @return CampaignParameters
*/
campaignProperties.action = CampaignAction.enum n;customParameters
/**
* You can use parameters to enrich analytical data with your own campaign-specific information and/or metrics.
* Observe the syntax guidelines when defining parameters.
*
* @param id ID of the parameter
* @param value Value of the parameter
*
* @return CampaignParameters
*/
campaignProperties.customParameters = {int id1: String value, int idn: String value};//run campaign in the app. Please note that you need to use the campaign format used by Mapp Intelligence.
buttons.add(ElevatedButton(
onPressed: () async {
var campaignProperties = CampaignParameters("inApp.push.nov2020.thursday");
campaignProperties.mediaCode = "abc";
campaignProperties.oncePerSession = true;
campaignProperties.action = CampaignAction.view;
campaignProperties.customParameters = {12: "camParam1"};
var event = PageViewEvent("TestCampaign");
event.campaignParameters = campaignProperties;
PluginMappintelligence.trackPageWithCustomData(event);
},
child: Text('Test Campaign'),
style:
ElevatedButton.styleFrom(primary: Theme.of(context).primaryColorDark),
)
);
Customer
To improve customer identification, you can use customer IDs instead of Mapp Intelligence's long-term cookies ("eid") as an additional identifier of the user. The customer ID can also be used for cross-device tracking, when it is identical to the one used on other devices.
Customer IDs can be passed to the library following a successful login or completed order, for example.
ID
A customer ID can be a unique identifier from your shop or CMS system, or the customer's e-mail address. If the latter, you need to encrypt the e-mail address and ensure the e-mail address is unreadable (e.g. using the MD5 or SHA256 hash) to comply with data protection requirements.
Category
Categories can be used for additional information of the customer. Categories have to be activated and set up in the configuration (" Configuration > Categorisation > URM Categories") before they can be collected. When configuring the pixel, you must use the ID as set up in the account configuration as a number and the respective value as a string.
Recommendation
Transmit hashed personal data should not be evaluated in terms of content (e.g. with the SHA256 hash). If you would like to collect this data for analytical reasons, we suggest that you transmit the data in encrypted form.
Supported methods for page requests
Methods | Description | Where to configure ( Q3 > Configuration > ...) | Where to analyze |
|---|---|---|---|
Creates the page parameter object | - | - | |
customerId | Use this to transmit an unique identifier of the user. | - | Visitors > URM - User Relationship Management > URM - Custom Visitor Id |
emailAddress | Use this to transmit the e-mail address of the user. | - | Visitors > URM - User Relationship Management > URM - [Name of Categories] |
emailReceiverId | Use this to transmit the e-mail receiver ID of the user. | - | Visitors > URM - User Relationship Management > URM - [Name of Categories] |
newsletterSubscribed | Use this to transmit the e-mail opt-in status of the user. | - | Visitors > URM - User Relationship Management > URM - [Name of Categories] |
firstName | Use this to transmit the first name of the user. | - | Visitors > URM - User Relationship Management > URM - [Name of Categories] |
lastName | Use this to transmit the last name of the user. | - | Visitors > URM - User Relationship Management > URM - [Name of Categories] |
phoneNumber | Use this to transmit the telephone number of the user. | - | Visitors > URM - User Relationship Management > URM - [Name of Categories] |
gender | Use this to transmit the gender of the user (1 = male | 2 = female). | - | Visitors > URM - User Relationship Management > URM - [Name of Categories] |
birthday | Use this to transmit the user's date of birth (YYYYMMDD). | - | Marketing > Search Phrases > Internal Search Phrases |
country | Use this to transmit the country of the user. | - | Datatype Text: Navigation > Page Parameters > [Name of Parameter] Datatype Figure: metric |
city | Use this to transmit the city of the user. | - | Datatype Text: Navigation > Content groups > [Name of Content group] Datatype Figure: metric |
zipCode | Use this to transmit the zip code of the user. | - | Visitors > URM - User Relationship Management > URM - [Name of Categories] |
street | Use this to transmit the street of the user. | - | Visitors > URM - User Relationship Management > URM - [Name of Categories] |
streetNumber | Use this to transmit the street number of the user. | - | Visitors > URM - User Relationship Management > URM - [Name of Categories] |
customCategories | The optional category (User Relation Management) can be used to categorise a customer. URM categories must be created in the tool first of all. | Categories > URM Categories > New Category | Datatype Text: Visitors > URM Categories > [Name of Categories] Datatype Figure: metric |
UserCategories()
/**
* UserCategories() constructor
*
* @return UserCategories()
*/
var userCategorises = UserCategories();customerId
/**
* @param i Use this to transmit an unique identifier of the user
*
* @return this
*/
userCategorises.customerId = String c;emailAddress
/**
* @param e Use this to transmit the e-mail address of the user
*
* @return this
*/
userCategorises.emailAddress = String e;emailReceiverId
/**
* @param eRID Use this to transmit the e-mail receiver ID of the user
*
* @return this
*/
userCategorises.emailReceiverId = String eRID;newsletterSubscribed
/**
* @boolean nSub Use this to transmit the e-mail opt-in status of the user
*
* @return this
*/
userCategorises.newsletterSubscribed = boolean nSub;firstName
/**
* @param fName Use this to transmit the first name of the user
*
* @return this
*/
userCategorises.firstName = String fName;lastName
/**
* @param lName Use this to transmit the last name of the user
* @return this
*/
userCategorises.lastName = String lName;phoneNumber
/**
* @param p Use this to transmit the telephone number of the user
*
* @return this
*/
userCategorises.phoneNumber = String p;gender
/**
* @enum g Use this to transmit the gender of the user (male | female | unknown)
*
* @return this
*/
userCategorises.gender = Gender.g;birthday
/**
* @Object Birthday Use this to transmit the user's date of birth
*
* @return this
*/
userCategorises.birthday = Birthday(int day, int month, int year);country
/**
* @param c Use this to transmit the country of the user
*
* @return this
*/
userCategorises.country = String c;city
/**
* @param c Use this to transmit the city of the user
*
* @return this
*/
userCategorises.city = String c;zipCode
/**
* @param zCode Use this to transmit the postal code of the user
*
* @return this
*/
userCategorises.zipCode = String zCode;street
/**
* @param s Use this to transmit the street of the user
*
* @return this
*/
userCategorises.street = String s;streetNumber
/**
* @param sNumber Use this to transmit the street number of the user
*
* @return this
*/
userCategorises.streetNumber = String sNumber;customCategories
/**
* The optional category (User Relation Management) can be used to categorise a customer. URM categories must be
* created in the account before using them.
*
* @param i ID of the parameter
* @param value Value of the parameter
*
* @return this
*/
userCategorises.customCategories = {int id1: String value, int idn: String value};buttons.add(ElevatedButton(
onPressed: () async {
var userCategorises = UserCategories();
userCategorises.birthday = Birthday(7, 12, 1991);
userCategorises.city = "city name";
userCategorises.country = "country name";
userCategorises.customerId = "e.g. hashed email address";
userCategorises.emailAddress = "email address";
userCategorises.emailReceiverId = "8743798";
userCategorises.firstName = "first name";
userCategorises.gender = Gender.male;
userCategorises.lastName = "last name";
userCategorises.newsletterSubscribed = true;
userCategorises.phoneNumber = "83203298320923";
userCategorises.street = "street name";
userCategorises.streetNumber = "street number";
userCategorises.customCategories = {1: 'category 1', 2: 'category 2'};
userCategorises.zipCode = "zip code";
var pageViewEvent = PageViewEvent("your page name");
pageViewEvent.userCategories = userCategorises;
PluginMappintelligence.trackPageWithCustomData(pageViewEvent);
},
child: Text('Track Page with custom data'),
style:
ElevatedButton.styleFrom(primary: Theme.of(context).primaryColorDark),
)
);
return buttons;Product
In Mapp Intelligence you can analyze the following states of your products:
viewed:
item is viewed on a product detail page
addedToBasket:
item is added to a shopping cartdeletedFromBasket:
item is deleted from the basket/shopping cartpurchased:
item is bought
addedToWishlist:
item is added to a wishlistdeletedFromWishlist:
item is deleted from a wishlistcheckout:
item is in the checkout process
Aggregated evaluations are possible across product categories. Mapp Intelligence automatically detects abandoned shopping carts from the information transmitted. Comprehensive information must be provided on the underlying order for product purchases, e.g. a unique order number. A list of tracked products appears in Mapp Intelligence under "E-Commerce > Products".
Parameter
Product details can be enriched by adding information via parameters. Each parameter must be configured in your account before being able to track it (Configuration > Custom Parameters > ECommerce Parameter). When configuring the pixel, you need to use the ID as set up in the account configuration as a number and the respective value as a string. E-Commerce parameters are used to transmit additional product information (e.g. size, color). E-Commerce parameters of the type "Text" are shown in Mapp Intelligence under "E-Commerce > ECommerce- Parameters". E-Commerce parameters of the type "Number" are available as a metric in the analysis.
Category
The relationship between product and product category must be unique. It is not possible to assign the product "Shoes" to the category "Ladies" and "Sales" at the same time. These non-unique relationships can be mapped using e-commerce parameters. Product categories of the data type "number" can be used to evaluate every product call with the value stored for it.
Product categories must be configured in the Q3 for Mapp Intelligence to measure this information. This is done under "Configuration > Categorization > Product Categories". When configuring the library, you need to use the ID as set up in the account configuration as a number and the respective value as a string. Please note that a product category cannot contain more than 110 characters.
A list of measured product categories of the data type "text" is displayed in analytics at "E-Commerce > Product Categories". Product categories of the data type "Number" are available as a metric in the analyses.
Product categories are only assigned to a product once. If a product is tracked together with a category, all other products will also be assigned to that category.
Supported methods for product / eCommerce requests
Methods | Description | Where to configure ( Q3 > Configuration > ...) | Where to analyze |
|---|---|---|---|
product constructor | Creates the product object. | - | - |
name | Saves products placed in the shopping cart. This property must be entered if products are to be measured. A product ID may not contain more than 110 characters. | - | E-Commerce > Products |
cost | Contains the product price ("0" prices are allowed). If you transmit a product several times (quantity property greater than 1), use the total price, not the unit price. | - | Metric: [Name of Parameter] |
productSoldOut | Use this to transmit the product is sold out or in stock (sold out = true, in stock = false) | Custom Parameters > ECommerce Parameter > Create new Custom Parameter > Preconfigured > Product sold out | Metric: [Name of Parameter] |
quantity | Contains the product quantity. | - | Metric: [Name of Parameter] |
categories | Product categories allow the grouping of products. | ECommerce > Product Categories > New Category | Datatype Text: E-Commerce > Product Categories > [Name of Parameter] Datatype Figure: metric |
ecommerceParameters | E-Commerce parameters can be used to add additional information to your products. | Custom Parameters > ECommerce Parameter > Create new Custom Parameter | Datatype Text: E-Commerce > Product Categories > [Name of Parameter] Datatype Figure: metric |
e-commerce constructor | Creates the e-commerce object containing the product object information. | - | - |
products | Contains an array of products in the e-commerce Object. | ||
status | Contains states of your product ( Status.viewed, Status.addedToBasket, Status.purchased). | - | - |
customParameters | You can use parameters to enrich analytical data with your own website-specific information and/or metrics. | Custom Parameters > ECommerce Parameter > Create new Custom Parameter > Preconfigured > Own Configuration | Datatype Text: E-Commerce > Product Parameters > [Name of Parameter] Datatype Figure: metric |
product constructor
var product = Product();name
/**
* @param i Saves products placed in the shopping cart. This property must be entered if products are to be
* measured. A product ID may not contain more than 110 characters
*
* @return Product()
*/
product.name = String i;cost
/**
* @param c Contains the product price ("0" prices are allowed). If you transmit a product several times
* (quantity property greater than 1), use the total price not the unit price
*
* @return Product()
*/
product.cost = double c;quantity
/**
* @param q Contains the product quantity
*
* @return Product()
*/
product.quantity = int q;categories
/**
* Product categories allow the grouping of products.
*
* @param i ID of the parameter
* @param v Value of the parameter
*
* @return MappIntelligenceProduct
*/
product.categories = {int id1: String Value, int idn: String Value};productSoldOut
/**
* @param sOut Use this to transmit the product is sold out or in stock (sold out = 1, in stock = 0)
*
* @return Product()
*/
product.productSoldOut = bool sOut;productAdvertiseID
/**
* @param ai Use this to transmit the variant of the product
*
* @return Product()
*/
product.productVariant = double ai;e-commerce constructor
/**
* @return EcommerceParameters()
*/
var ecommerceParameters = EcommerceParameters();products
/**
* @param p Contains list of products
*
* @return EcommerceParameters()
*/
ecommerceParameters.products = Array p;status
/**
* @param s Contains states of your product (viewed, addedToBasket, purchased)
*
* @return EcommerceParameters()
*/
ecommerceParameters.status = Status.enum s;customParameters
/**
* You can use parameters to enrich analytical data with your own website-specific information and/or metrics.
*
* @param i ID of the parameter
* @param v Value of the parameter
*
* @return EcommerceParameters()
*/
ecommerceParameters1.customParameters = {int id1: String value, int idn: String value};buttons.add(ElevatedButton(
onPressed: () async {
var product = Product();
product.name = "product id";
product.cost = 33.2;
product.quantity = 10;
product.productSoldOut = 1;
product.productAdvertiseID = 99099;
product.categories = {1: "category 1"};
product.ecommerceParameters = {1: "ecommerce parameter 1"};
var ecommerceProperties = EcommerceParameters();
ecommerceProperties.products = [product];
ecommerceProperties.status = Status.viewed;
var pageViewEvent = PageViewEvent("page request with product information");
pageViewEvent.ecommerceParameters = ecommerceProperties;
PluginMappintelligence.trackPageWithCustomData(pageViewEvent);
},
child: Text('Track Page with custom data'),
style:
ElevatedButton.styleFrom(primary: Theme.of(context).primaryColorDark),
));
return buttons;
}Order
Mapp Intelligence can also track orders. To do this, the order value is transmitted along with the order number. "0" values are permitted. A list of tracked orders can be analyzed in Mapp Intelligence under "E-Commerce > Orders separately". The difference to product tracking is that the information refers to the total order value that is transmitted rather than the individual products. Besides the total of purchased products, the total order value may also contain discounts, shipping, and packaging cost information.
Currency
Contains the currency code of a product or order; the value must be passed to the Webtrekk pixel in line with the ISO standard.
The currency is only passed for the purpose of currency conversion. In other words, the currency will be converted to the currency as specified in your Mapp Q3 account configuration ( "Configuration > System configuration: Data Collection").
Parameter
E-Commerce parameters must be set up in the configuration (" Configuration > Custom Parameters > E-Commerce Parameter") before they can be entered. In this setup, the ID (relevant for tracking) and a data type (text/number) are defined for each parameter. When configuring the tracking in the pixel, you need to include the ID as a number and the respective value as a string.
Parameters can also be used to transmit information about an order, e.g. payment or shipping type. In these cases, order tracking must be used. It is enough to transmit this property once per order. It applies equally to all products in the shopping cart. The reference (product or order) is selected when configuring the Smart Pixel. If "individual value" is selected, the parameter refers to the order. If "multiple values" have been selected, the parameter can refer to the product or the order.
Supported methods for product / eCommerce requests
Methods | Description | Where to configure ( Q3 > Configuration > ...) | Where to analyze |
|---|---|---|---|
e-commerce constructor | Creates the e-commerce object containing the product object information. | - | - |
products | Containes the array of products in the ecommerce parameter object. See section "Product" above | - | - |
status | Contains states of your product ( Status.viewed, Status.addedToBasket, Status.purchased). Set this to purchased when tracking an order. | - | - |
orderValue | Saves the total order value. This property must be entered if total order values are to be tracked. | - | E-Commerce > Orders separately |
orderID | Contains a unique order number (order ID). Use of this setting ensures that no orders are counted twice. | - | E-Commerce > Orders separately |
currency | The currency of an order. | - | - |
couponValue | Contains the value of a coupon. | Custom Parameters > ECommerce Parameter > Create new Custom Parameter > Preconfigured > Coupon value | Datatype Text: E-Commerce > Product Parameters > [Name of Parameter] |
paymentMethod | Use this to transmit the payment method of the order. | Custom Parameters > ECommerce Parameter > Create new Custom Parameter > Preconfigured > Payment method | Datatype Text: E-Commerce > Product Parameters > [Name of Parameter] |
shippingServiceProvider | Use this to transmit the shipping service of the order. | Custom Parameters > ECommerce Parameter > Create new Custom Parameter > Preconfigured > Shipping service | Datatype Text: E-Commerce > Product Parameters > [Name of Parameter] |
shippingSpeed | Use this to transmit the shipping speed of the order. | Custom Parameters > ECommerce Parameter > Create new Custom Parameter > Preconfigured > Shipping speed | Datatype Text: E-Commerce > Product Parameters > [Name of Parameter] |
shippingCost | Use this to transmit the shipping costs of the order. | Custom Parameters > ECommerce Parameter > Create new Custom Parameter > Preconfigured > Shipping costs | Datatype Text: E-Commerce > Product Parameters > [Name of Parameter] |
markUp | Use this to transmit the margin/mark-up of the order. | Custom Parameters > ECommerce Parameter > Create new Custom Parameter > Preconfigured > Gross margin | Datatype Text: E-Commerce > Product Parameters > [Name of Parameter] |
orderStatus | Use this to transmit the order status of the order. | Custom Parameters > ECommerce Parameter > Create new Custom Parameter > Preconfigured > Order status | Datatype Text: E-Commerce > Product Parameters > [Name of Parameter] |
customParameters | You can use parameters to enrich analytical data with your own website-specific information and/or metrics. | Custom Parameters > ECommerce Parameter > Create new Custom Parameter > Preconfigured > Own Configuration | Datatype Text: E-Commerce > Product Parameters > [Name of Parameter] Datatype Figure: metric |
e-commerce constructor
/**
* @return EcommerceParameters()
*/
var ecommerceParameters = EcommerceParameters();products
/**
* @param p Contains list of products
*
* @return EcommerceParameters()
*/
ecommerceParameters.products = Array p;status
/**
* @param s Contains states of your product (viewed, addedToBasket, purchased). Set to purchased in orders.
*
* @return EcommerceParameters()
*/
ecommerceParameters.status = Status.enum s;orderValue
/**
* @param v Saves the total order value. This property must be entered if total order values are to be tracked
*
* @return EcommerceParameters()
*/
ecommerceParameters.orderValue = double v;orderID
/**
* @param i Contains a unique order number (order ID). Use of this setting ensures that no orders are counted twice
*
* @return EcommerceParameters()
*/
ecommerceParameters.orderID = String i;currency
/**
* @param c The currency of an order
*
* @return EcommerceParameters()
*/
ecommerceParameters.currency = String c;couponValue
/**
* @param cValue Contains the value of a coupon
*
* @return EcommerceParameters()
*/
ecommerceParameters.couponValue = double cValue;paymentMethod
/**
* @param pMethod Use this to transmit the payment method of the order
*
* @return EcommerceParameters()
*/
ecommerceParameters.paymentMethod = String pMethod;shippingServiceProvider
/**
* @param sService Use this to transmit the shipping service of the order
*
* @return EcommerceParameters()
*/
ecommerceParameters.shippingServiceProvider = String sService;shippingSpeed
/**
* @param sSpeed Use this to transmit the shipping speed of the order
*
* @return EcommerceParameters()
*/
ecommerceParameters.shippingSpeed = String sSpeed;shippingCost
/**
* @param sCosts Use this to transmit the shipping costs of the order
*
* @return EcommerceParameters()
*/
ecommerceParameters.shippingCost = double sCosts;markUp
/**
* @param gMarkUp Use this to transmit the margin/mark-up of the order
*
* @return EcommerceParameters()
*/
ecommerceParameters.markUp = double gMarkUp;orderStatus
/**
* @param oStatus Use this to transmit the order status of the order
*
* @return EcommerceParameters()
*/
ecommerceParameters.orderStatus = String oStatus;customParameters
/**
* You can use parameters to enrich analytical data with your own website-specific information and/or metrics.
*
* @param i ID of the parameter
* @param v Value of the parameter
*
* @return EcommerceParameters()
*/
ecommerceParameters1.customParameters = {int id1: String value, int idn: String value};buttons.add(ElevatedButton(
onPressed: () async {
var ecommerceProperties = EcommerceParameters();
ecommerceProperties.products = [product];
ecommerceProperties.status = Status.purchased;
ecommerceProperties.orderValue = 24.95;
ecommerceProperties.orderID = "ABC123";
ecommerceProperties.currency = "EUR";
ecommerceProperties.couponValue = 10;
ecommerceProperties.paymentMethod = "paypal";
ecommerceProperties.shippingServiceProvider = "dhl";
ecommerceProperties.shippingSpeed = "express";
ecommerceProperties.shippingCost = 3.95;
ecommerceProperties.orderStatus = "payed";
ecommerceProperties.markUp = 6.95;
ecommerceProperties.customParameters = {1: 'parameter 1'};
var pageEvent = PageViewEvent("track order");
pageEvent.ecommerceParameters = ecommerceProperties;
PluginMappintelligence.trackPageWithCustomData(pageEvent);
},
child: Text('Confirmation'),
style:
ElevatedButton.styleFrom(primary: Theme.of(context).primaryColorDark),
));
return buttons;
}Goal
Website goals help to track the success of your website. You can easily analyze and filter the individual goals in Mapp Intelligence. Furthermore, the calculation of the customer journey is based on website goals, meaning that you can track the individual campaigns responsible for the goal achievement. Website goals have to be configured. When configuring the tracking in the library, you need to include the ID as a number and the respective value as a string. The website goal "Order" is predefined in Mapp and cannot be tracked within the page object. As soon as a parameter is tracked (no matter which value is submitted), the goal is set as achieved. Therefor it does not make sense to submit the value "no" for the goal "Newsletter Registration" if a user has not registered for the newsletter. Setting the value to "no" would instead mark the goal as achieved.
You can track goals via action and page requests.
Supported methods for page requests
Methods | Description | Where to configure ( Q3 > Configuration > ...) | Where to analyze |
|---|---|---|---|
Creates the ecommerce parameter object necessary to transmit the goal | - | - | |
customParameters | Session parameters always refer to a complete session (visit). If the value for the parameter is transmitted during a visit several times, only the first or last value is evaluated, based on the configuration of the Webtrekk GUI. | Custom Parameters > Session Parameters > Create new Custom Parameter > Preconfigured > Own Configuration | Datatype Text: Navigation > Page Parameters > [Name of Parameter] Datatype Figure: metric |
EcommerceParameters()
var ecommerceGoal = EcommerceParameters();customParameters
/**
* When using website goals, all central goals are quickly available for analyzing and filtering. Website goals needs to be marked accordingly in your account under ecommerce parameters.
*
* @param id ID of the parameter
* @param value Value of the parameter
* @return MappIntelligencePage
*/
ecommerceGoal.customParameters = {int id: String Value};buttons.add(ElevatedButton(
onPressed: () async {
var ecommerceGoal = EcommerceParameters();
ecommerceGoal.customParameters = {1: 'parameter 1'};
var pageViewEvent = PageViewEvent("page request with ecommerce goal");
pageViewEvent.ecommerceParameters = ecommerceGoal;
PluginMappintelligence.trackPageWithCustomData(pageViewEvent);
},
child: Text('Track Page with custom data'),
style:
ElevatedButton.styleFrom(primary: Theme.of(context).primaryColorDark),
)
);
return buttons;Session
Session parameters always refer to a complete session (visit). In case of transmitting a parameter multiple times during a visit, the system only evaluates the first or last value of the parameter during the visit (based on the configuration in your account). An example for the utilization of a session parameter would be the login status of the user. By default, each visit would be indicated as "not logged-in" at the beginning. The successful login is passed to the same parameter and overwrites the first value.
A session parameter cannot be used to add an information to a specific webpage, but only to the complete visit. Please use page parameters if you want to analyze information of a specific page of your website or evaluate multiple values of a parameter in the same visit.
If you want to start your visit with an action request, contact your account manager and ensure that your account allows session starts with an action request.
Supported methods for session requests
Methods | Description | Where to configure ( Q3 > Configuration > ...) | Where to analyze |
|---|---|---|---|
Creates the session parameter object | - | - | |
parameters | Session parameters always refer to a complete session (visit). If the value for the parameter is transmitted during a visit several times, only the first or last value is evaluated, based on the configuration of the Webtrekk GUI. | Custom Parameters > Session Parameters > Create new Custom Parameter > Preconfigured > Own Configuration | Datatype Text: Navigation > Page Parameters > [Name of Parameter] Datatype Figure: metric |
SessionParameters()
var sessionParameters = SessionParameters();parameters
/**
* Session parameters always refer to a complete session (visit). If the value for the parameter is transmitted
* during a visit several times, only the first or last value is evaluated, based on the configuration of the
* Webtrekk GUI
*
* @param i ID of the parameter
* @param v Value of the parameter
*
* @return MappIntelligenceSession
*/
sessionPropertis.parameters = {int id1: String Value, int idn: String Value};buttons.add(ElevatedButton(
onPressed: () async {
var sessionParameters = SessionParameters();
sessionParameters.parameters = {1: 'parameter 1'};
var pageViewEvent = PageViewEvent("page request with session parameters");
pageViewEvent.sessionParameters = sessionParameters;
PluginMappintelligence.trackPageWithCustomData(pageViewEvent);
},
child: Text('Track Page with custom data'),
style:
ElevatedButton.styleFrom(primary: Theme.of(context).primaryColorDark),
)
);
return buttons;Pre-Defined Session Parameter
The prerequisite for tracking the default values (App version, App update, and App first open) is that you first create the necessary session parameters in Mapp Q3. Using pre-defined parameters, you do not need to create the parameters in your mobile application, but just need to activate them in Mapp Q3 instead. This section describes how to create the appropriate parameters.
The following parameters are pre-defined in the SDK:
Parameter | Parameter ID | Description | Data Type | Amount Parameter Values | Calculation |
|---|---|---|---|---|---|
App updated | 815 | When the end-user updates the app to a new version, it is tracked via this predefined session parameter. | Figure | Single value | Last value wins. This means only the last v alue of the transmitted parameter is counted per session. |
App version | 804 | This parameter analyzes whether users are utilizing the latest version of your app. | Text | Single value | Last value wins. This means only the last value of the transmitted parameter is counted per session. |
App first open | 821 | This parameter is tracked when the user opens the app for the first time after installing the mobile application from the Web or App Store. | Text | Single value | First value wins. This means only the first value of the transmitted parameter is counted per session. |
To configure the session parameter, proceed as follows:
Log in to your Mapp Q3 account/
Go to Configuration > Custom Parameters > Session parameters
Then click Create a new custom parameter. The specification dialog for the session parameter opens.
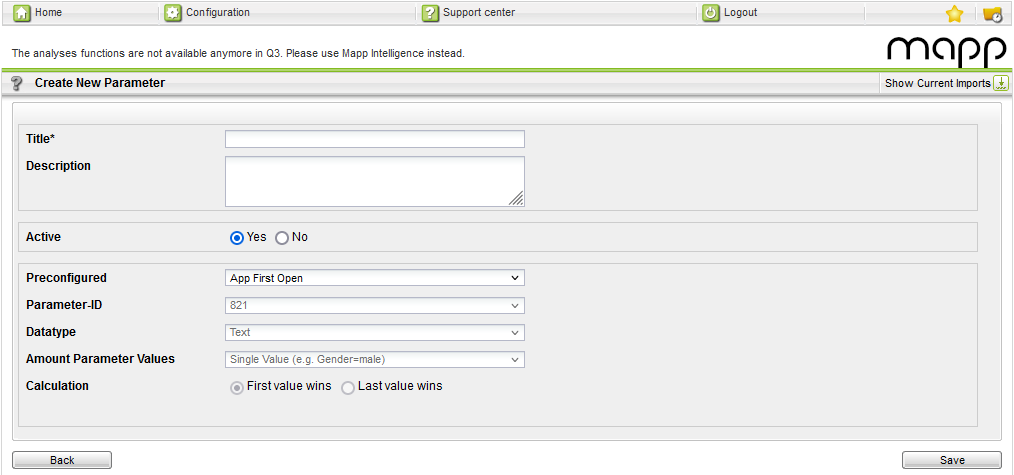
Make the following configuration:
Parameter
Description
Title
Mandatory. Enter the name of the session parameter.
Description
Optional. Enter a description for the session parameter.
Active
Select via the radio button whether the session parameter is active or inactive. When disabled, no data is collected.
Preconfigured
Under "Preconfigured," select one of the following parameters:
App updated
App version
App first open
Pre set settings apply automatically.
Parameter ID
The ID is set automatically by the system.
Click Save to save your settings.
Media
You can use our media tracking API to track user behavior on your media files.
Supported methods for media requests
Methods | Description | Where to configure ( Q3 > Configuration > ...) | Where to analyze |
|---|---|---|---|
Core object for Media Tracking | |||
Creates the media object and unique media identifier. | - | Navigation > Media > Media | |
action | The following actions are possible:
| Navigation > Media > Media Player Actions | |
position | Marks the current position of the video when sending the request. | - | Navigation > Media > Media Run Time |
duration | Specifies the total length of the video. | - | - |
customCategories | You can assign additional information to the media. | Categories > Media Categories > New Category | Datatype Text: Navigation > Media Categories > [Name of media category] Datatype Figure: metric |
soundVolume | Volume, number 0-255, 0 is minimal, 255 is maximal | - | Navigation > Media > Media Player Volume |
soundIsMuted | (1=mute active, volume off, 0=mute not active, volume on) | - | Navigation > Media > Media Player Mute |
bandwidth | Bandwidth bits/seconds | - | Navigation > Media > Media Bandwidth |
MediaParameters()
/**
* @param name
*
* @constructor
*/
var mediaProperties = MediaParameters(String name);action
/**
* @param action
*
* @constructor
*/
mediaProperties.action = String action;position
/**
* @param number
*/
mediaProperties.position = int number;duration
/**
* @param total playtime
*/
mediaProperties.duration = int total;customCategories
/**
* You can use parameters to enrich analytical data with your own media-specific information and/or metrics.
*
* @param i ID of the parameter
* @param v Value of the parameter
*
* @return
*/
mediaProperties.customCategories = {int id1: String value, int idn: String value};soundVolume
/**
* @param {number value between 0 and 255} soundVolume
*/
mediaProperties.soundVolume = int soundVolume ;
soundIsMuted
/**
* @param {number} soundIsMuted
*/
mediaProperties.soundIsMuted = bool soundIsMuted;bandwidth
/**
* @param {number} bandwidth
*/
mediaProperties.bandwith = int bandwith;
List<Widget> _buildButtons(BuildContext context) {
List<Widget> buttons = [];
buttons.add(ElevatedButton(
onPressed: () {
var mediaProperties = MediaParameters("TestVideo");
mediaProperties.action = "view";
mediaProperties.position = 12;
mediaProperties.duration = 120;
mediaProperties.customCategories = {20: "mediaCat"};
var mediaEvent = MediaEvent("Test", mediaProperties);
PluginMappintelligence.trackMedia(mediaEvent);
},
child: Text('Test Media1'),
style:
ElevatedButton.styleFrom(primary: Theme.of(context).primaryColorDark),
));
buttons.add(ElevatedButton(
onPressed: () async {},
child: Text('Player Example'),
style:
ElevatedButton.styleFrom(primary: Theme.of(context).primaryColorDark),
));
buttons.add(ElevatedButton(
onPressed: () async {
Navigator.push(
context,
MaterialPageRoute(
builder: (context) => VideoPlayerApp(),
),
);
},
child: Text('Player Example2'),
style:
ElevatedButton.styleFrom(primary: Theme.of(context).primaryColorDark),
));
return buttons;
}