This guide shows you how to integrate Mapp Intelligence with Google Tag Manager (GTM) to enable tracking on your WordPress or WooCommerce website.
In the first three steps, you’ll set up the basic tracking configuration:
Install and configure the Mapp Intelligence Plugin in WordPress
Create variables and triggers in Google Tag Manager
Install the Mapp Intelligence GTM template and map your data
If you’re using WooCommerce, you can continue with an optional fourth step to add e-commerce tracking, including product views, cart events, and order data.
Step 1: Install Mapp Intelligence in WordPress
Log in to your WordPress backend and go to Plugins > Add New.
Search for “Mapp Cloud” and click Install Now.
Once installed, go to Plugins in the left-hand menu. You will now see “Mapp Cloud” listed in your plugin menu.
Click on “Mapp Cloud” to open the configuration page.
In the configuration, select “Google Tag Manager” as the tracking method.
Under “Google Tag Manager Container ID”, you can enter your GTM Container ID.
This is only needed if you want the Mapp Intelligence plugin to insert the GTM code snippet automatically into the <head> of your website.
If you’re already loading the GTM snippet via your theme or another plugin, leave this field empty.
You can find your Container ID (e.g. GTM-XXXXXXX) in the container overview in your GTM account.
If you want to exclude certain keys from the dataLayer, you can do so under “Exclude keys”.
By default, the key customFields is excluded because it may contain personal data from other plugins or themes.
Only remove this key if you’re sure you want to include that data.
Use GTM’s Preview Mode or the browser’s JavaScript console to inspect what’s inside customFields.
You can also exclude WordPress users from tracking.
If this option is activated, logged-in users such as admins, editors, or managers will not be tracked. This does not affect WooCommerce customers — they are tracked as usual.
Once everything is set, click Save Changes.
Step 2: Create variables and triggers in Google Tag Manager
This step covers how to configure the trigger and variables in your Google Tag Manager (GTM) container.
A) Create a trigger
Log in to your GTM account and open your container.
In the left-hand menu, go to Triggers and click New.
Click Trigger Configuration and select Custom Event as the trigger type.
In the field Event name, enter:
mapp.loadName the trigger.

Click Save to finish.
B) Create variables
In the left-hand menu, go to Variables and click New.
Click Variable Configuration and choose Data Layer Variable as the type.
In the field Data Layer Variable Name, enter the key you want to retrieve from the data layer.
For example:
mapp.pageName
You can name the variable itself however you like — but the value for Data Layer Variable Name must exactly match the key in the data layer.
Click Save.
Repeat this process for every value you want to track.
The tables below provide an overview of available keys (see General WordPress data, WooCommerce product tracking, etc.).
Step 3: Configure the Mapp Intelligence GTM template
In this step, you’ll install the Mapp Intelligence Smartpixel tag in GTM and connect it to your previously created trigger and variables.
In your GTM container, go to Tags and click New.
Click Tag Configuration, then select Community Template Gallery.
Search for and select the template “Mapp Intelligence Smartpixel – Tracking Configuration”.
Name the tag — we recommend calling it “Mapp Page Tracking”.

Connect the trigger
Scroll down to Triggering and click “Choose a trigger to make this tag fire…”.
Select the trigger you created earlier, e.g. “mapp.load”.
Map your data
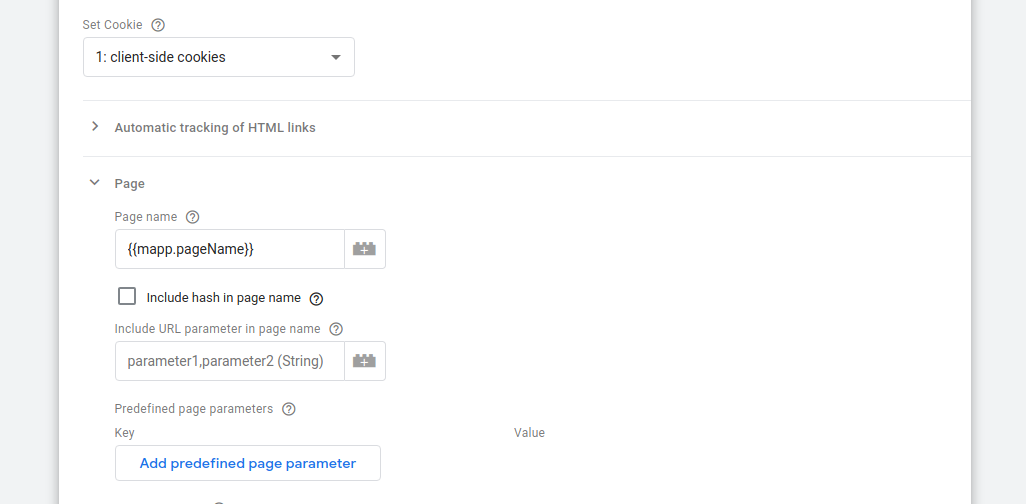
In the template configuration, assign your data layer variables to the appropriate fields.
For example, to track the page name, map your variable mapp.pageName to the Page Name field in the tag.
You only need to map the values you want to track. Additional fields can be added at any time.

Fill in your basic tracking configuration:
Track ID (provided by Mapp)
Track Domain (e.g. track.mydomain.com)
Click Save, then Submit and Publish your GTM container.
Your basic tracking setup is now complete.
Step 4: E-commerce with WooCommerce
After completing the basic setup, you can optionally extend your tracking to include WooCommerce-specific data like product views, cart events, and orders.
You’ll learn how to:
Track product views, cart events, and orders
Understand what’s included by default
Customize tracking using advanced product data
Depending on your use case, you can stop after the basic setup or continue with the optional advanced configuration.
Basic configuration
For basic e-commerce tracking, all you need to map is this:
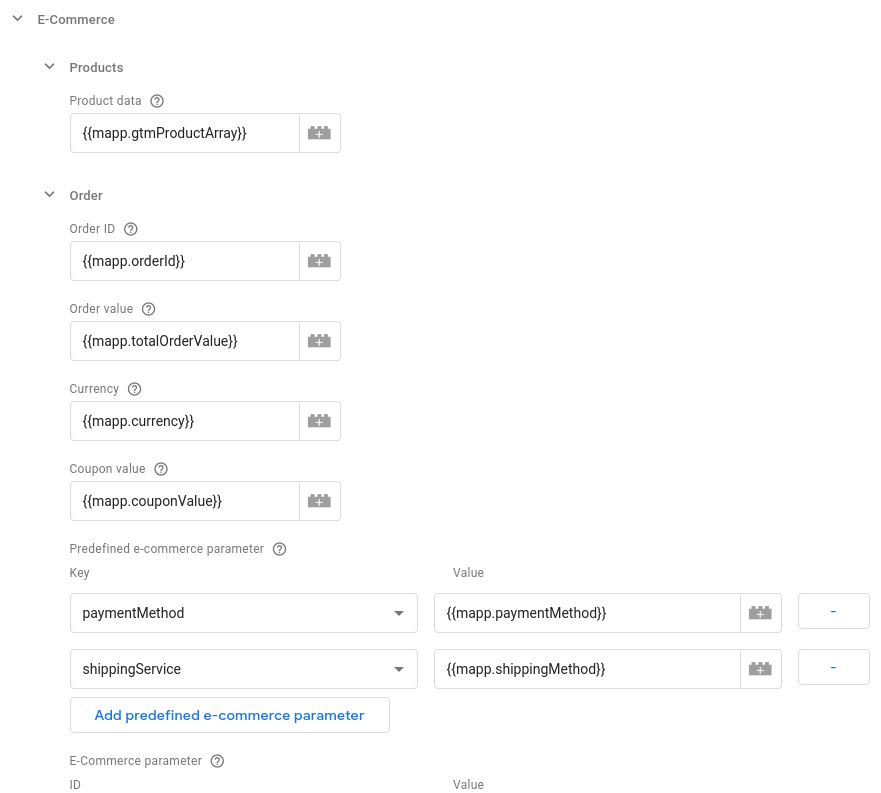
Now you will track orders, product views, and products being added to the basket. The product ID, which is the central identifier for products in your tracking data, will be in this format: "[productID] - [productName]". Additional tracking data is available in gtmProductArray, even if not used in the basic setup.
Here is an overview of what is included in the basic configuration, and what else is available:
property name | tracked via basic configuration | notes | |
|---|---|---|---|
product id | id | yes | Format: [productID] - [productName], example: "18 - T-Shirt". |
product cost | cost | yes | Quantity of product is taken into account, so two $5 products will track a price of $10. |
product quantity | quantity | yes | Amount of products. Unusually 1 when views, but can be more when adding to basket or during order. |
product status | status | yes | "view", "basket" or "confirmation". |
product id only | id_only | no | just the id of the product, without the name |
product name | name | no | just the name of the product, without the id |
product SKU | sku | no | SKU of product |
is product collection | collection | no | Map this to a multi-value e-commerce parameter so you can filter products of type 'group'. A product of type 'group' can never have a full conversion, because only the child items, e.g. the products within that group, can be bought. 1 means it is of type 'group', 0 for everything else. |
product taxonomies and attributes (variable products) | taxonomy_name_N | no | All taxonomy and attribute (→ variable products) values, with N as the number of the value. For example, if you have a product with the categories "Music", "Jazz" and "Acid", you'll have the entries: So the key names depend on your product and shop settings. Find out your values by using the GTM preview mode or have a look at your dataLayer via browser JS-console. In the dataLayer array, look for the entry with the event 'mapp.load', and then under gtmProductArray[0]. |
Advanced product tracking
This section is intended for advanced use cases. You don’t need to configure these parameters unless you require more detailed product tracking or dynamic mapping.
You can further customize the product tracking and use the additional information that is available in "mapp.gtmProductArray".
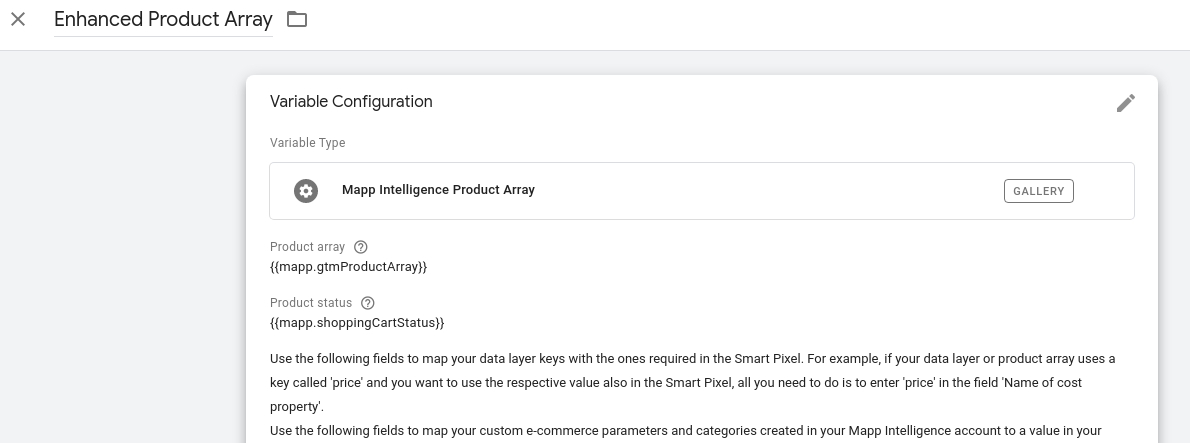
To do that, you first need to create a new variable. Click variables → New → Choose type → Community Template Gallery → Mapp Intelligence Product Array
Add the variable template to your container and open the configuration.
If you then map Product array to mapp.gtmProductArray and Product status to mapp.shoppingCartStatus, and map the new variable, that we call "Enhanced Product Array" here, to the product array entry in the main Mapp Intelligence Template, you are back to the basic setting but you have the option to customize it now.

In your Enhanced Product Array, you can now map the additional values to product categories (static values) and e-commerce parameters (dynamic parameters).
For example, the SKU value is a static value, meaning it is always the same for a product. So it is a perfect value to map to a product category. All you need to do is to add it to the corresponding table. So if you'd want to add the sku as product category 3, you would do it like this: enter the is number in the left column, and the property name (see table above) in the right column:

A typical example for dynamic values are attributed in variable products. Let' map e-commerce parameter 20 to the pa_color_0 taxonomy:

If you now save and publish your settings, the additional data will be tracked if it is available in a product.
Reference: Data Layer Variables Created by the Plugin
General WordPress data
Data Layer Variable Name | notes |
|---|---|
mapp.contentCategory | Values can be page, post, product, etc. |
mapp.contentSubcategory | Values can be: single-page, single-post, category-post, etc. |
mapp.customerId | In case the user is logged in, here is the MD5 hash of the email address. |
mapp.customFields | This key is blacklisted by default. Here you can find data from your plugins and themes, and some of them might contain personal data. That's why this key should only be whitelisted if you really need certain data from your plugins/themes in your data layer. |
mapp.internalSearch | On search result pages only: search term. |
mapp.language | Language code. Since the underlying Smartpixel tracks the language automatically, this is not needed normally. |
mapp.numberSearchResults | On search result pages only: the amount of search result as a string. |
mapp.orderBy | On archive pages only. "default" if no particular order is set. |
mapp.pageName | URL without the http(s) protocol URL parameters |
mapp.pageNumber | On archive pages only. |
mapp.pageTitle | Title of the page. |
mapp.taxonimes.taxonomieName.N | Object with taxonomies. By default, WordPress comes with two taxonomies: categories and tags. Categories are sorted from lowest to highest level, so if you'd want to map the lowest category level, you'd use "mapp.taxonomies.category.0". If you'd want to map the second tag, you would use "mapp.taxonomies.post_tag.1". Plugins and Themes might add additional taxonomies that will show up here if there are values available for the current post/page. |
mapp.userRoles.0 | Array of user roles names. For the first use.0, if there is a second one use mapp.userRoles.1 etc. |
WooCommerce product tracking
There are many keys containing product data. However, when using the Google Tag Manager template and its underlying Smartpixel, all you basically need is 'mapp.gtmProductArray'. Inside that variable, you'll find all product data without the need to bring it to the right structure. You will learn in step 3 how you can customize the tracking information.
Structured product data (recommended)
Data Layer Variable Name | notes |
|---|---|
mapp.gtmProductArray | Array containing all product information in perfect structure for usage in conjunction with our Google Tag Manager template and its underlying Smartpixel. |
mapp.pageRequestType | Populated with value 'virtual' when adding a product to basket via AJAX (product lists, related products...). The first trackrequest is a product view, the second one the add-to-basket. This way you never have products added to basket without being viewed. Use this parameter to filter out views that have no 'real' view and just exist for the sake of data consistency. Can be used as a page parameter for example. |
mapp.shoppingCartStatus | "view" on single product page, and right before adding a product to basket from product lists. "basket" when adding to basket, and "confirmation" after order. This is needed when using the Mapp Intelligence Product Array variable template (see below). |
Raw product data (only needed in edge cases)
Under normal circumstances, you won't need those because the tracking is covered by mapp.gtmProductArray. Only use the following keys in case you have an edge case where you need a specific entry. However, for Mapp Intelligence product tracking the variables mapp.gtmProductArray and optionally mapp.shoppingCartStatus as well as mapp.pageRequestType will be all you need.
Data Layer Variable Name | notes |
|---|---|
mapp.productName | Human-readable title of the product. |
mapp.productCost | Cost of the product. |
mapp.productId | WooCommerce ID of the product. |
mapp.productSKU | Product SKU. |
mapp.productQuantity | Amount of products. |
mapp.productSoldOut | '1' in case product is sold out. |
mapp.productCategory | Highest level of product categories. |
mapp.productSubCategory | 2nd level of product categories. |
mapp.productCategories.N | Array with all product category levels - in case you have more than two levels, you can use this. For example, if you want to map a level 3 category, you can do this with "mapp.productCategories.2". The Index is always one value lower than the level of the category. |
productCollection | 1 is the product is a product group, 0 for all other product types. |
mapp.taxonomies.taxonomyName[n] | Contains product taxonomies as well as attributes for variable products, for example, mapp.taxonomies.pa_color[0] is the color of a product. |
mapp.products | Array with all products from product lists. Each object has the keys like a normal product (productName, productCost etc.). |
WooCommerce order tracking
Data Layer Variable Name | notes |
|---|---|
mapp.orderId | Woocommerce Order ID. |
mapp.totalOrderValue | Order value, incl. tax and shipping. |
mapp.subtotalOrderValue | Order value without tax and shipping. |
mapp.taxValue | Tax of order. |
mapp.couponValue | Value of a coupon, if available. |
mapp.shippingMethod | Name of the shipping provider. |
mapp.shippingCost | Shipping cost for the order. |
mapp.paymentMethod | Name of the payment provider. |
mapp.currency | Currency code (ISO 4217). |