Scenario
Send a birthday message to contacts on their birthdays.

Benefits
Show customer appreciation.
Increase engagement with your brand.
Generate additional sales with special offers.
Further Inspiration
Take this scenario to the next level with these suggestions.
Track whether the recipient clicks on the special offer. If he doesn't, send a follow-up email a week later.
Hotel or travel agency? Send an email 3 weeks before the birthday suggesting that the recipient plan a special getaway. To do so, change the birthday selection to the following: Date of Birth, Equals, Relative Date, Before Run, 21 days before (check the Ignore Year checkbox).
Do something fun and different: send half-birthday emails. Include a message like, "Isn't it more fun to celebrate twice a year?" To do so, change the birthday selection to the following: Date of Birth, Equals, Relative Date, Before Run, 6 months before (check the Ignore Year checkbox).
Want to add a coupon to the message? Mapp Engage offers the Coupon Manager feature for creating and sending coupons. See Coupon Manager.
Prerequisites
To send birthday messages, you need to know your contacts' birthdays. Birthdays are stored in the standard user attribute Date of Birth. Contacts whose Date of Birth attribute is empty do not receive a birthday message. Don't have your contacts' birthdays stored? For new contacts, try adding a birthday field to your standard subscription form. For existing contacts, send an email inviting them to submit their birthday on a landing page with a web form.
Procedure
This procedure has three steps.
A) Create the prepared message.
B) Create a selection that identifies contacts whose birthday matches the current date (ignoring the year).
C) Create a time-based automation for daily sendout.
A) Create the Message
 | BirthdayEmail | Save the message as a prepared message. For more information, see Save Draft as Prepared Message. |
You can update the content of the prepared message at any time. For example, you can easily add or change a coupon or update the graphics. There is no need to change or pause the automation. Sendout with the new content continues as scheduled.
B) Create the Selection
In the Main Navigation menu, click Recipients > Selection Builder.
⇒ The Selections window opens.Click Create New.
⇒ The Selection Builder opens.In the Header area, click the name to edit it. Create a name for the selection. The name must be unique in the system.
In the Add New Rules panel, click Profile.
⇒ The panel expands to display profile attributes in your system.Drag a new Date of Birth rule onto the selection builder.
Click the
 icon to edit the rule.
⇒ A configuration panel appears to the right.Enter the following settings.
Field
Settings
Operator
Equals
Date Type
Relative Date
Relative to Run Date
On Run
Ignore Year
Check the Ignore Year checkbox
Click Apply.
⇒ A birthday rule is added to the selection.Click the Save button to save and publish the selection.
⇒ Before publishing, Mapp Engage checks the selection for correctness. Mapp Engage only publishes the selection if the rules are logically combined, all dates in the selection are valid and all mandatory fields are filled. A published selection can be used for sendout, in automations, in the CMS and to transfer contacts between groups.
Add an additional group condition to the selection to limit birthday message sendouts to a specific group.
C) Automate Daily Sendout
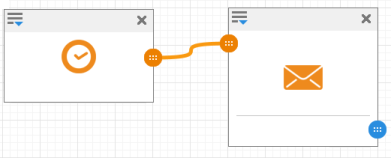
In the Automation area, create a new whiteboard.
Click the Load Template button.
⇒ The Load Template window opens.Load the Birthday Message template.
Define the settings for the modules as follows:
Time Module
Field
Entry
Name
This field displays the default name of the module. This field is editable.
Date
Recurring Date
Time
Define the desired time of the daily sendout. The slider Hour works on a 24 hour clock.
Period
Day(s)
Value
1
Time-based Job Module
Field
Entry

Name
This field displays the default name of the module. This field is editable.
Job
Message
BirthdayEmail
Selection
Select your birthday selection.
Click Next.
⇒ The Whiteboard wizard opens to step two.Define the desired time frame and notifications.
Click Activate to immediately activate the whiteboard.
⇒ The whiteboard is saved and activated. The automation has the status Running if the start date is immediate and Scheduled if the start date is in the future.
Gain insight into the performance of your messages in the Statistics area. All of the messages are evaluated together as a single message. This allows you to see at a glance how your birthday messages are performing. See Message Statistics (window).