In this section, you will find the steps to integrate the plugin based on the used pixel integration.
Implementation Methods
The Kameleoon extension makes it easier for you to analyze the displayed A/B test and variants. Mapp Intelligence integration on your website is required for a successful setup. Using the extension, the information from Kameleoon tests is sent directly to Mapp Intelligence.
This document describes the technical integration and configuration of the extension on your website.
For a detailed description of the Kameleoon system, visit the company’s website at www.kameleoon.com.
Configuration in Mapp Q3
Data is recorded using one event parameter. This must be saved in Mapp Q3 under Configuration > Custom parameters > Event parameters.
Although you can choose your own names for them, We recommend using the following configuration:
Parameter | Datatype | Amount Parameter Values |
|---|---|---|
Kameleoon Variation | Text | Single Value |
Integration
Download
You can find the package on our Github page.
Browser
The Kameleoon extension file should ideally be integrated directly into the header area of the page after the Smart Pixel.
<html>
<head>
<title>Homepage</title>
<script type="text/javascript" async src="js/smart-pixel-loader.min.js"></script>
<script type="text/javascript" async src="js/smart-pixel-kameleoon.min.js"></script>
</head>
<body>
The content of your website is placed here.
</body>
</html>Node
$ npm install @webtrekk-smart-pixel/kameleoonvar webtrekkSmartPixel = require('@webtrekk-smart-pixel/core');
var webtrekkKameleoon = require('@webtrekk-smart-pixel/kameleoon');
var wtSmart = webtrekkSmartPixel.use(window, window.document);
wtSmart.push(webtrekkKameleoon.use());RequireJS
requirejs(['wtSmart', 'wtSmartKameleoon'], function(wtSmart, wtSmartKameleoon) {
window.wtSmart = window.wtSmart ? window.wtSmart : wtSmart.use(window, window.document);
window.wtSmart.push(wtSmartKameleoon.use());
// do tracking stuff here
});Methods and properties
name
Get the name of the extension.
/**
* @type {string}
*/
wtSmart.extension.kameleoon.name;version
Get the version of the extension.
/**
* @type {string}
*/
wtSmart.extension.kameleoon.version;config
Set and get the current configuration of the extension.
parameterIdVariation: Enter the parameter ID of the respective event parameter you created in Mapp Q3, for example, "7". As a predefined action name the plugin automatically uses "kameleoon_<<Test Name>>_<<Test ID>>."
withPersonalization: If you activate this feature, the personalization will be tracked.
useVariationInActionName: To better filter results if a visitor sees both versions in one visit, you can save the test and variant name as event name instead of parameters ("kameleoon_<<Test Name>>_<<Test ID>>_<<Variation Name>>").
trafficDeviationThreshold: If you want to stop tracking a variant that exceeds the specified amount of traffic, configure this option.
/**
* @param {{
* parameterIdVariation: string,
* withPersonalization: boolean,
* useVariationInActionName: boolean,
* trafficDeviationThreshold: {
* min: number,
* max: number
* }
* }} [config]
*
* @returns {object}
*/
wtSmart.extension.kameleoon.config(config);isActivated
Get the status, if the extension is enabled.
/**
* @returns {boolean}
*/
wtSmart.extension.kameleoon.isActivated();activate
Activate the extension.
wtSmart.extension.kameleoon.activate();deactivate
Deactivate the extension.
wtSmart.extension.kameleoon.deactivate();Example
// is kameleoon activated
var isActivated = wtSmart.extension.kameleoon.isActivated();
// set kameleoon config
wtSmart.extension.kameleoon.config({
parameterIdVariation: '17',
withPersonalization: true,
useVariationInActionName: false,
trafficDeviationThreshold: {
min: 1,
max: 99
}
});
// get kameleoon config
var kameleoonConfig = wtSmart.extension.kameleoon.config();
// activate kameleoon
wtSmart.extension.kameleoon.activate();
// deactivate kameleoon
wtSmart.extension.kameleoon.deactivate();Integrate the Kameleoon plugin into the container in which the webpage to be measured is located.
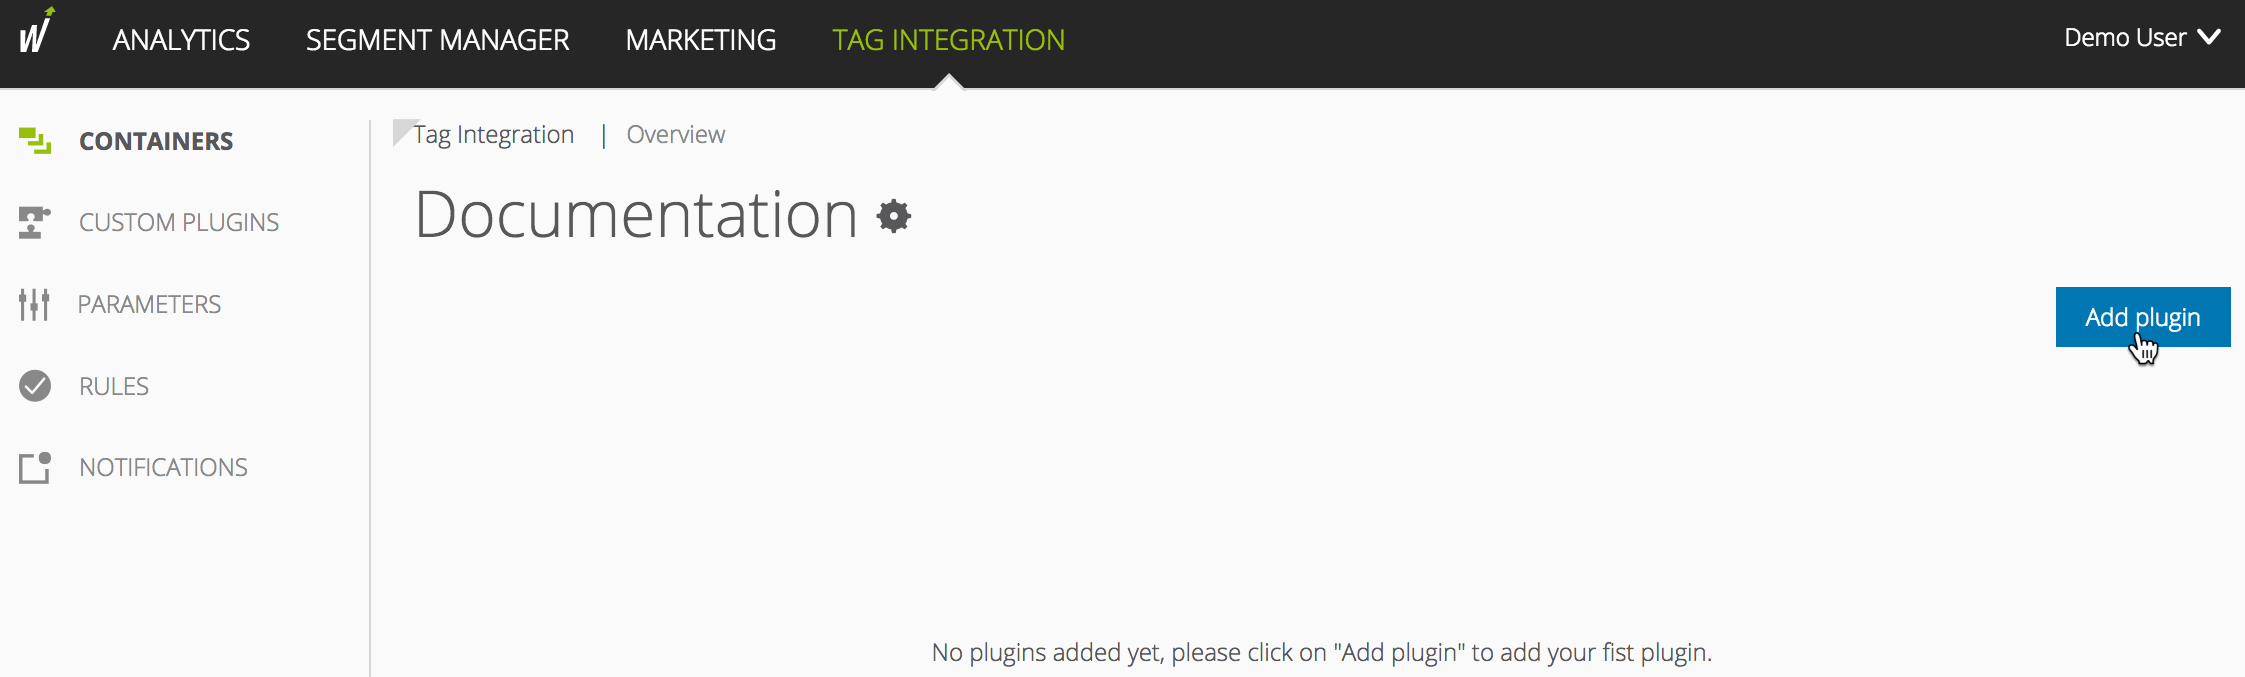
To add plugins to the desired container, proceed as follows:
In the container overview, select the required container by clicking the corresponding entry.
Click Add Plugin. You will be forwarded to the overview of all available plugins.
Select Kameleoon Tracking by clicking the appropriate button. The plugin configuration dialog opens.
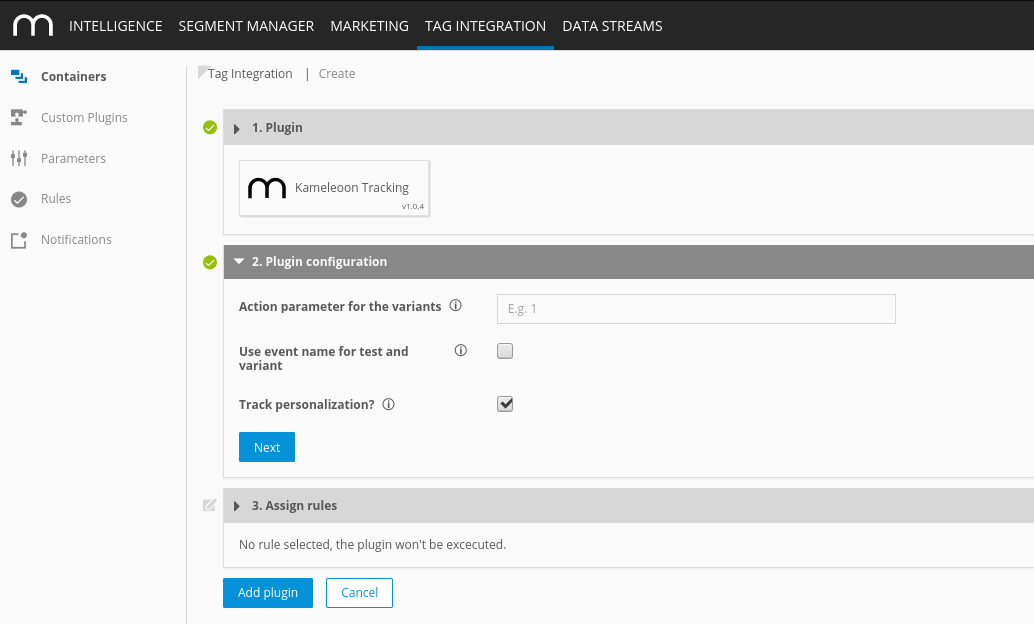
Now enter the following information:
Parameter
Description
Action parameter for the variants
Enter the parameter ID of the respective event parameter you created in Mapp Q3, for example, "7."
Use event name for test and variant
To better filter results if a visitor sees both versions in one visit, you can save the test and variant name as event name instead of parameters.
Track personalization?
If you activate this feature, the personalization will be tracked.
Click Next.
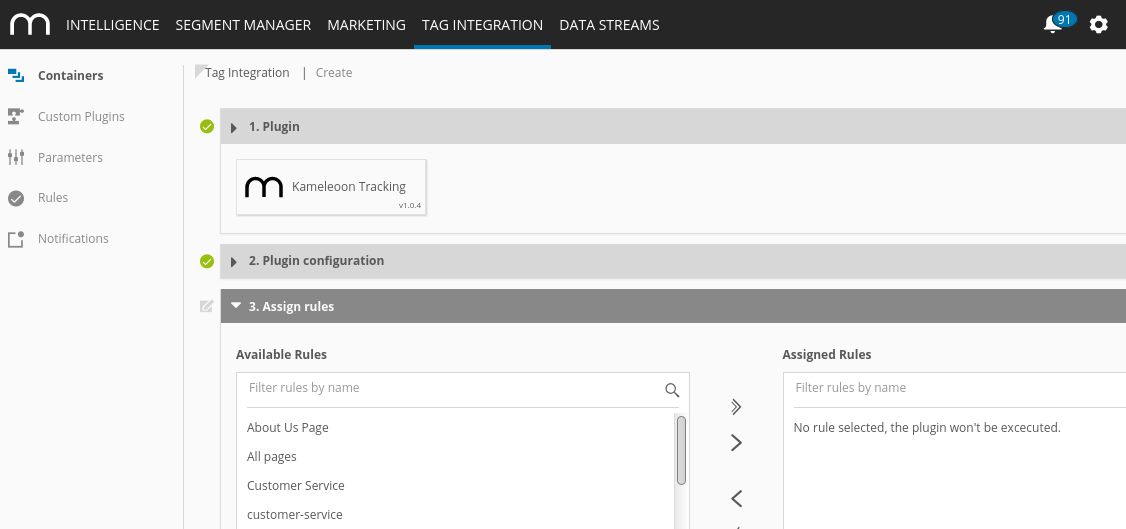
In the Assign rules area, you define the page areas on which the measurement is to be carried out.
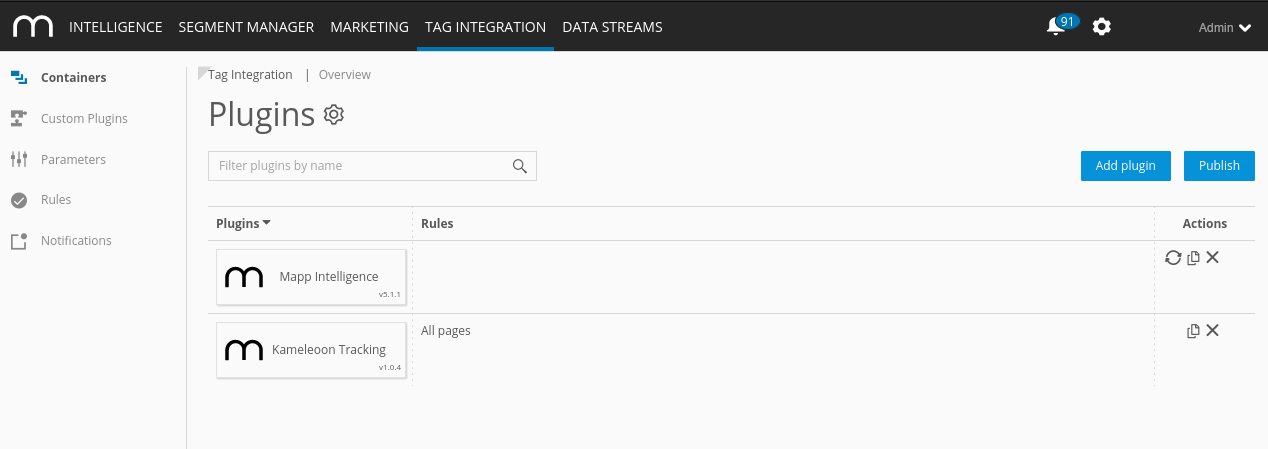
Then click Add plugin.
Finally, click Publish to publish your container, including the newly added Kameleoon plugin.
Download the JavaScript file.
In the JavaScript file "pixel-kameleoon.min.js," make the following adjustments:
Example(function (window) { var wt_kameleoonConfig = window.wt_kameleoonConfig || { withPersonalization: true, parameterIdVariation: "7", useVariationInActionName: false }; /* ... */ })(window);Parameter
Description
parameterIdVariant
Enter the parameter ID of the respective event parameter you created in Mapp Q3, for example, "7."
As a predefined action name the plugin automatically uses "kameleoon_<<Test Name>>_<<Test ID>>."
useVariationInActionName
To better filter results if a visitor sees both versions in one visit, you can save the test and variant name as event name instead of parameters ("kameleoon_<<Test Name>>_<<Test ID>>_<<Variation Name>>").
withPersonalization
If you activate this feature, the personalization will be tracked.
Include the script file in your website in advance so that it provides the method "wt_kameleoon" under the object "window".
The parameter "executePluginFunction" is used for the activation itself. This can be set either in the configuration variable (webtrekkConfig) in the global pixel file (for example, "webtrekk_v4.js") or as a parameter of a page-specific pixel object.
Example global configuration
var webtrekkConfig = { trackId: "111111111111111", trackDomain: "track.webtrekk.net", domain: "www.website.com", executePluginFunction: "wt_kameleoon" };Example page-specific configuration
var wt = new webtrekkV3(); wt.contentId = "de.startseite"; wt.executePluginFunction = "wt_kameleoon"; wt.sendinfo();If you want to measure the data on all your pages, we recommend global integration. The page-specific configuration is used for the measurement of individual pages.