This plugin connects your WordPress or WooCommerce website with Mapp Intelligence, enabling the tracking of user interactions and e-commerce behavior.
It provides the following features:
Basic tracking for WordPress pages and posts
Advanced tracking of shop interactions in WooCommerce, such as product views, cart events, and orders
Integration with Mapp Tag Integration or Google Tag Manager
Access to a flexible data layer (
window._ti) for customization and analysis
If you prefer using Google Tag Manager instead of Tag Integration, you can find all details here: GTM Setup for WordPress / WooCommerce
Installation
Learn how to install the Mapp Intelligence plugin in your WordPress instance.
Installation via the WordPress UI
Log in to WordPress as admin and go to your dashboard. Then click "Plugins" and "Add New" and search for "Mapp Intelligence". Once found, click the "Install Now" button.
Manually Uploading the WordPress Plugin
Download the plugin from the WordPress plugin website and unzip its content in your WordPress plugin directory, e.g. wp-content/plugins.
Then, log in to WordPress as an admin, go to Plugins in the main menu and click "activate" under the Mapp Intelligence entry in Installed Plugins.
Configuration
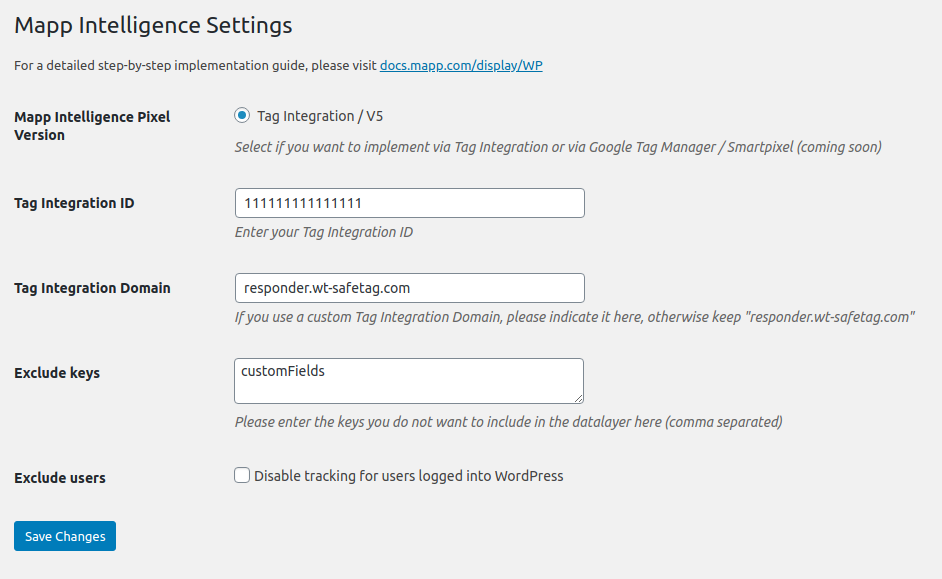
After activating the Mapp Intelligence plugin in WordPress, you find the entry "Mapp Intelligence" under "Plugins" in the main menu of your dashboard.
Option | Description |
|---|---|
Mapp Intelligence Pixel Version | Choose whether you want to use Tag Integration (V5) or Google Tag Manager as your integration method. |
Tag Integration ID | Enter the Tag Integration ID provided by Mapp. |
Tag Integration Domain | You can use a custom responder domain for improved data quality. If you do not have one, keep the default: responder.wt-safetag.com. |
Exclude keys | The plugin creates a global JavaScript object called |
Exclude users | Enable this option if you want to exclude users who are logged in to the WordPress admin area. Tracking is never performed inside the admin panel, but previewing pages from there is tracked by default. |
Data layer
The Mapp Intelligence Plugin creates an object called "_ti" in a global context. In Tag Integration, you can map the keys in the parameter section.
For example, _ti.pageName stores the URL of the current page. To map this key as the name of the page, create a parameter like so:
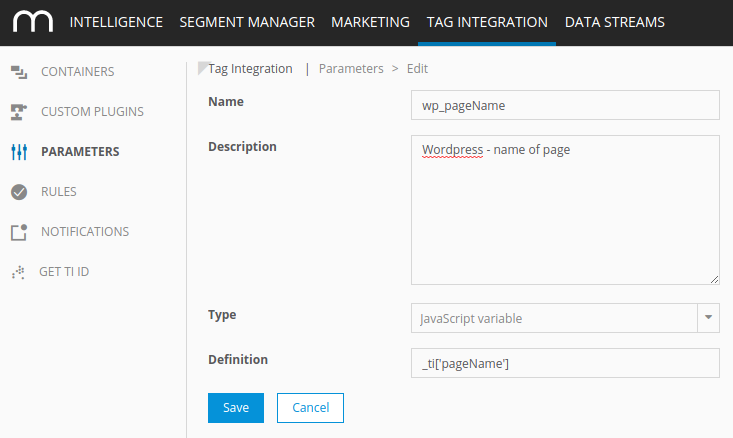
Then, in your Mapp Intelligence plugin, map it under Page > Page name:
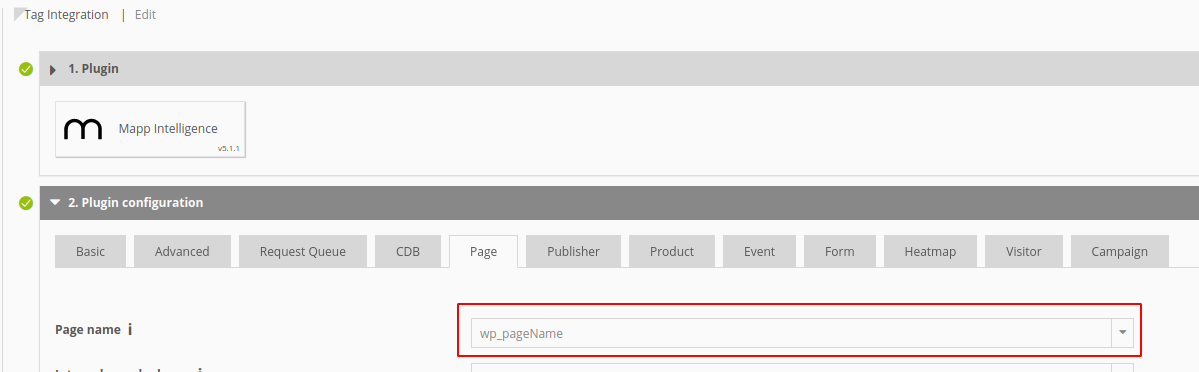
Now, all track requests will receive the name of the page from the _ti data layer object.
The plugin automatically creates the following keys in the data layer object.
WordPress: Tracked Data
key | notes |
|---|---|
| URL without the HTTP(s) protocol URL parameters |
| Title of the page. |
| Language code. |
| Values can be page, post, product, etc. |
| Values can be single-page, single-post, category-post, etc. |
| On archive pages only. "default" if no particular order is set. |
| On archive pages only. |
| On search result pages only: search term. |
| On search result pages only: the number of search results as a string. |
| Categories are sorted from lowest to highest level. To map the lowest level, use |
| If the user is logged in, here is the MD5 hash of the email address. |
| The array of user role names. |
| This key is blacklisted by default. Here you can find data from your plugins and themes, some of which might contain personal data. That's why this key should only be whitelisted if you really need certain data from your plugins/themes in your data layer. |
Customizing the Data Layer
You can modify the _ti data layer before it is sent to the browser – for example, to add dynamic values that are only available server-side.
To do this, use the WordPress filter mapp_datalayer_before_create. This filter gives you access to the original data layer array, which you can extend or adjust as needed.
Avoid overwriting existing keys unless you are certain. Refer to the full key list above to prevent conflicts.
Example
add_filter('mapp_datalayer_before_create', function($datalayer) {
$datalayer['someKey'] = 'someValue';
return $datalayer;
});WooCommerce: Product Tracking
key | notes |
|---|---|
| Human-readable title of the product. |
| Cost of the product. |
| WooCommerce ID of the product. |
| Product SKU. |
| Currency code (ISO 4217). |
| Amount of products - only during order. |
| "view" on the single product page, and right before adding a product to basket from product lists. "add" when adding to basket, and "conf" after order. |
| '1' in case the product is sold out. |
| Highest level of product categories. |
| 2nd level of product categories. |
| Array with all product category levels - in case you have more than two levels, you can use this. For example, if you want to map a level 3 category, you can do this with "_ti['productCategories'][2]". The Index is always one value lower than the level of the category. |
| Only for product variations: an object with product variation data. |
| Array with all products from product lists. Each object has the keys like a normal product (productName, productCost, etc.). |
| Populated with value 'virtual' when adding a product to the basket via AJAX (product lists, related products...). The first one is a product view, the second one is the add-to-basket. This ensures no product is added to the basket without first being viewed. Use this parameter to filter out artificial views used only for tracking consistency. |
WooCommerce: Order Tracking
key | notes |
|---|---|
| WooCommerce Order ID. |
| Order value, incl. tax and shipping. |
| Order value without tax and shipping. |
| Tax of order. |
| Value of a coupon, if available. |
| Name of the shipping provider. |
| Shipping cost for the order. |
| Name of the payment provider. |