Purpose
Use this setup if you have one store (one website) with one store view.
Procedure
Setup in Mapp Engage
A) Create Groups
You must create three groups for the purpose of data synchronization. You will need them later during the plugin setup.
On Mapp Engage, navigate to the Audience section and click on Groups > Create New and three groups:
one for customers called, for example, "magento_customer"
one for subscribers called, for example, "magento_subscriber"
one for guests called, for example, "magento_guest"
B) Prepare messages
You can create messages in Mapp Engage or use the default message provided by Adobe Commerce (Adobe Commerce Admin Panel > Marketing > Email Templates). The plugin supports sending email messages described on this page.
To create the message in Engage, follow these steps:
Go to the Message section in Mapp Engage and choose Prepared Message.
Click on Email > New Email.
Compose the transactional emails you want to send. You will need them at a later stage of the configuration.
Once these messages are created, you can select them in Adobe Commerce by going to Stores > Configuration > Mapp Cloud > Mapp Engage (Connect) - Emails. See step I2 below.
For more information, see Prepared Messages.
C) Create integration between Engage and Adobe Commerce
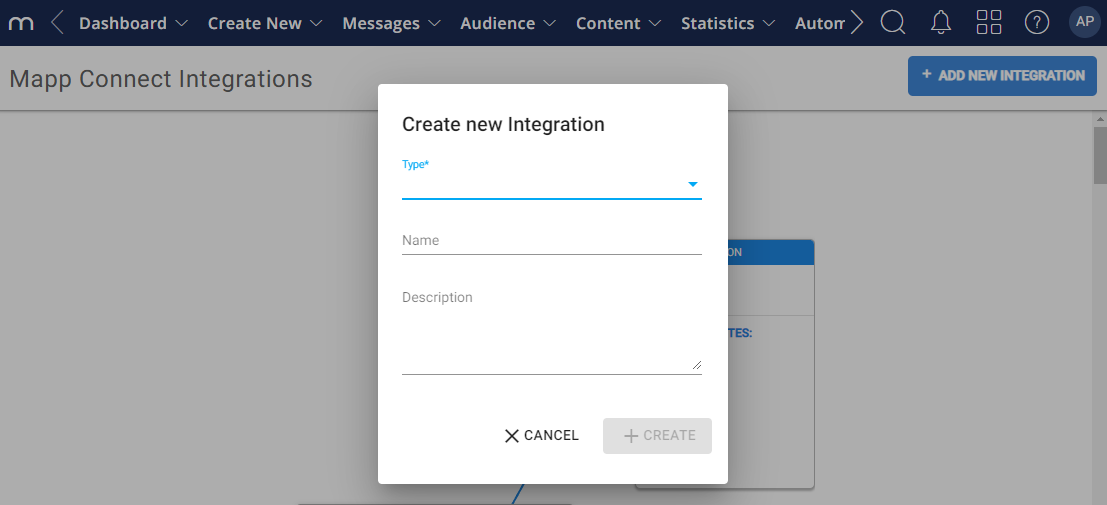
Go to Data Management > Mapp Connect.
Click Add New Integration.
Select the integration type "Magento" from the drop-down list.
Enter the name of the connection and click Create.
The Integration Settings tab opens to the Overview tab. You can still change the name of the integration here and add a description.
(optional) Check the box if you want a Whiteboard triggered when the contact's mapping attributes change.
Copy the secret key and save it for future reference. You will need it to authenticate the connection between Mapp Engage and your plugin.
Click Save.

D) Configure Mapping
A mapping is a list of imported data objects from Adobe Commerce. The default types of import for Adobe Commerce, as well as standard attributes, are already added.
For the full list of default mapping types and what each one does, see Mapping.
Any custom mapping needs to be added to the configuration. This can be done via an import or manually:
Go to Data Management > Mapp Connect.
Open the Adobe Commerce integration of your choice.
Click the Mapping tab.
Import your mapping, or add it manually.
For more information, see Mapping.
Setup in Adobe Commerce
E) General Configuration
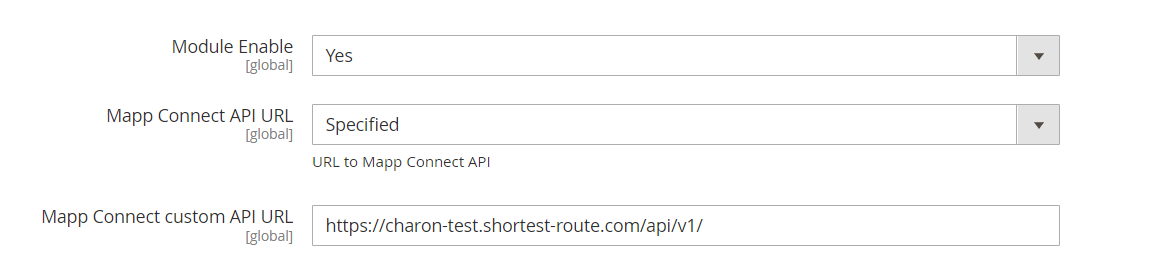
Log in to the Adobe Commerce Admin panel and go to Store > Configuration > Mapp Cloud > Mapp Engage (Connect) - General. By default, this page opens to Scope: Default Config.
Configure the Adobe Commerce general settings, such as choosing the environment or adding specific preferences.
Setting
Details
Module Enable
Here, you can activate and deactivate the Mapp Engage module.
Mapp Connect API URL
EU L3 cluster: https://jamie/.g.shortest-route.com/charon/api/v1/
EMC cluster: https://jamie/.h.shortest-route.com/charon/api/v1/
US L3 cluster: https://jamie/.a.shortest-route.com/charon/api/v1/
EMC-US cluster: https://jamie/.c.shortest-route.com/charon/api/v1/
Specified: This option opens the Mapp Connect custom API URL input field.
For more information, see Mapp Engage Clusters and Time Zones.
Mapp Connect custom API URL
You must select Specified in the Mapp Connect API URL field for this field to appear.
Example configuration
F) Integration Configuration
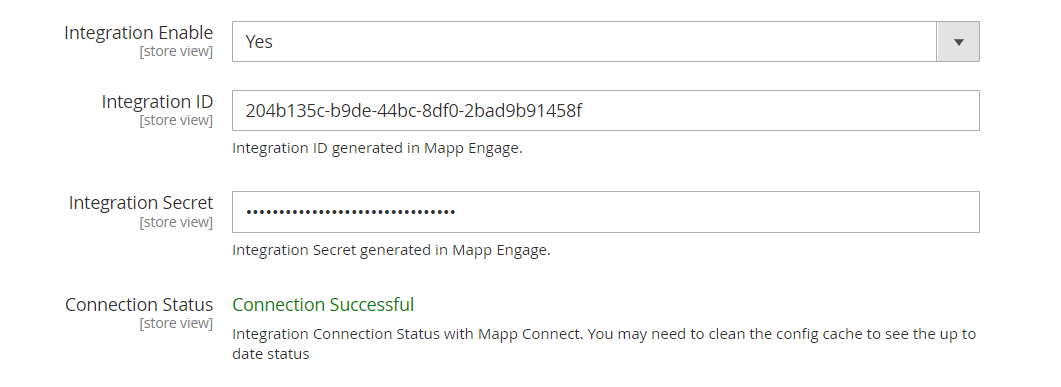
Enable the integration by selecting Yes in the Integration Enable field.
Enter the Integration ID and Integration Secret generated in Mapp Engage.
Click the Save button.
Click the Save Config button to save the configuration.
Setting
Details
Integration Enable
You can activate and deactivate the integration between Mapp Engage and Adobe Commerce.
Integration ID
Both are generated in Mapp Connect. See point C3 above.
For more information, see Create an Integration.
Integration Secret
Connection Status
Displays the connection status with Mapp Connect.
Example configuration
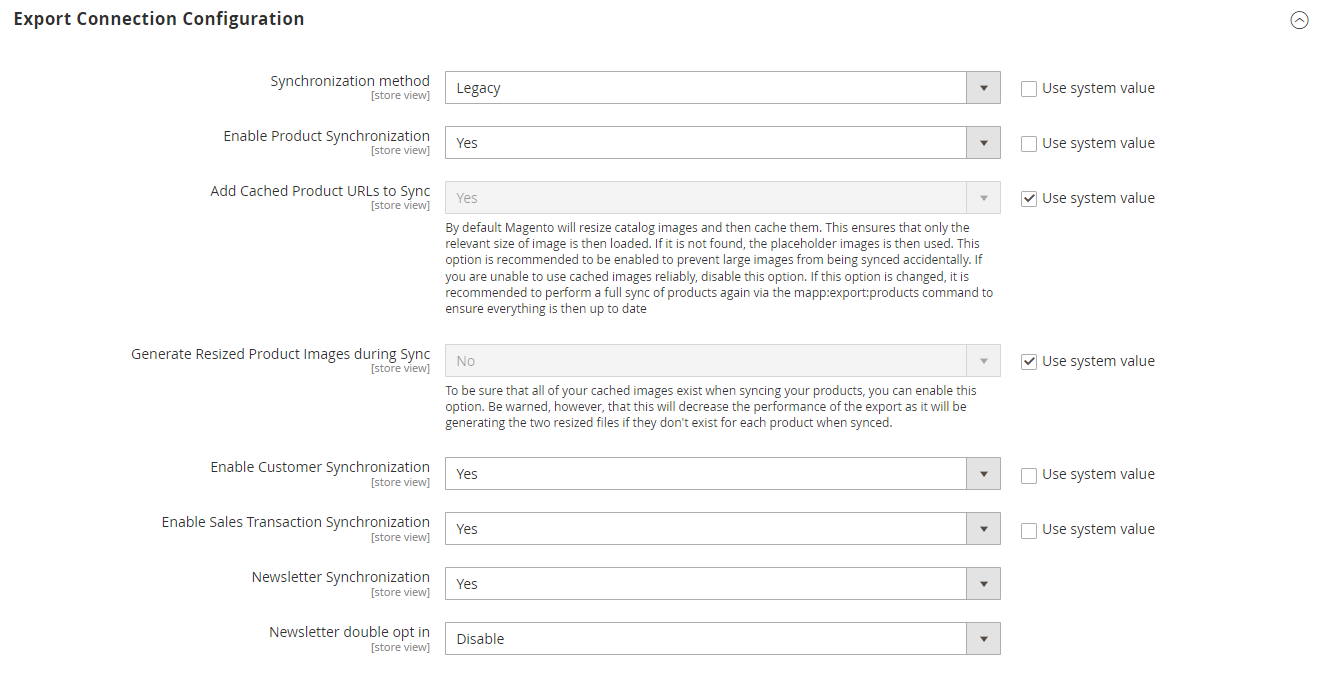
G) Export Connection Configuration
Configure synchronization for products, customers, transactions, and newsletters.
Adobe Commerce sends only real-time data to Mapp Engage. Data created before the integration is not transferred automatically.
If you need historical data in Engage, you must:
Export data from Adobe Commerce using CSV Exports, and
Import data into Engage using Data Imports in Mapp Connect (FTP/SFTP).
Setting | Details |
|---|---|
Synchronization method |
|
Enable Product Synchronization | Allows you to define your synchronization preferences for products. If enabled, the products created on the Adobe Commerce admin page will show in the product catalog in Mapp Engage. |
Add Cached Product URLs to Sync |
|
Generate Resized Product Images during Sync | This option appears when you set Add Cached Product URLs to Sync to Yes. Enabling this option ensures that all cached images are present during the product synchronization process.
|
Enable Customer Synchronization | This setting enables you to specify your synchronization preferences for contacts. If enabled, Engage will mirror contacts created in Adobe Commerce. |
Enable Sales Transaction Synchronization | This setting enables you to specify your synchronization preferences for transactions. If enabled, Engage will mirror transactions registered in Adobe Commerce. |
Newsletter Synchronization | Allows you to define your synchronization preferences for newsletters. If enabled, contacts who sign up for a newsletter with their email address will be added to the defined Mapp Engage group. |
Newsletter double opt-in | Allows you to Enable or Disable double opt-in for the newsletter. For more information, see Set up Double Opt-in with the Email Channel. |
Max Newsletter Request Retry Count | This option appears when the Synchronization Method: DB Trigger is used. The DB Trigger method allows for requests to be sent multiple times in case of a failure (for example, connection issues). The default number of retries is 10, but you can uncheck the Use system value checkbox and enter a custom number. |
Use system value | If checked, the plugin will use the Adobe Commerce system value even if another option is selected from the drop-down. |
Example configuration
H) Mapp Engage Groups
Select the groups created in Mapp Engage in step A of the procedure.
Click on the Save Config button to save the configuration.
You must create three groups for the purpose of data synchronization in Mapp Engage. The groups will only appear if the plugin is set up correctly and the connection is active.
Example configuration

I) Configure messages
In the Adobe Commerce Admin account, go to Stores > Configuration > Mapp Cloud > Mapp Engage (Connect) - Emails.
For each transactional email, select the prepared messages you created in Engage (step B above) or check the Use system value checkbox if you want to use the Adobe Commerce email. See Use Magento Transactional Emails for more information about transactional emails.
Click Save Config.