Goal
Configure message limitation so contacts are not sent too many messages within a defined time frame. Setup has three parts: create a system-wide limit, enable limitation for the groups it should apply to, and optionally set a limit for an individual contact. For the concept and how the rules interact, see Message Limitation.
Create a System-Wide Limit
Define how many messages a contact can receive across all groups within a time frame.
Go to Messages > Limitations.
Click Create new Limitation.
From Maximum Number of Messages, choose the number of messages.
From Time Range in Days, choose the time range.
Click Save & close.
The new message limitation has been created. You can create multiple limitations, and the strictest limit always applies.
Enable Limitation for a Group
System-wide and contact-specific limits apply only in groups where message limitation is enabled.
Go to Audience > Group Management > Groups.
Open the group you want to edit.
Click the Sendout Options tab.
In the Message Limitation area, select Consider Message Limitations.
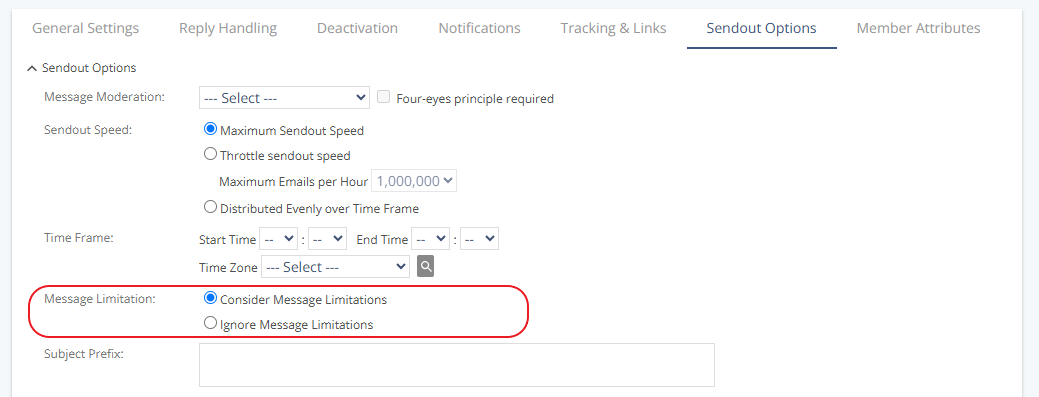
Click Save.
Set a Limit for a Single Contact
Define a limit for an individual contact in the XML import file. Once the limit is reached, Mapp Engage stops sending to that contact and resumes automatically when the time period is over.
Create an XML import file.
Use the following format to define the limit. Example:
<?xml version="1.0" encoding="ISO-8859-1"?>
<userdata xmlns="http://webservices.ecircle-ag.com/ecm">
  <user>
    <email>Jane.Miller@email.com</email>
    <maxmessages number="2" period="7"/>
  </user>
</userdata>
Attributes
maxmessages: Limits the number of messages that can be sent to one recipient.
number: Maximum number of messages allowed during the defined time period (1–99).period: Time frame in days (1–31) during which the limit applies.